From the FasterSkier archive — posts syndicated from athletes’ and coaches’ own blogs between 2004 and 2012, kept online as published. Current coverage is at fasterskier.com.

Category: Technique

The most controversial of topics. After fitness, the best way to ski faster is to do so more efficiently. There are many opinions on what is the “best technique.” We present different viewpoints from around the ski world.
  • SkiErg Training: Training Considerations and Technique

    SkiErg Training: Training Considerations and Technique

    I hate rollerskiing. As much as I try to be a good Nordie, I just can’t get over my fear of hitting the pavement. Between a history of bike racing and the rollerski learning curve, I’ve already lost enough skin. I know it’s good for me and might make me faster on snow, but I’m too old to put up with my heart rate being affected more by fear-induced adrenaline than by quality training.

    My legs and lungs get plenty of work all summer from running, cycling, and strength training, but my typical dryland routine does little for the arms. I’ve tried to swim, but I haven’t progressed past drinking half the pool. 

    A few years ago, I set up some resistance bands to train the arms for double poling. After developing triceps tendinopathy, taking a snapped band to the crotch, and generally finding the bands to be either too hard or too easy, I realized my workouts were far from ideal. 
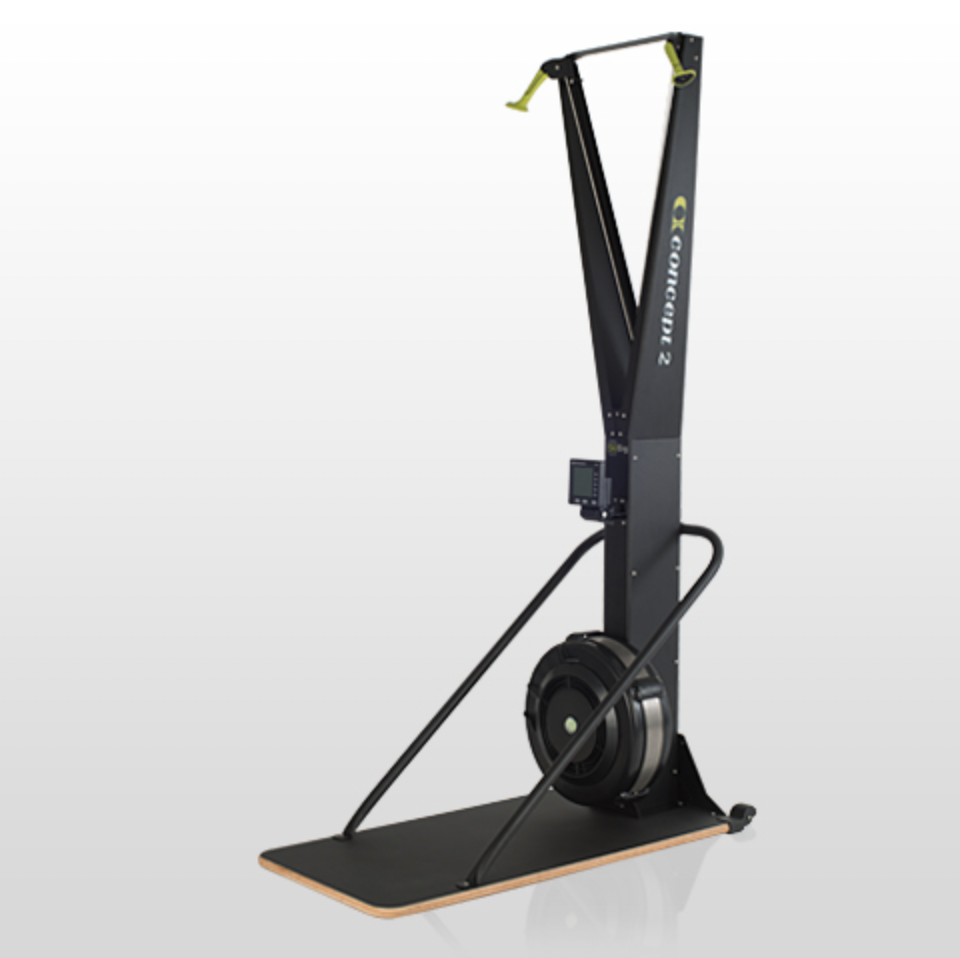
    (Photo: Concept2.com)

    What the bands gain from their price-point, they yield in utility. By their nature, the more you stretch a band, the more resistance it provides. This is the opposite of what happens with poling on snow, where the greatest resistance (or force requirement) takes place near the beginning of the pushing phase and decreases through the end of each cycle. 

    Staring in the face of another hot (and smoky) summer, I splurged on a Concept2 SkiErg last spring. Thus, I was immediately able to avoid rollerskiing (without feeling guilty) while simultaneously shielding myself from the heat and poor air quality. Solved were the resistance bands’ problems of poor adjustability and inverse force curve. This utility continued during the purgatory of shoulder season in the fall, and carried me through the local trails’ annual mid-season melt out here in Salt Lake City. 

    Cool tool. What do I do with it?

    For some expert information, I asked Miles Havlick, head Nordic coach for the reigning NCAA national champion University of Utah Ski Team, some questions about how they incorporate the SkiErg into their training. 

    What are your typical resistance settings? What’s the max you’ll use?

    We almost always use the max resistance setting of 10 during SkiErg workouts. The majority of the time we do sprint type workouts on the SkiErg machines with interval lengths of less than 5-minutes in duration. However, during longer sessions we will lower the resistance in order to keep the intensity lower.

    Author’s comment: 10 is hard! Keep in mind these are elite skiers. In a video blog from Jens Burman, he notes that his max resistance is 7. 

    Better for easy, Z1-2 endurance or higher intensity intervals?

    In my opinion, it is better for high intensity sessions targeting more anaerobic or strength training. Although the muscles are fairly similar to actually double poling, we prefer to perform longer L1 sessions on rollerskis which offers more variety in terrain and more closely resembles double poling on snow.

    Author’s comment: In my opinion, pavement hurts more than snow and I haven’t lost any skin to L1 sessions on the SkiErg.
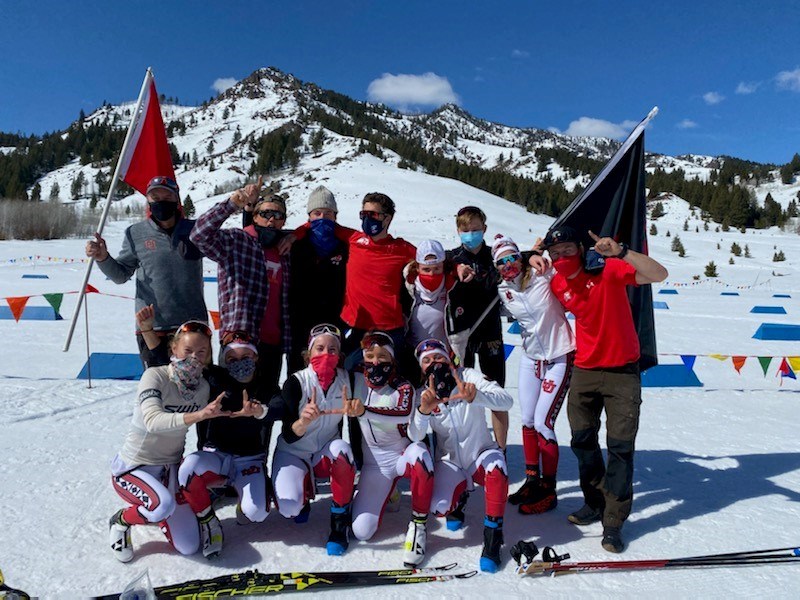
    Head coach of the University of Utah nordic team, Miles Havlick (far right), was named RMISA coach of the year in 2021 following a record setting season for the Utes. (Photo: utahutes.com)

    Do you cue or work on technique during SkiErg sessions?

    We certainly do. It is easy to get higher power numbers when using techniques that are not as effective on snow, however, we are training to be better on snow. Therefore, we are always trying to emulate the most effective on-snow double pole technique on the SkiErg machines.

    Author’s comment: more on this below.

    Do you incorporate drills like balancing on one leg or BOSU?

    We have played around with it but we do not regularly utilize this. It is effective for making L1 workouts more interesting, however during higher intensity bouts, it seems to detract from the quality and focus of the on-snow movements that we are trying to emulate.

    Training sessions on the SkiErg can cover both ends of polarized training with the capacity for both longer duration, low intensity workouts with emphasis on metabolic efficiency and for shorter, high intensity intervals to work power. 

    SkiErg Technique

    While perhaps the best indoor replacement, pulling on the SkiErg is definitely not the same as poling on snow or rollerskis. The notable difference is the lack of balance with a forward trunk lean. Without bindings and the ski to counterbalance, there is much more tendency to fall forward on your face. Or, perhaps, more tendency to sit back so you don’t fall on your face. This is a likely reason why coaches can be critical of spending too much time on a SkiErg, with a nod toward the potential non-ski-specific movements Havlick alluded to when he commented that they are always attentive to form.  

    With that in mind, there are absolutely some technique fundamentals that can be reinforced on the SkiErg. 
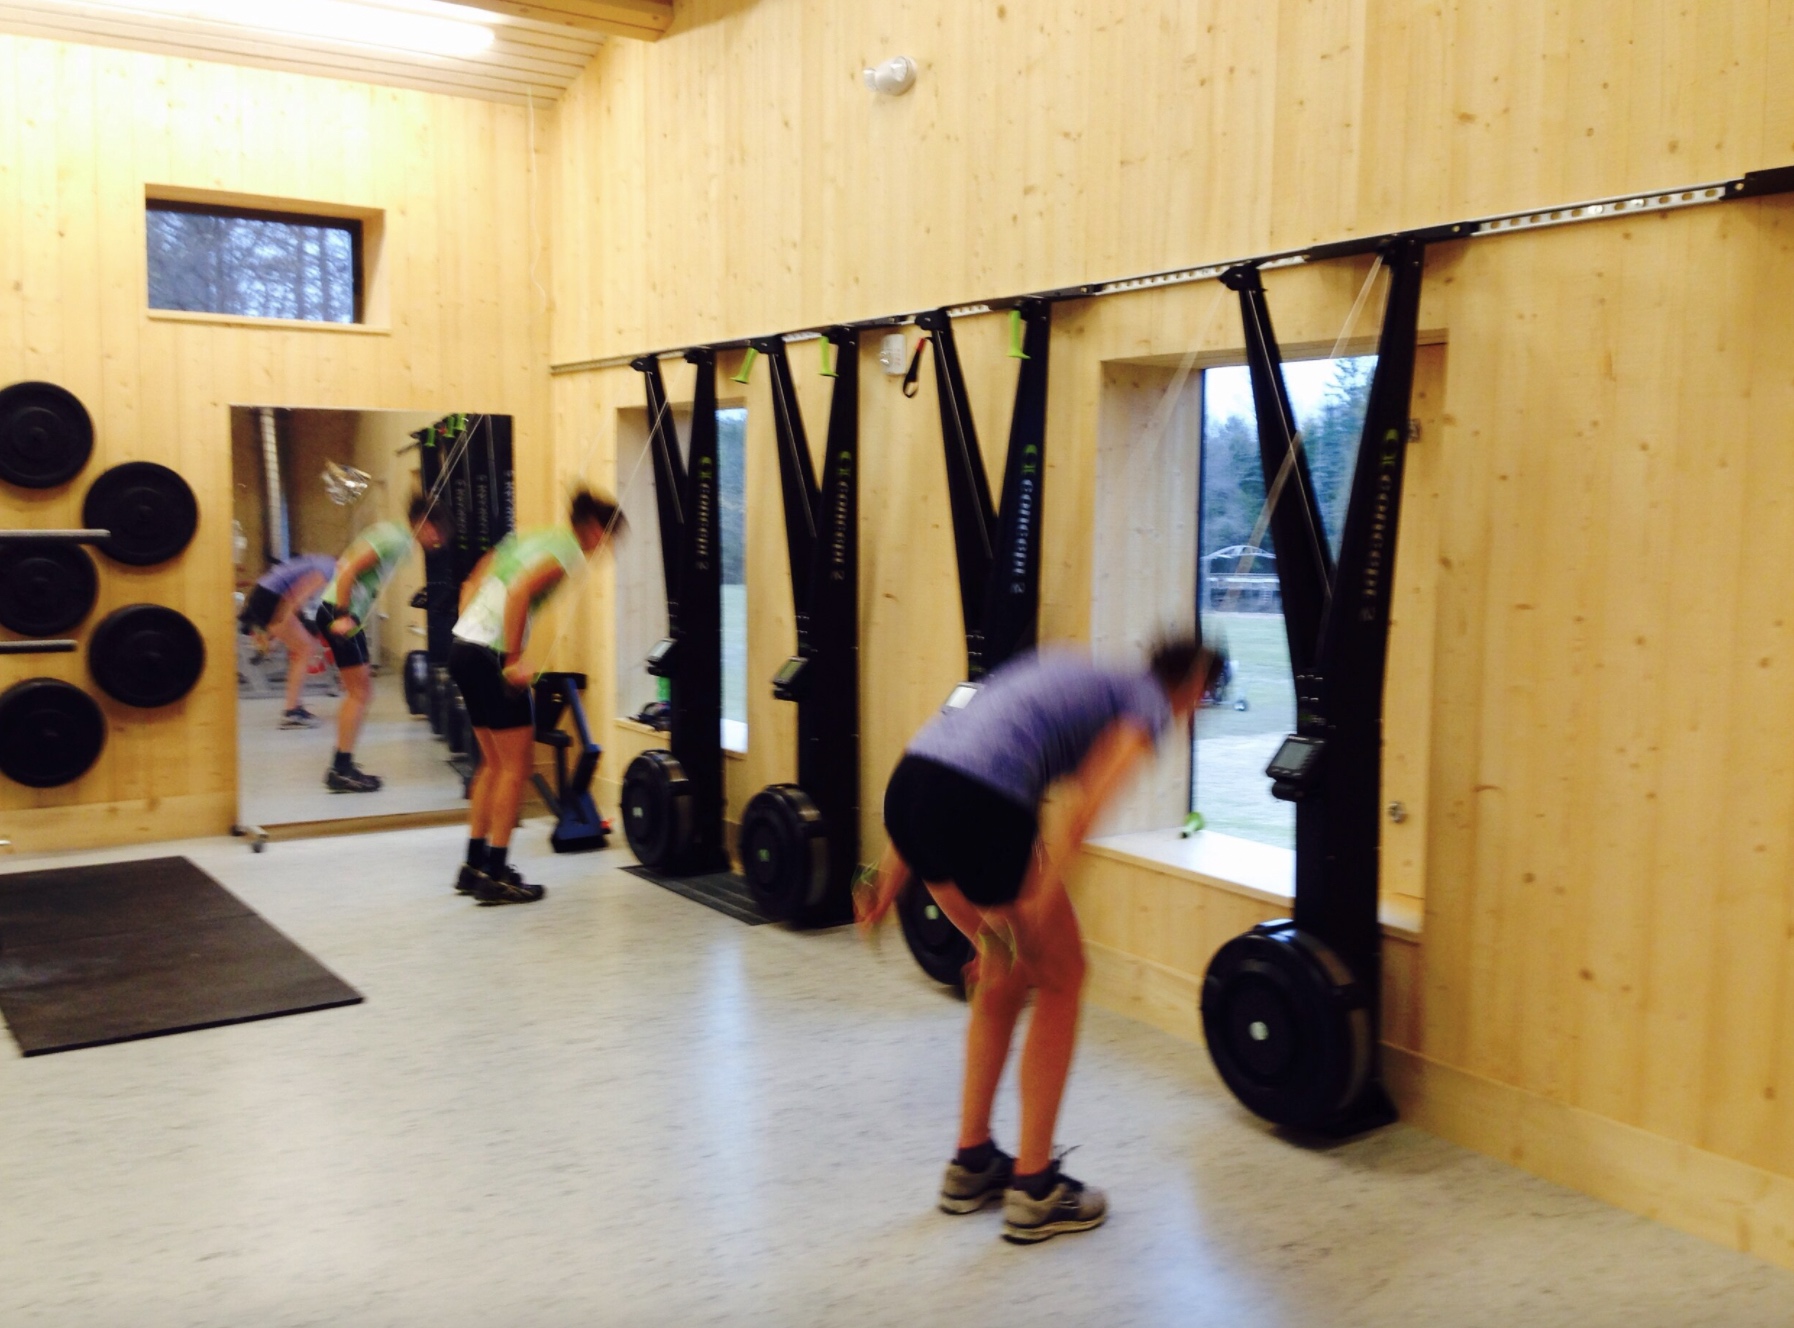
    A pair of Craftsbury Green Racing Project athletes complete a 1k time trial on the SkiErg in November, 2014. (Photo: GreenRacingProject.com)
    The Arms

    The monotony repetition of the poling motion creates a great opportunity to reinforce some key components:

    • Hands high: don’t be lazy, get those hands up
    • Elbows fairly fixed with short swings under higher resistance (think uphill double pole or V1)
    • Elbows extend with long swings under lower resistance (think fast V2 or V2 alternate)
    • Smooth on the power: like starting a car from a dead stop but getting up to speed quickly – if you just stomp on it, the wheels will spin. With poling, we want to achieve peak force quickly but smoothly; setting the poles, then delivering power to them as the upper body drops powerfully onto the poles and the pole angle decreases to deliver the force behind the skier as a push off, versus just stabbing the poles as hard as we can into snow. The latter strategy does not propel forward motion as the peak force is directed into the ground, which incurs vibrational losses in the pole shaft, and robs the system of energy before the pole angle changes toward one more effective for force delivery. 


    The Hips

    “Hips high” might be one of the more overused and less understood cues in Nordic skiing. Without digging too deeply here, the basic premise while on the SkiErg is starting the poling motion from a tall position. As the body compresses with the arm pull, hinge at the hips and ankles. Then, focus on quickly getting back to the tall start position by extending the hips via contraction of the glutes (aka “squeeze your butt cheeks”). Your knees should be relaxed and bend slightly on each cycle, but you’ll want to avoid significant knee bending as it likely indicates that you are sitting back too much. I’ve personally found that one of the biggest gains I’ve found on snow is through focusing on quickly returning to the high hands and hips start position, over and over and over on the Erg.

    As much as high intensity double poling is a full body effort (not just the arms), in skiing it is more about movement across the hips and ankles vs the knees. In CrossFit gyms, this is not necessarily the case. They are after maximum generation of force, not skiing efficiently. Please don’t do this.

    Balance

    While Havlick mentioned that they rarely incorporate balance drills into SkiErg sessions, I think they can be very useful for reinforcing single leg stability, especially if there is a specific component to address like foot pressure distribution, ankle dorsiflexion, or lateral weight shifts from the hips. As with any balance exercise, it is generally more beneficial to work on consistently accomplishing appropriate balance on the floor before moving on to an unstable surface like a BOSU or Dynadisc.

    Visual learner? Here’s a helpful video on the CXC Facebook page with Eliska Albrigtsen, former CXC head coach who now leads the University of Alaska Fairbanks team. 

    Looking for more? Find a 2017 Wednesday Workout with Sadie Bjornsen here, featuring 30 minutes of 30/30’s on the SkiErg.
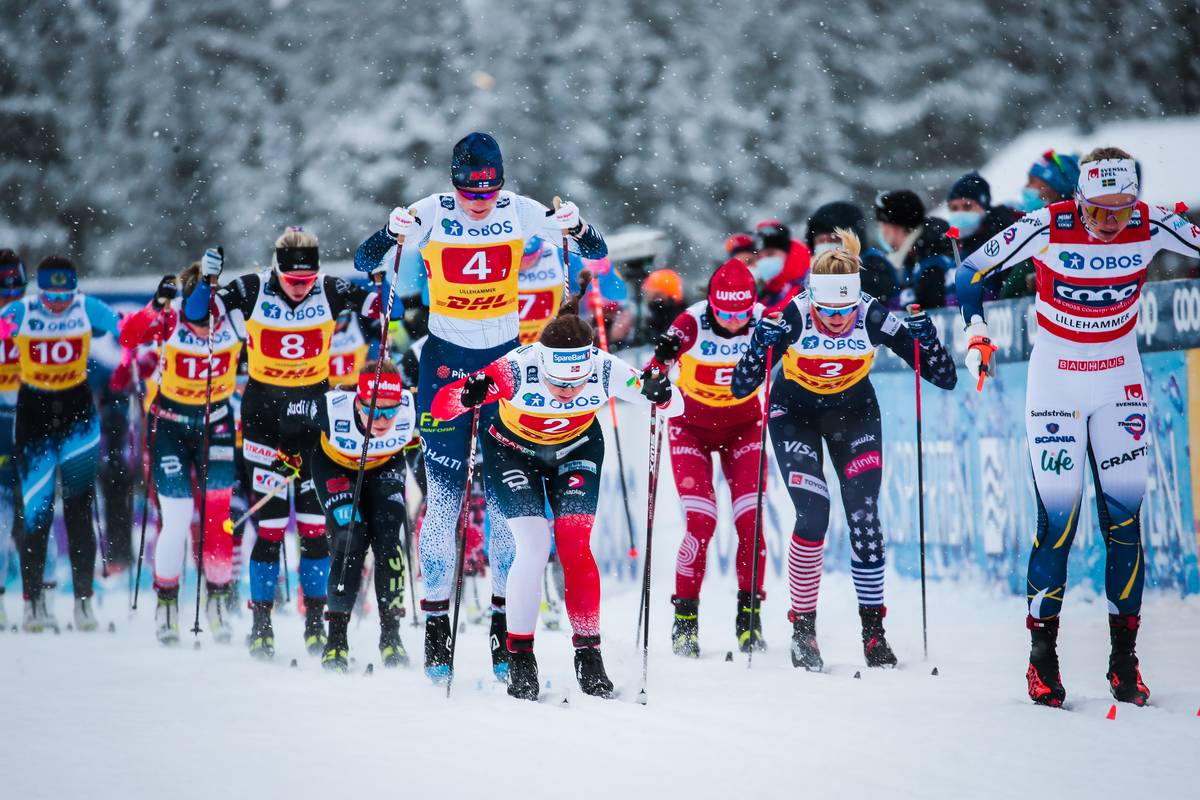
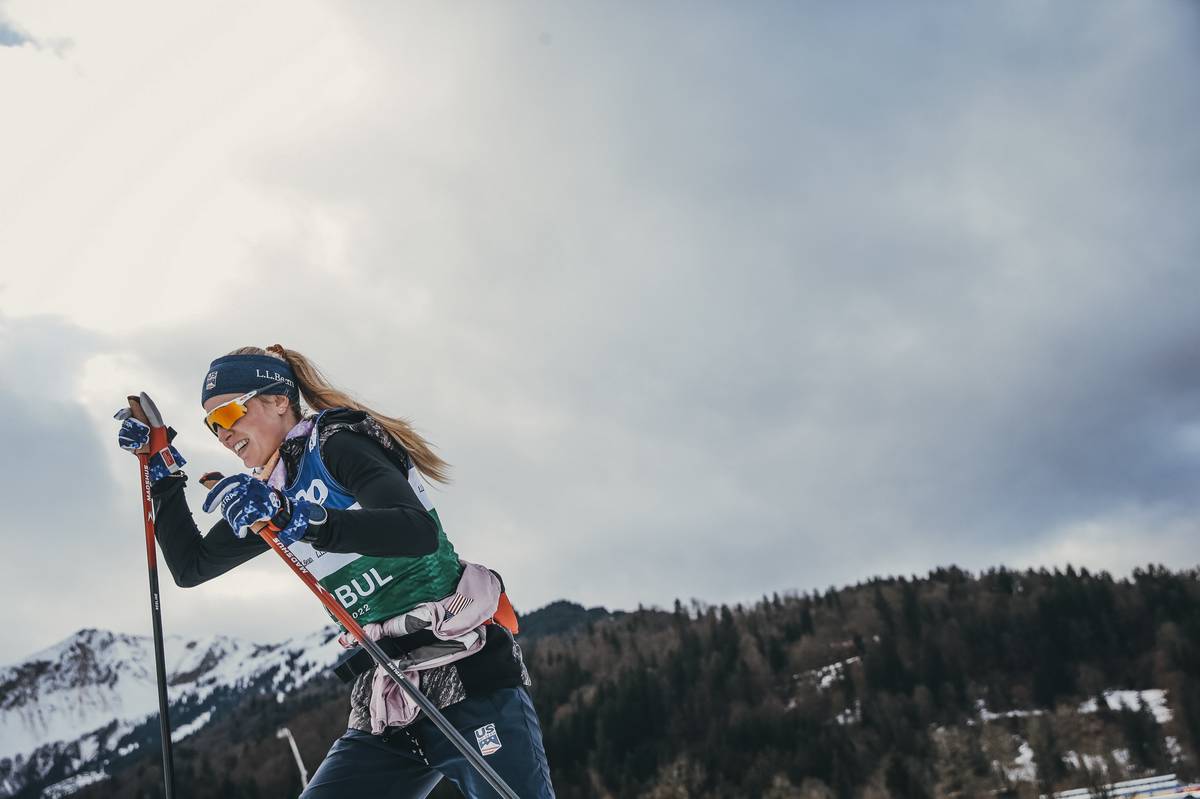
    Doublepole form on display at the start of the 4×5-kilometer relay in Lillehammer. Hailey Swirbul (bib 3) skis the scramble leg for the U.S. (Photo: NordicFocus)

    Author’s Disclosure: Concept 2, manufacturers of the SkiErg, is a sponsor of FasterSkier; however, I purchased mine at full price before I was affiliated with this fine website. In addition to the SkiErg, Abilica makes a very similar device. The Italian company Ercolina makes an upper body ergometer that has the advantage of being much more compact and portable, but it is also more expensive and very hard to find in the US.  

  • Prime the Body for Race Day with a Race-Prep Workout from Jessica Yeaton

    Prime the Body for Race Day with a Race-Prep Workout from Jessica Yeaton

    David Norris and Scott Patterson complete a set of pre-race classic intervals to optimize their performance in the next day’s races. (Photo: Tom Horrocks)

    All the athletes are all stripped down to their race suits and zooming around the course with laser focus.  They are breathing hard; in fact, some of them seem to be skiing at max effort. If it weren’t for the lack of announcements, race bibs, and cheering from the crowd (pre-COVID, of course) you might actually think it’s race day – but it’s not. It’s actually the day before the race, and many of the athletes are performing their race-prep workout. 

    For most cross-country skiers, a race-prep workout entails skiing fairly hard, often involving a similar pace to that of the race the following day. This may seem counter-intuitive, as you might think that energy conservation is key to peak performance. I distinctly remember being a middle-school cross-country runner and taking the day before the race entirely off; my race-prep “workout” would then consist of 20 minutes of walking to ensure that my legs didn’t get “too tired”. Sadly, this leisurely myth was debunked, and I have learned over the years that race-prep the day prior is actually a great time to put in some harder efforts to optimize performance. 

    Here are a few of the reasons why it’s a great idea to push yourself out of your comfort zone the day before, and a few suggestions for improving your race-prep workout before your next race.

    Hailey Swirbul completes a pre-race training session in Davos, SUI in December, 2021. (Photo: NordicFocus)

    While rest is important, taking a day off can often make your legs feel heavy or sluggish the next day. This is one of the main reasons why it is important to get out and ski the day prior to a race, even if minimally. Many athletes opt to take two days prior to the race completely off instead. 

    One of the biggest goals of a race-prep workout is to help switch your legs on and avoid any lethargic feelings on race day. It is not uncommon for athletes to report feeling “terrible” and having heavy legs during a race-prep workout. Rather than serving as a bad omen for the race the next day, it actually can be a positive sign that both feelings and performance will improve on race day. That being said, the length of the race helps determine the intensity of the workout the day prior. The shorter and more intense the race is the next day, the harder the pre-race workout will be, and vice versa.

    U.S. Ski Team member and soon to be two-time-Olympian, Rosie Brennan, offered her advice for a race prep-workout and how it differs depending on the type of race. Rosie excels at both sprint and distance racing; last season she won both the sprint and distance world cup races in Davos, Switzerland. Additionally, while many other world cup athletes specialize in sprint or distance events, Rosie’s race calendar consists of a mix, which has given her plenty of practice perfecting her race-prep. 

     “For sprint days, I do one lap of the course L3, take a break, and then one lap L4. After that I will run through a few speeds on key sections of the course.”

    Before distance races, Brennan states that her preparation is a little more variable. “If I’ve been racing a fair amount, I will generally do one 10 min interval that is mostly level 3 and kicks up into level 4 the last few minutes. If I haven’t raced in a while or feel like I need to rev the engine a little more, then I will do something like 3×4 minutes progressive, starting in level 3 and moving into level 4 for the last interval.”

    Race prep is also used to feel the rhythm of the course and practice corners, transitions, downhills, or other key spots on course at race speed. That is the beauty of skiing so quickly during these workouts – you can really get a feel for the way the course will ski the following day. Brennan says that race prep helps her to get a feel of how the course and snow might ski at race speed. “This allows me to better develop a race plan or do some visualization of how I want to ski on race day”, she states. 

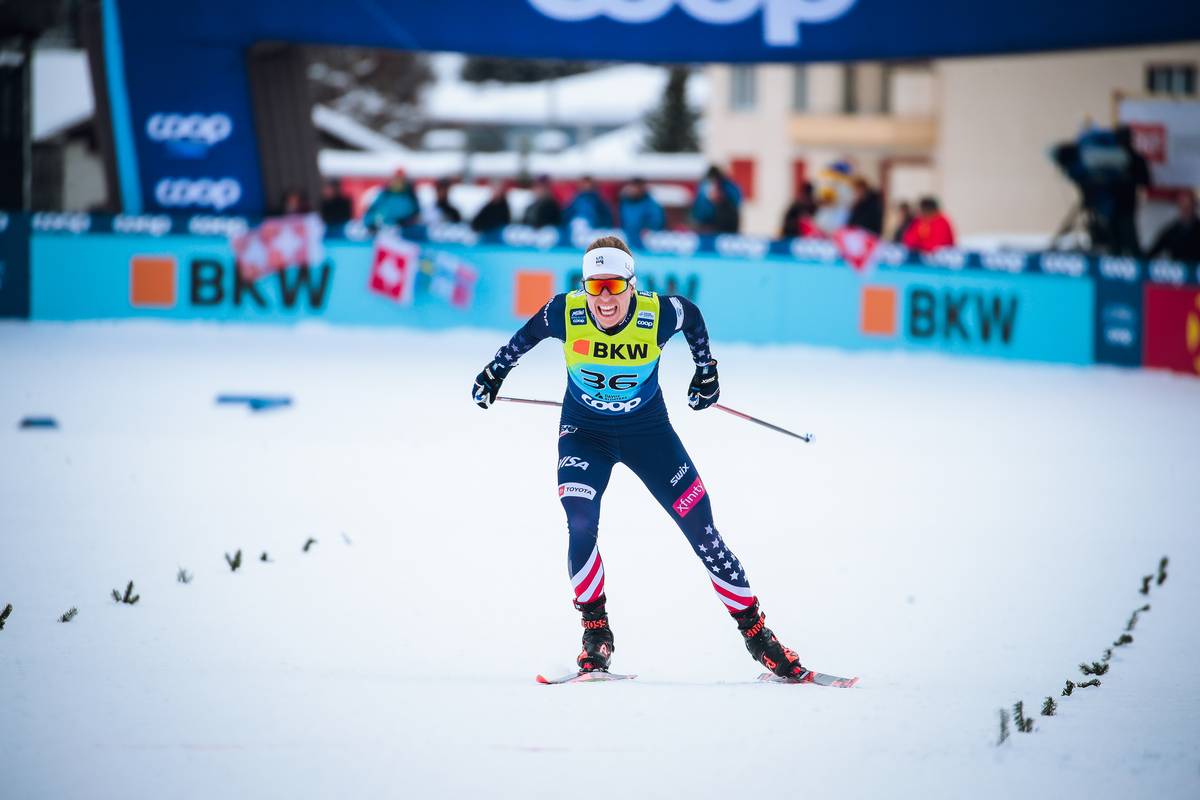
    Rosie Brennan powers through the final stretch to finish 4th in Davos in December, 2021. (Photo: NordicFocus)

    Although race-prep is often performed at a zone 3-4 pace, or just below/touching into anaerobic threshold, the total work time rarely exceeds 10-12 minutes.  For elite cross-country skiers, a typical interval set is generally between 25-60 minutes of work time depending on the target heart rate zone. By keeping the total time of race-prep significantly lower than a standard interval set, it ensures that the overall fatigue is minimized while still allowing for adequate practice of critical spots on the race course.

    Another goal of the workout the day before pertains to fueling. Muscle glycogen, or the major source of carbohydrate for energy during exercise, is pertinent to optimal performance. The greater muscle glycogen stores are, the longer the time to exhaustion, and the faster you can ski. Hard race-prep intervals serve as a stimulus for the resynthesis of muscle glycogen. Following this workout, muscle glycogen is rapidly replenished due to increased insulin sensitivity and cell membrane permeability to glucose. (1)

    That being said, it is critical to adequately fuel post-workout to ensure that this happens. So, while the race-prep workout might be slightly taxing in the short term, it ultimately assists our bodies in jump-starting the fueling process and ensuring that our muscles are ready to perform an even higher-intensity workout (race) the next day.

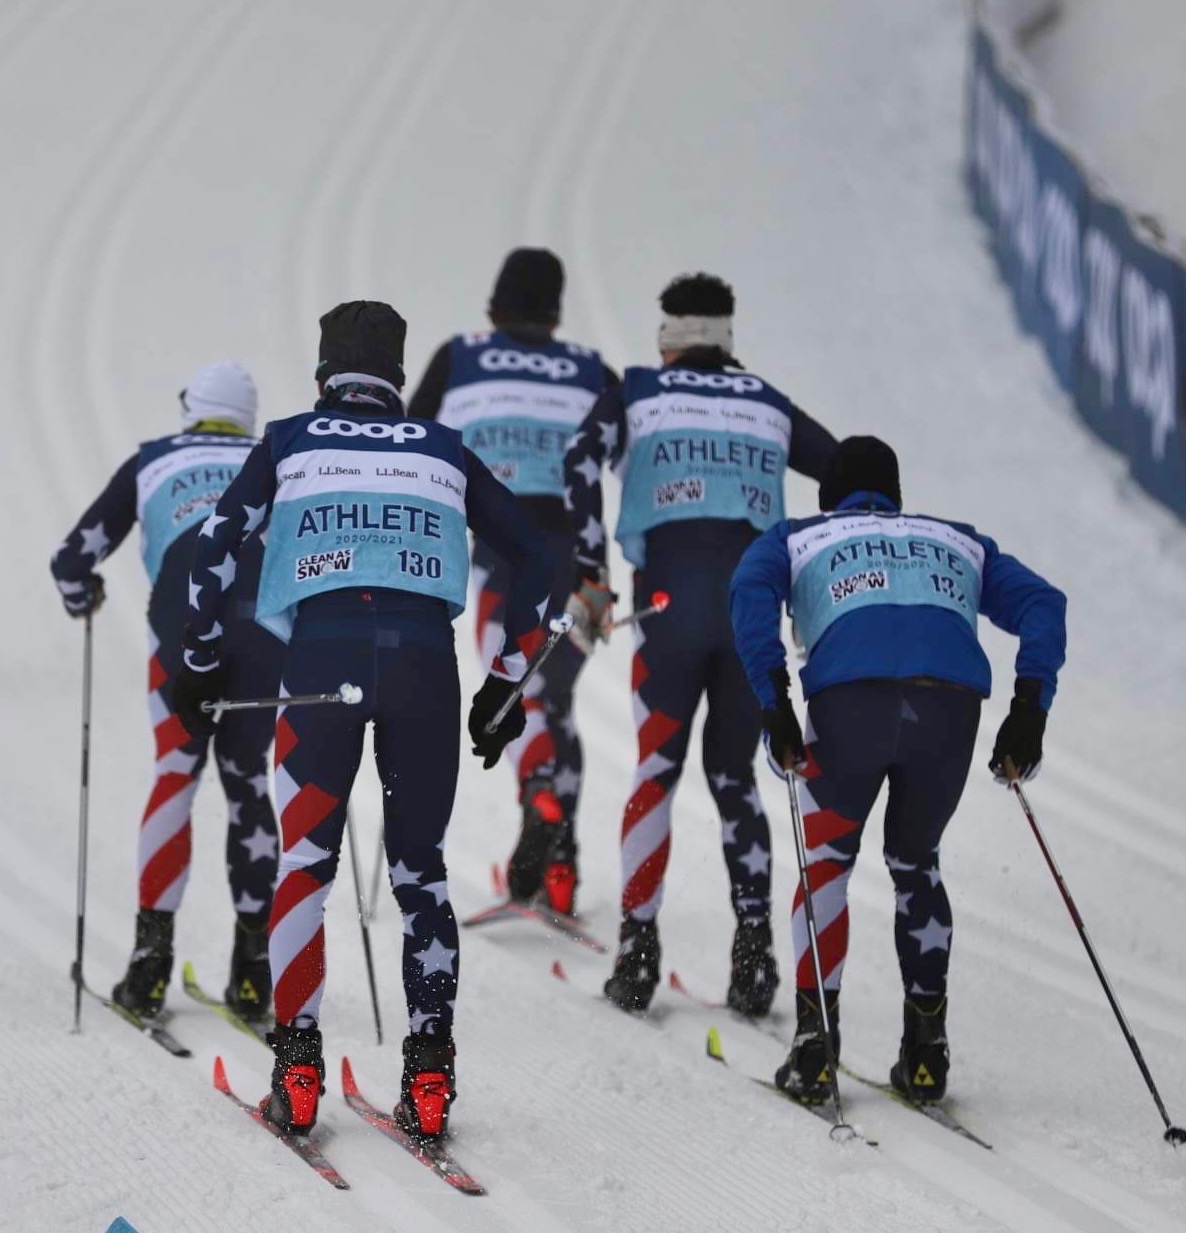
    A group of American men complete their pre-race workout. (Photo: Tom Horrocks)

    Ultimately, race-prep helps prepare our bodies both physically and mentally for a race effort the following day. When performed correctly, the stimulus of intervals the day prior to a race can prime our muscles and spark our metabolism for peak performance. While your legs may not seem super fresh during the session, trust that race-prep helps pave the way for better feelings on race day.


    Sources:
    1.     Ivy JL. Muscle Glycogen Synthesis Before and After Exercise. Sports Med. 1991;11(1):6-19. doi:10.2165/00007256-199111010-00002

  • Adding Power to the Push Off: Understanding the Rate of Force Development

    Adding Power to the Push Off: Understanding the Rate of Force Development

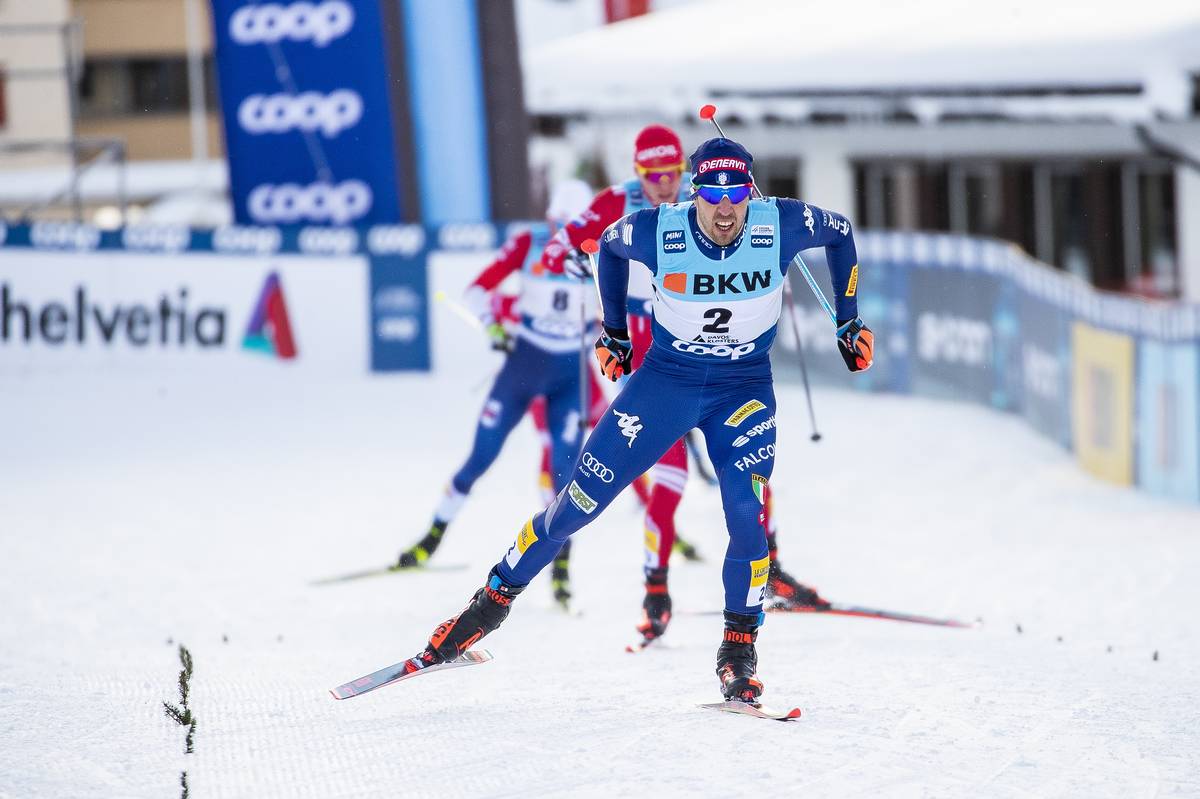
    Italy’s Federico Pellegrino closing out the win at the 2020 Davos freestyle sprint. (Photo: NordicFocus)

    This article builds upon the four-part “Building a Better Skier” series, which explores how biomechanics and movement patterns affect skiing technique, and more importantly how you can apply these concepts to improve your skiing. Please feel free to email the author with any questions: ned.dowling@hsc.utah.edu.

    Recently, I overheard one of my Physical Therapy colleagues tell a patient, “We’ve got to get you jumping. If you want to get back to running, you’ll need to do some jumping first. Running is nothing but jumping from one leg to the other.” Running is a bit more complex than that, but she made a good point. 

    I’d think it obvious to most that jumping is a faster, more explosive movement than simply taking a step. The same goes for running versus walking. Time spent with one foot on the ground in running is about 0.215 seconds while walking is closer to 0.6 seconds. In the context of cross country skiing, the propulsive phase during skate V2 is around 0.310 seconds and 0.230 seconds with diagonal stride. While these numbers are variable based on velocity, it should be easy to appreciate that the actions involved in running and Nordic skiing happen at a much faster rate than with walking. 

    But what does ‘happen at a faster rate’ mean? To answer this, I’m going to take a dive into some physics and biomechanics. First, we need a name for what exactly is happening faster. For the sake of this article, we’re going to go with force. This is perhaps more appropriate than power and maybe less accurate than impulse, but it certainly does the trick of conveying the message that an action has been initiated with the intent of creating motion, be it skiing, running, walking, jumping, etc. (If you want a deeper dive, I highly recommend Force: the Biomechanics of Training by Dan Cleather.)

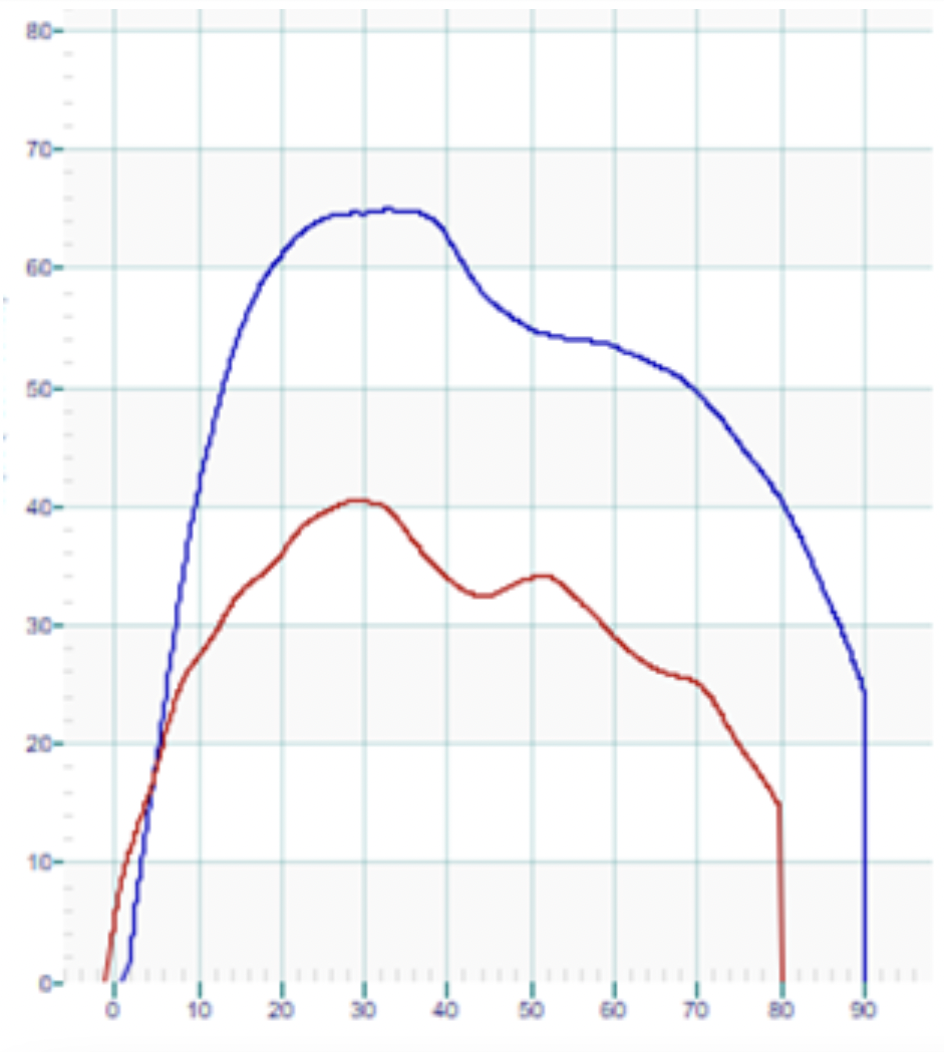
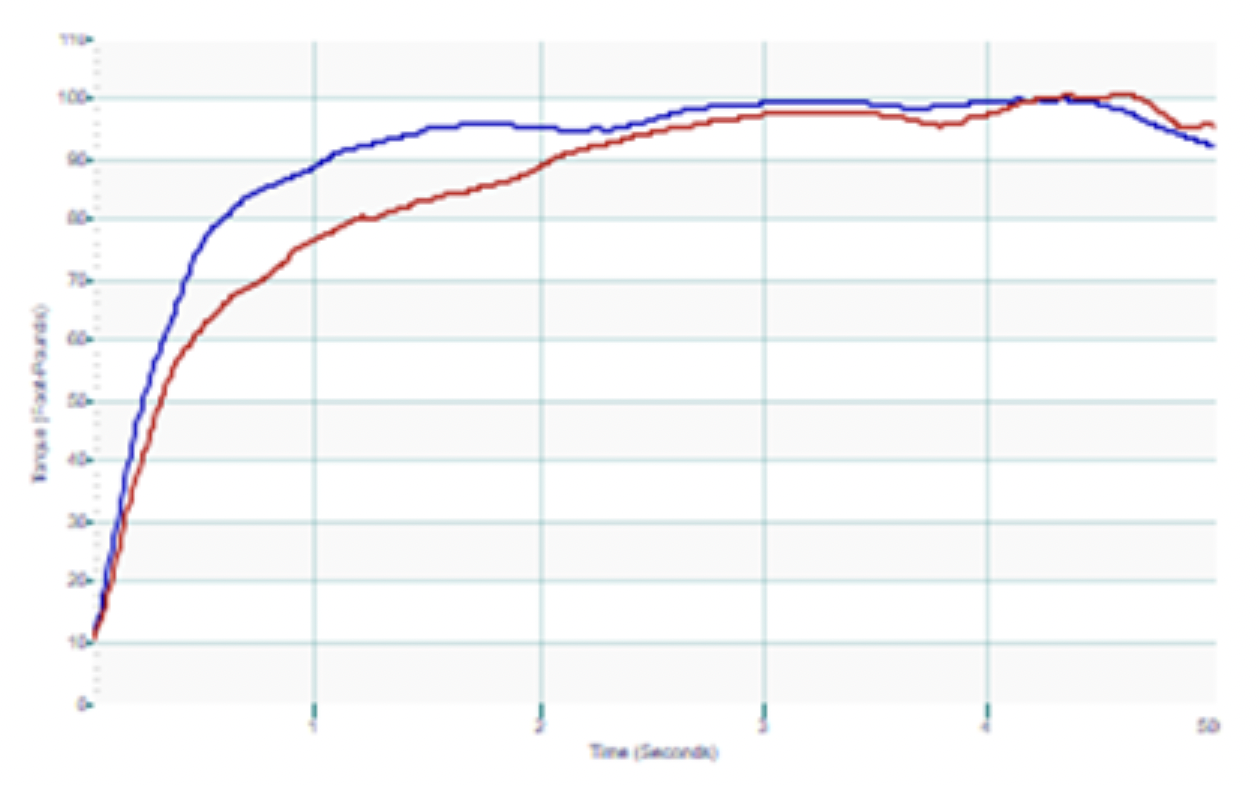
    To overcome gravity and the friction (or suction) of snow, force is required. Our velocity or speed is largely dependent on the magnitude of the force we generate. However, force is not simply an instantaneous measurement. We can talk about peak force or average force, but these miss the big picture. With skiing, whether we are talking about legs propelling skis or arms pushing on poles, force can be plotted on a graph where the Y-axis is the magnitude of force, the X-axis is the amount of time that force is applied, and the area under the resulting curve is the total quantity force applied to the ski or pole during one cycle.

    In this graph, the peak force (y-axis) is much greater for the blue line. The greater magnitude of force is also held for a longer period of time (x-axis). Thus, the area underneath the blue line is considerably greater than the area under the red line. All else being equal, the skier producing the blue line will be faster.

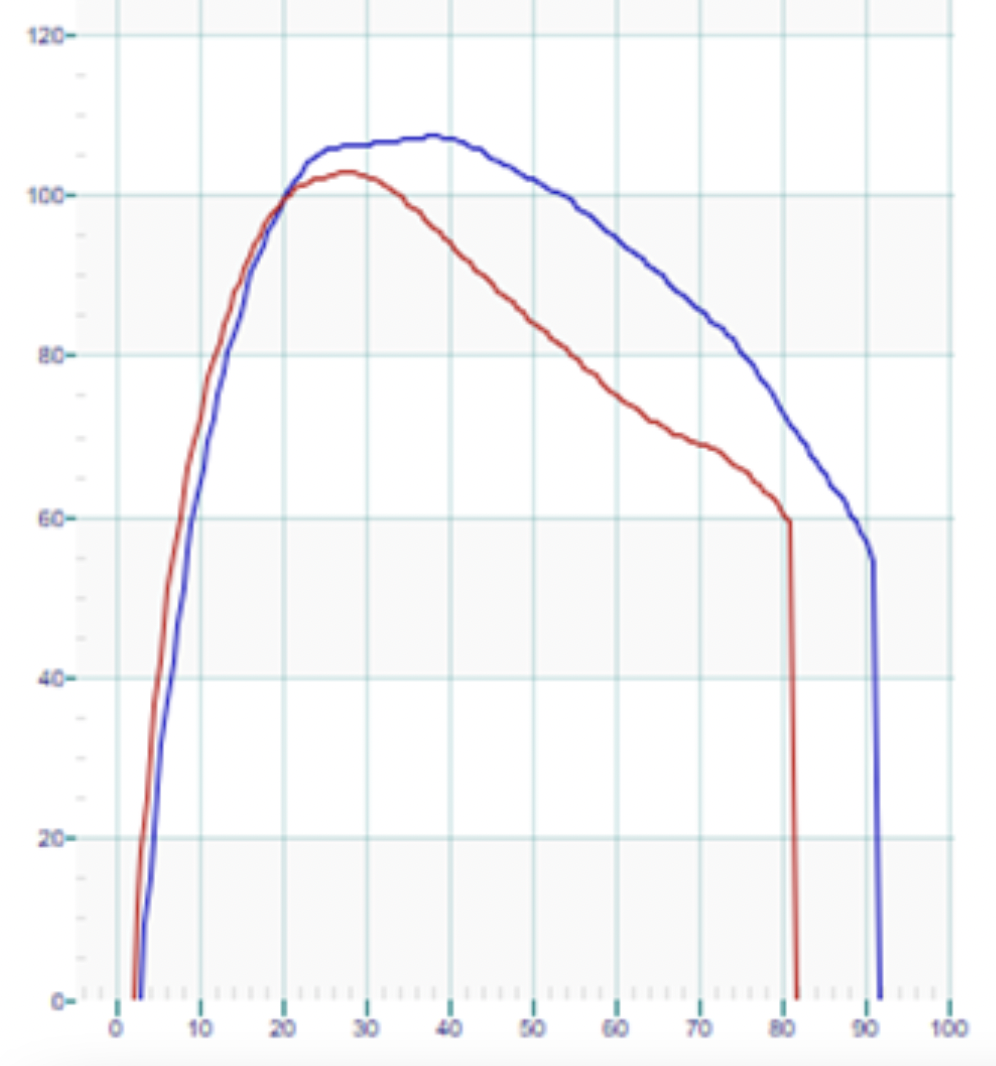
    Here we see similar peak forces (y-axis), but the red line doesn’t maintain its force and drops off more rapidly (x-axis). The area under the blue line is larger as a result.

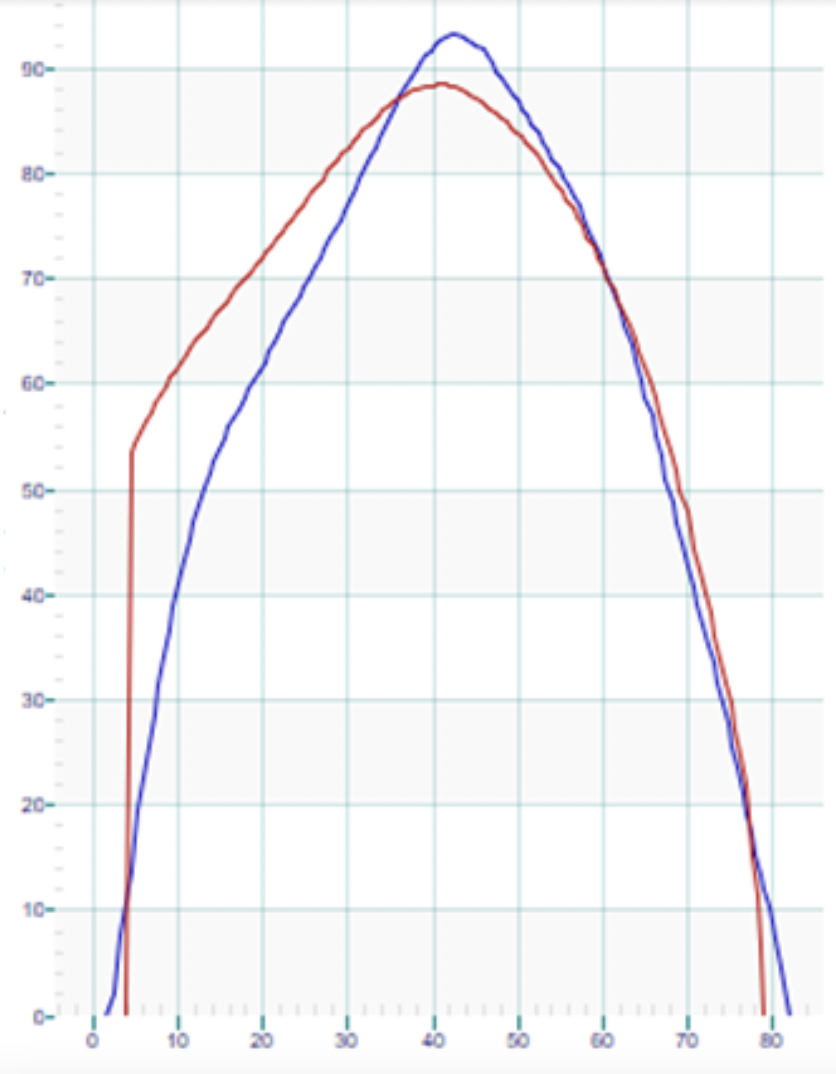
    In this graph, the red and blue lines have very similar peak forces (y-axis) and duration (x-axis). However, there is a major difference in how they get there. The red line reaches its peak force faster. As a result, the area under the red line is larger than the blue. This is because, even though peak force and duration are the same, the red athlete’s peak force happened faster.

    Here’s another example of similar peak force, but the blue line has a much steeper curve and is reaching peak force more quickly.

    The slope of the line, “rise over run” if you remember way back to middle school, represents how quickly force is generated. This is called the rate of force development (RFD), and since it is the name of the article and we’ve spent so much time just getting to this point, it must be important.  

    I already pointed out that force development in powerful skiing happens quickly. In their article, General strength and kinetics: fundamental to sprinting faster in cross country skiing (also cited above), the authors set out to draw correlations between biomechanics, kinematics, and strength in elite skiers. Among their primary findings were: 1. “Analysis of kinetics and kinematics revealed that it was not exclusively the magnitude of applied forces during skiing, but the timing and proper instant of force application were major factors discriminating between faster and slower skiers.” And 2. “General strength and power per se seem not to be major determinants of performance in elite skiers, whereas coordination of these capacities within the different and complex skiing movements seems to be the discriminating factor.” 

    A primary takeaway is that RFD is related to maximum velocity. This sounds intuitive enough: a sprinter on the track is generating more force per stride over 100 meters than a distance runner racing the 5k. But they go on to conclude that as the skiers increased their speed, they decreased their stride time/duration of force (X-axis). How can speed be increasing if the duration of force is decreasing? Won’t the area of the graph get smaller? 

    Some of the speed increase is the result of higher peak forces, but it was also attributed to increased RFD. If we manipulate the graph such that peak force is achieved more quickly — meaning a steep spike at the onset of the force — we can afford to decrease the force more rapidly while still generating a larger area under the curve. 

    With regards to physical attributes, the authors discovered that maximum strength was not correlated with maximum skiing speed; however, jump height (aka RFD) was closely correlated. In the study, maximum strength was considered isometrically, meaning that the muscles were resiting a static load (think planks) versus a push or pull against a load. 

    It also should be noted that a quicker, but shorter, stride must be accompanied by a faster stride cycle or cadence in order to be effective. This will be well understood by anyone who rides a bike with a power meter: if you are trying to maintain 300w on a climb and shift into an easier gear, your cadence has to increase or the power will drop off. The change in gearing creates less max force through the pedals but is compensated by increasing the speed at which the crank is turned.

    Simi Hamilton pushes over the roller during a 2020 skate sprint in Dresden, Germany. (Photo: Nordic Focus)

    RFD sounds awesome. How do I get some?

    Simply put, you train it. In order to increase the speed at which muscles contract and generate force, we must increase the speed of muscle contractions in training. On the low-load end of the spectrum, this can mean simply speeding up standard strength exercises like squats, leg press, and lat pulls. 

    At the higher end of the spectrum are jumping and plyometric training. Plyometric training significantly improves vertical jump height, which was already noted to be correlated with increased skiing speed. 

    Plyometric exercises incorporate a pre-load or “stretch” phase prior to a rapid contraction. For example, if we consider a vertical jump, starting the jump from a squat position is a simple contraction of the muscles responsible for hip, knee, and ankle extension. But if the jumping motion begins in standing before dropping into a squat and quickly rebounding for the vertical jump, the same muscles that generate the jumping force are lengthened before contracting. This harnesses the energy produced by the elastic recoil of muscles and tendons. 

    Think about putting a fairly tight rubber band around your wrist. The rubber band is actively contracting against your wrist and the pressure, or force, is evident. Now pull back on the rubber band and let it snap against your wrist. This amount of force is significantly and noticeably (sorry!) greater. Our muscles and tendons do not harness that much elastic energy, but you get the idea.

    A pause for words of advice/caution: If the previous paragraph made your knees tremble or your back start to tighten, keep in mind that all exercises exist on a spectrum. With any exercise program, the load or difficulty must start with what is doable. There is a fine line between doing enough to stimulate adaptations in the body and doing too much, increasing the potential for injury. If you are managing a chronic musculoskeletal issue or returning from injury, it is highly recommended that you consult with a Physical Therapist or Athletic Trainer for a more personalized RFD program. Plyometric exercises can be done in a pool with a significant decrease in resistance. The overall load in the water is decreased, but the RFD benefit is retained.

    Plyometric Exercises to Increase RFD:

    Hopping: Whether on two feet or one, hopping drills will help strengthen the feet and ankles while developing RFD in the calf muscles. These have the lowest loads and can be valuable exercises themselves or as part of your warm up. Jumping rope falls in this category and has been shown to improve running speed.

    This video demonstrates a handful of “pogo” style hopping drills. Notice how the knee and hip stay fixed with force being generated by the ankle.

    Jumping: Vertical jumps, broad jumps, box jumps, drop jumps, bilateral, unilateral, backwards, sideways–the variety is only limited by your imagination. However, to get the most out of the plyometric stretch cycle, it is arguably best to make these countermovement jumps where the body drops down before exploding upwards (or sideways, forward, etc.).

    In this video, Dave Quammen of Park City Sports Medicine demonstrates a series of two-legged jumping drills. Challenge can be increased with added repetitions or with reversing direction with the forward jumps. Try these on one leg for a significant increase in load/difficulty. 

    Bounding: With or without poles, bounding follows the basic premise of adding “pop” to a normal stride for increased RFD and exaggerated height, distance, or speed. While boulding can be done on flat ground, there are added benefits to going uphill: because height and flight time are reduced so are the impact forces when landing. It also takes more effort to go uphill, so the workout is more efficient (more bang for the buck), and it just feels more natural.

    Demonstration of more running-oriented hill bounding, from Lydiard Training.

    Ski bounding with poles is a traditional dryland exercise that not only improves RFD but works the core and arms at the same time — valuable training even if you only skate ski. It can be done on a long gradual hill for endurance work, but short, steep hills will emphasize RFD.

    The U.S. Ski Team completes a set of longer duration L4 ski bounding intervals way back in 2012. Camera quality has since improved, but the background song is still a classic. Note how the technique is very different from running even though the speed might be similar. 
    Again, with the basic concept of creating quick, explosive movements, there are far more ways to develop RFD than this summary can hope to cover. The remaining topic, then, is dosage. 

    Plyometric exercises are demanding and stressful to the musculoskeletal system. Delayed onset muscle soreness is to be expected, and at least one recovery day is mandatory. Aside from muscle soreness, any pain that is beyond mild or takes more than a couple of hours to subside should be considered a contraindication and deserving of a consultation with a sports medicine provider. 

    For most readers, doing the exercises once or twice a week is an adequate stimulus for both improvement of RFD and appropriate recovery. As for duration or repetitions: when in doubt, start small. In the jumping video above, Dave demonstrates two repetitions of each jump. If we consider the full video to be one set, then starting with 2-3 sets is likely reasonable. Then, increase repetitions to progress the program. Keep in mind that quality is key — if you feel your technique or stability start to wean, it’s best to stop there. Total exhaustion is not the goal. 

    Precede plyometrics with a light cardio warm up. If coupling plyometrics with core or strength training in the same session, it is generally recommended to do the plyos first before you are too fatigued.

    Sophie Caldwell Hamilton powers through the heats during a classic sprint in Oberstdorf, Germany in March 2021. (Photo: Nordic Focus)
  • Building a Better Skier Part 3: Single Limb Stability

    Building a Better Skier Part 3: Single Limb Stability

    This is Part 3 of a series delving into how biomechanics and movement patterns affect skiing technique. If you haven’t already, start with the introduction, Part 1 which introduces the concept of a neutral spine posture, and Part 2 which describes spine stability and mobility.

    The ability to balance and be stable on one leg is where the rubber meets the road (or ski hits the snow). True, we generate propulsion with strength and endurance, but if that power is not transferred into glide, it becomes wasted effort. This is quite literally what separates the efficient from the inefficient. Or, the fast from the not so fast.

    This study set out to quantify the difference in glide between elite and sub-elite skiers (national vs regional skiers). As expected, they found that the higher caliber skiers did, in fact, glide better. In trying to quantify the why, fitness aside, they found that the national level skiers had a different pattern of foot pressure in the boot. Where the regional skiers only pressured the medial side (big toe side), the national skiers loaded their feet across the whole foot. 

    What’s really happening here is that the national level skiers were better at shifting their weight over the glide foot/ski. This “commitment” to the glide ski is one of the hardest things to master, especially for adults learning to Nordic skiing later in life. 

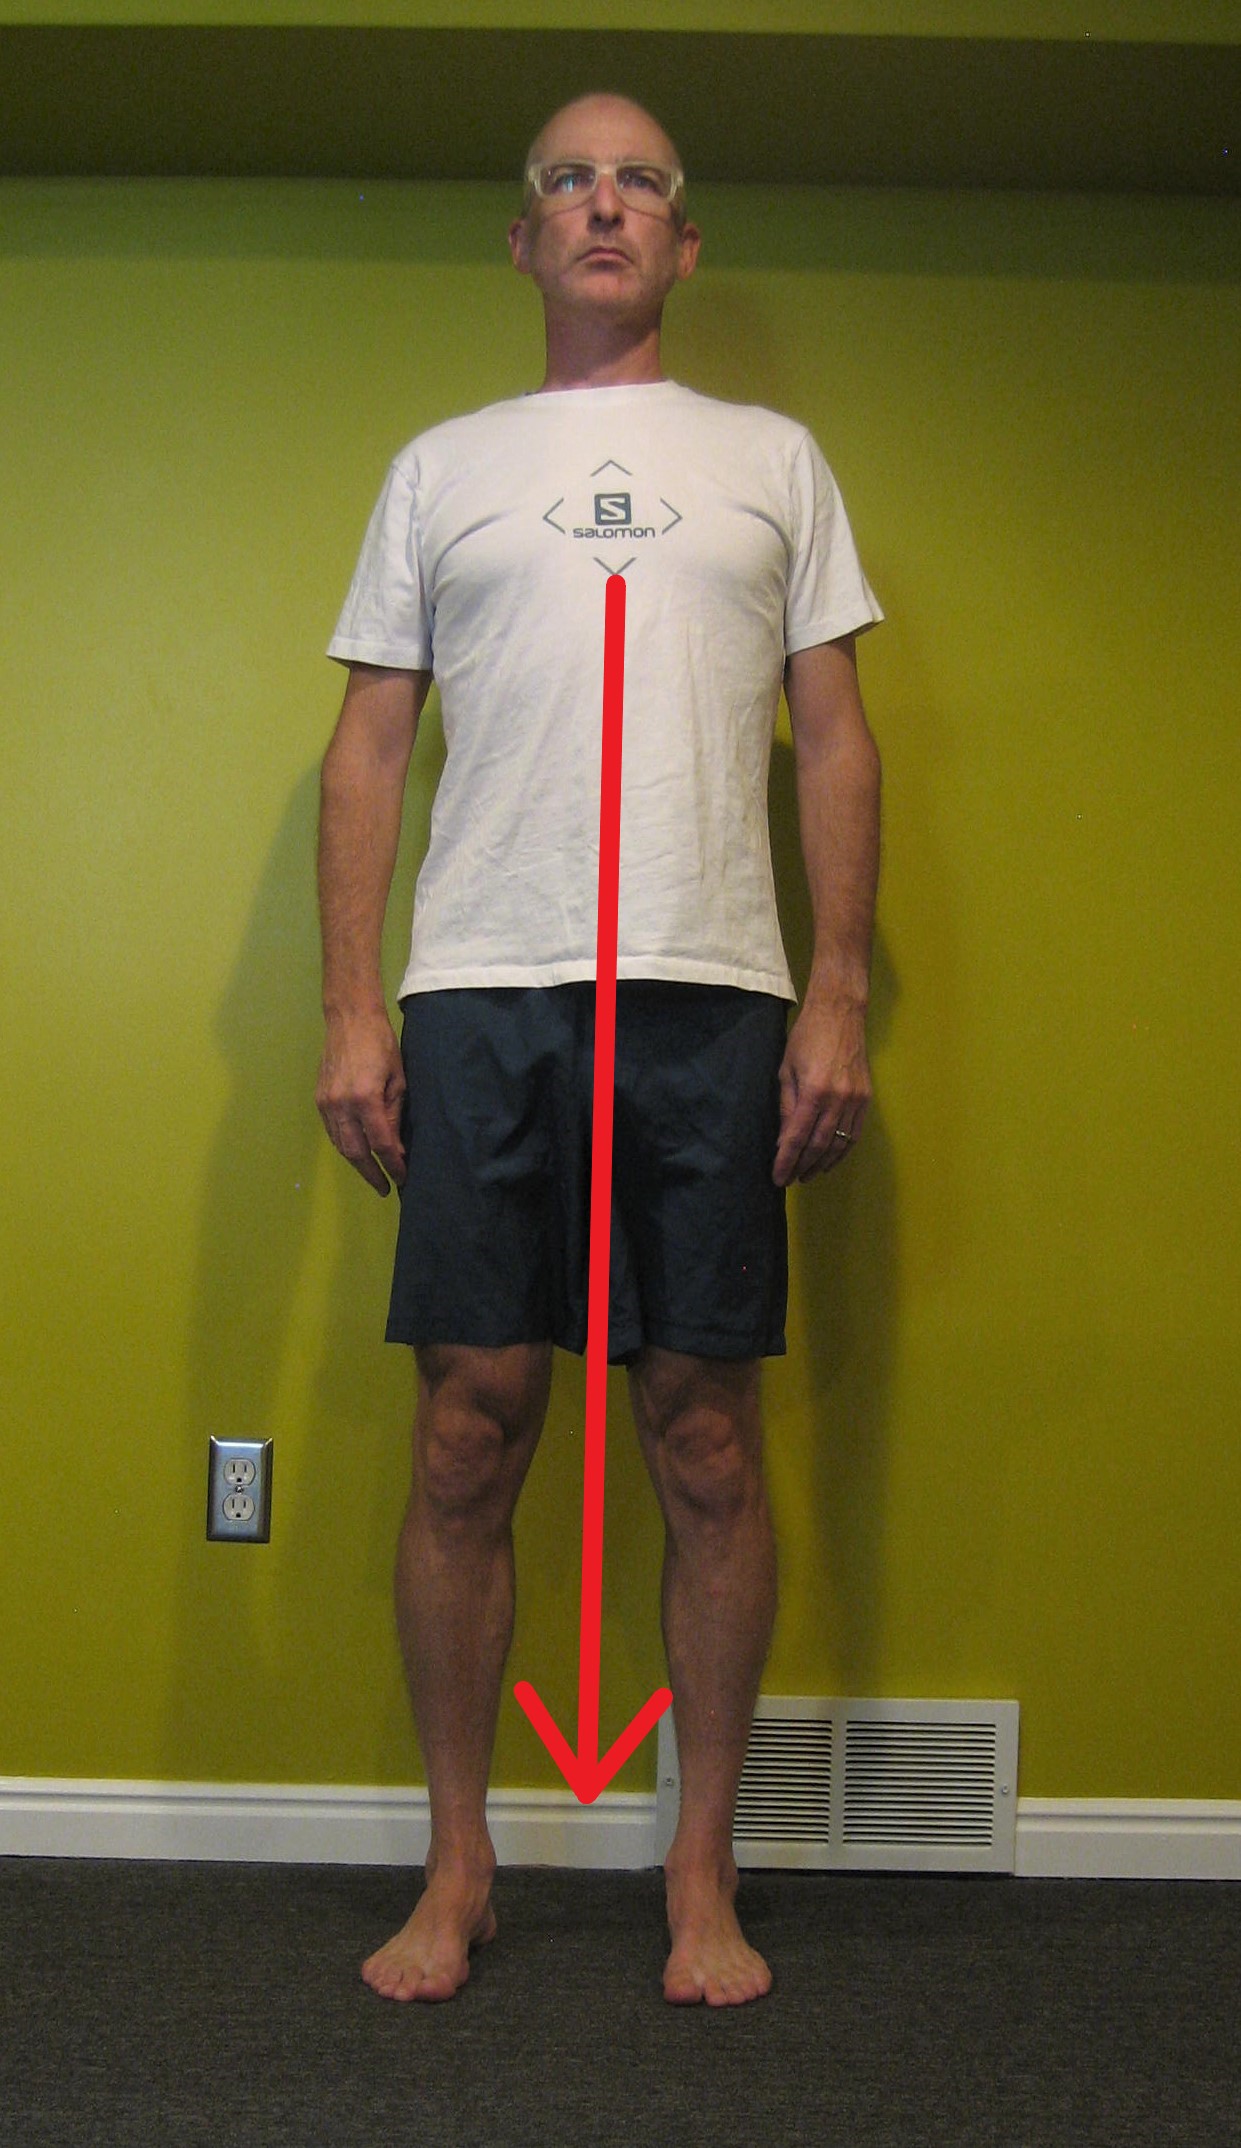
    When standing on two feet, your center of gravity falls in the middle between your feet. If you want to balance on one foot, your weight has to shift. You can’t just pick up one foot. To achieve this weight shift, you can lean your trunk, which will allow you to balance, but it is not a stable or powerful position. If you shift your pelvis to the side of the stance leg, you can accomplish the requisite weight shift AND place your body in a position where muscles are engaged and ready to roll .

    The skiers in this video are fine examples of appropriate, hip-centric weight shifts. Notice how the upper body stays very quiet and still. There is no side to side movement. The pelvis, however, can clearly be seen moving side to side to move the skier’s center of gravity fully over top of the glide ski.

    This is all easier said than done. Go stand in front of a mirror — a bathroom vanity mirror is fine because you only need to see your shoulders. Balance on one foot. Do your shoulders stay level? Now move the opposite leg to the side and back a few times. Are your shoulders still level? If they are not, then it’s unlikely that you are shifting your weight appropriately. If you are struggling with balance on a smooth, flat floor, you can appreciate the challenge of finding stability while gliding down an undulating track on a toothpick of a ski.

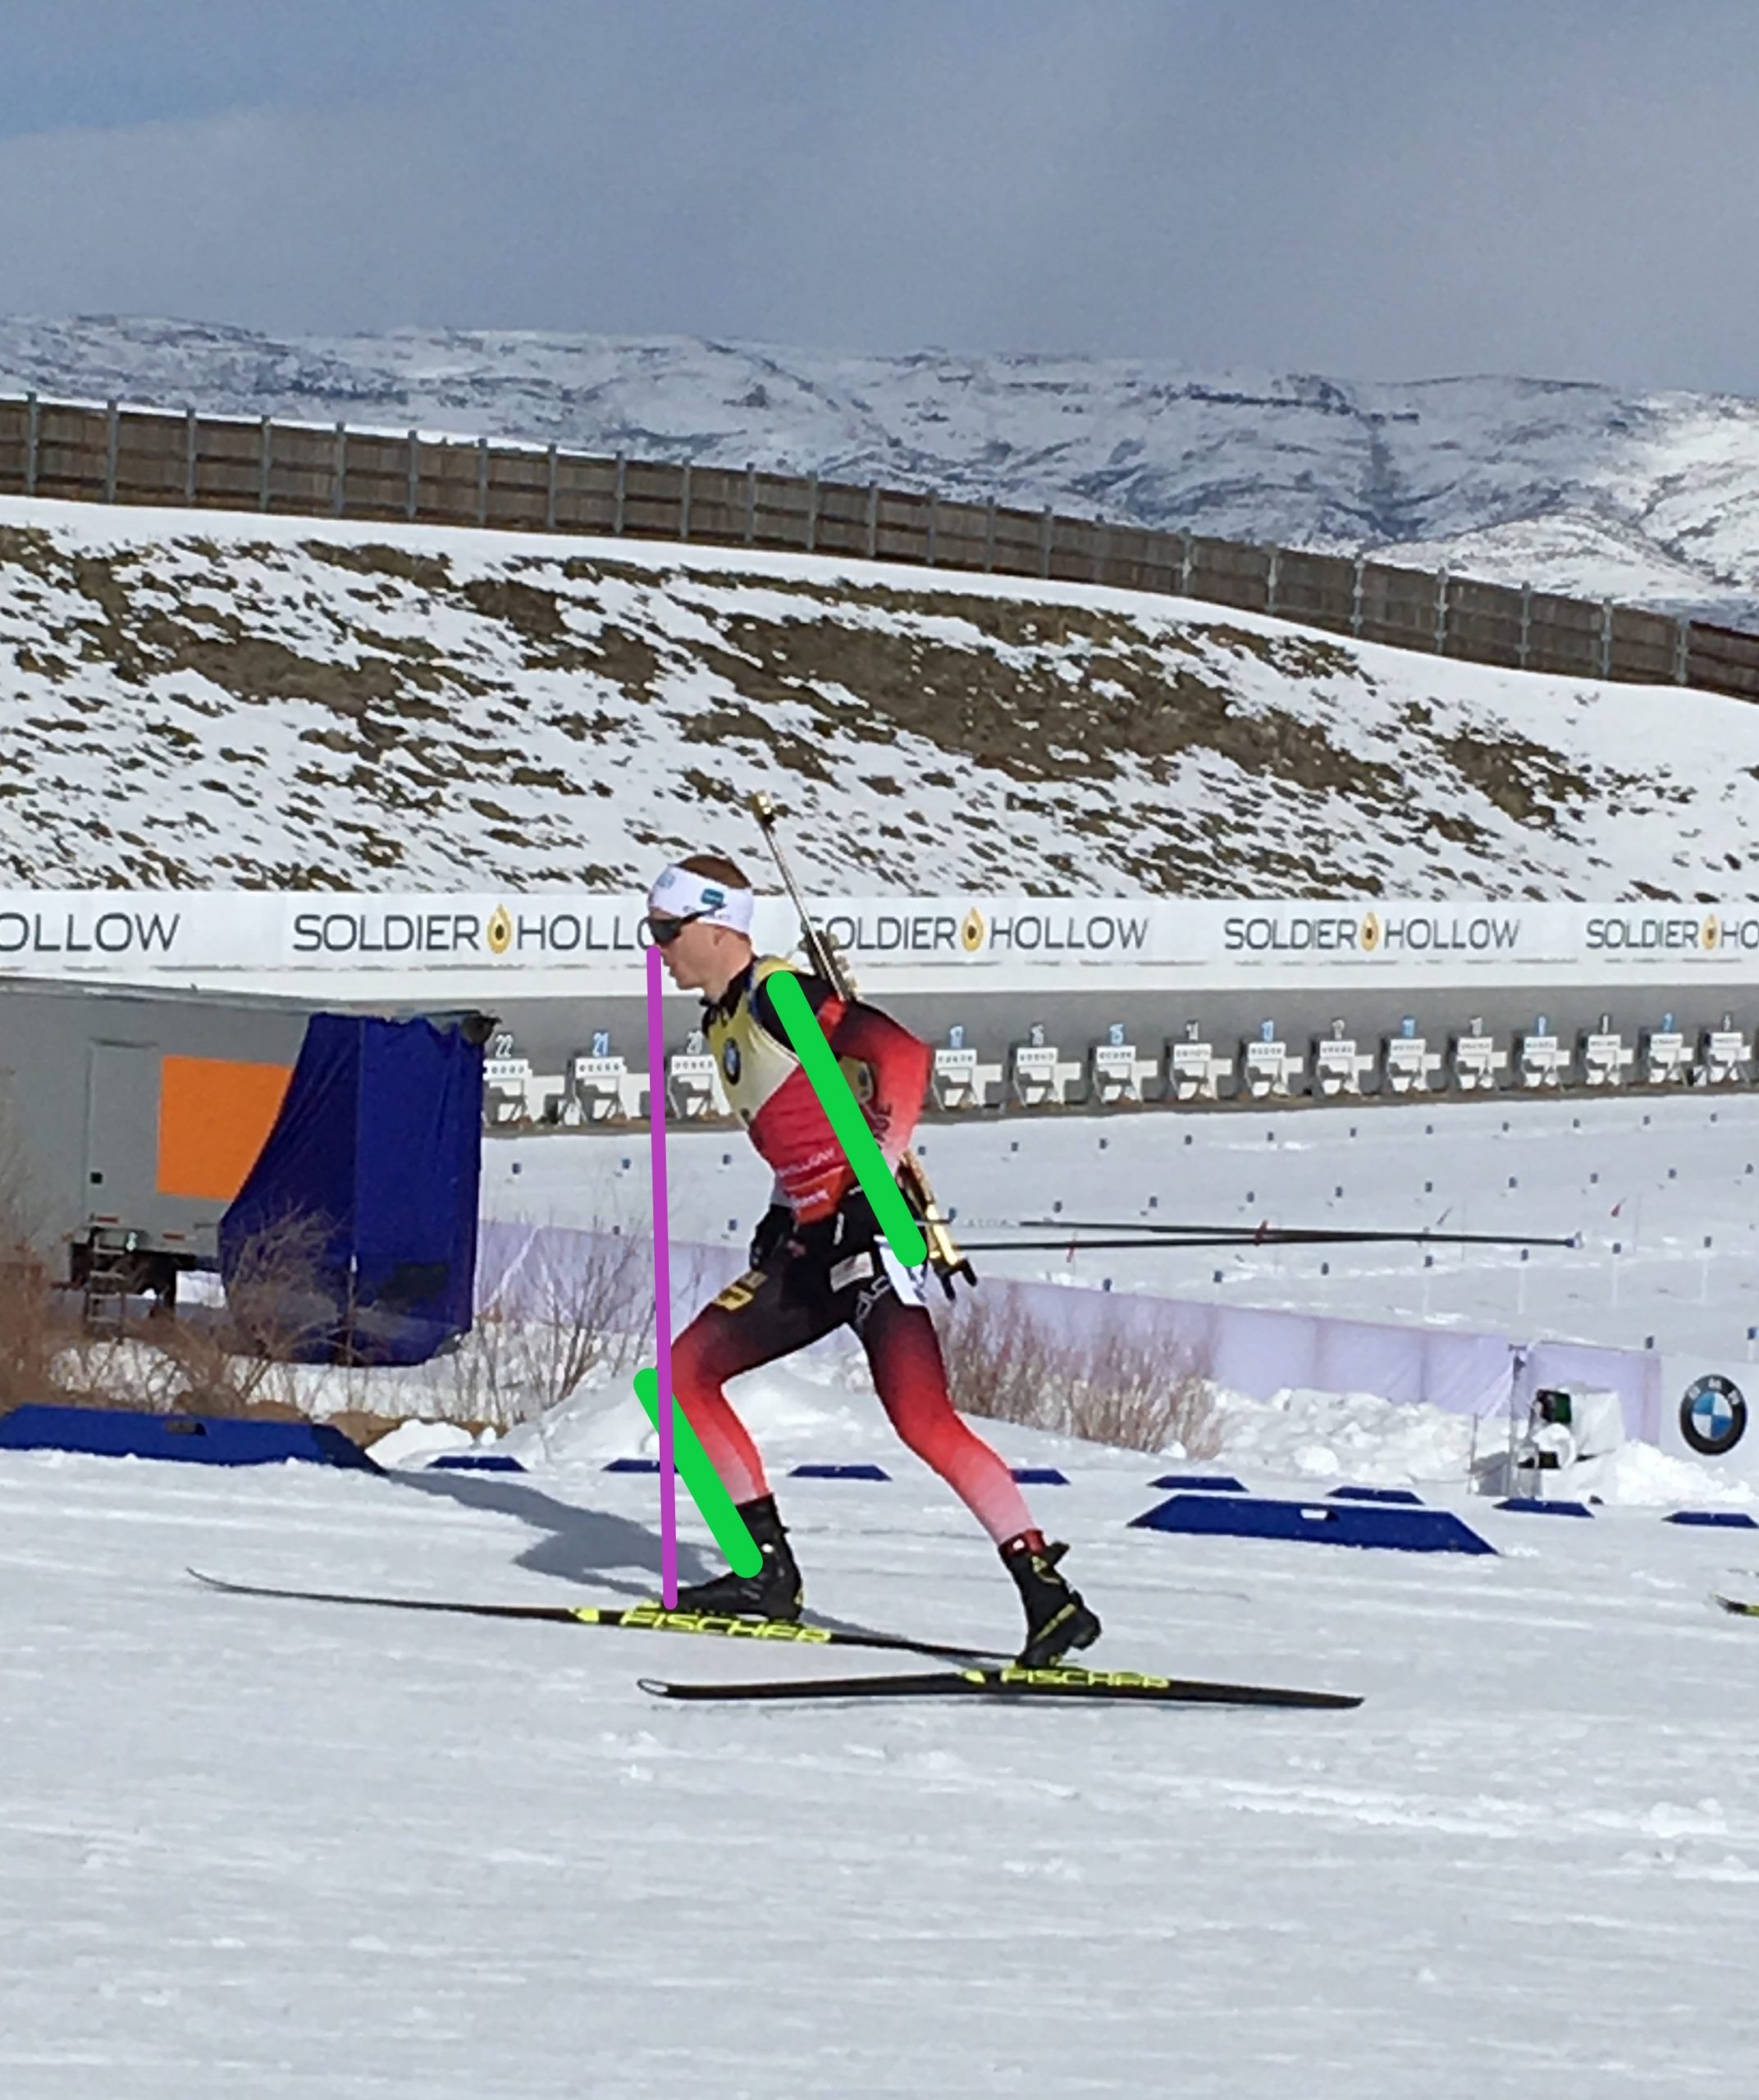
    Another major component of single limb stability is the coordination of joint flexion at the hip, knee, and ankle. Anyone who’s had a ski lesson has heard the phrase nose, knees, and toes —  or that the shin and trunk should be parallel. These cues are all about getting the ankle, knee, and hip to flex together. The goal is to put the body in a position that is both inherently stable due to muscle activation and preloaded for propulsion. This is what I’ll be referring to as the basic shape.

    Norwegian biathlon star Johannes Thingnes Bø models “nose, knees, toes.” Notice that the shin and trunk (green lines) are parallel. (Photo: Ned Dowling)

    The next experiment requires a partner. Balance on one leg staying very upright with your knee and hip straight. Have your partner push you (gently!) from each side. Did you maintain your balance? Now aim for the nose, knees, toes position and have your partner push on you again. Which position was more stable? (If you had difficulty finding this position, there will be more cues with the exercises below.)

    If the distribution of foot pressure and coordinated joint flexion are two major components of single leg stability — which has been shown to be a major component of skiing efficiency — then it seems highly rational that we should strive to perfect these traits on dry land before we expect ourselves to do it on skis (including and arguably even more so on rollerskis). We must be able to form the basic shape.

    Adequate strength of the gluteal muscles is a prerequisite. If you don’t already incorporate glute exercises in your strength program, you can get some great ideas from previous FasterSkier articles here and here.

    Foot and ankle mechanics are also a primary contributor. In the basic shape, we are asking the ankle to flex forward at the same time that the foot has to accept our full weight. Insufficient or excessive flexion, or poorly controlled mobility through the foot and/or ankle can force the tibia (shin bone) to rotate inward, taking the knee with it. Lack of glute strength and control can have the same effect from the top down. With this extraneous  motion coming from either direction, the result is an increased valgus (medially-directed) force on the knee, which equates to increased loads in both the tibiofemoral and patellofemoral joints. Clinically, this is the most common cause of knee pain with Nordic skiing.

    If the prescription for controlling top-down motion is glute strength and coordination, the bottom-up is addressed through strength of the muscles in the foot and ankle. Conveniently, these can often be addressed by simply working on single limb stability — as long as you pay attention. Quality control is mandatory!

    A note on orthotics: In many circles, custom orthotics have fallen out of vogue especially since studies like this one have found them to be no better than exercise at helping knee pain. But the demands on the ankle joint are quite different in Nordic skiing than with walking or running, which are more commonly studied. Skiing generally requires a much greater amount of dorsiflexion. As mentioned above, we want this dorsiflexion to happen without internally rotating the tibia. The addition of external support to the foot has the potential to control this aberrant motion. I am a strong proponent of at least some upgrade of insoles in ski boots (and cycling shoes for the same reason). Most stock insoles are terrible, even the ones that came in my very expensive carbon boots. Out-of-the-box options from Superfeet, Sole, Powerstep, and Curex are all quite good and far less expensive than custom. For some, these might not provide enough support and custom orthotics with a strategic build up of additional material would be better. 

    How do you know? A quick test I do in the clinic is to have my patient balance and do a couple of single leg squats while barefoot. Then I have them do the same thing with a more supportive insole. Then I place a piece of ¼” (4mm) thick folded cardboard under the insole at the ball of the foot and have them repeat the balance and squats. I’m looking for whether they become “easier,” “less painful,” or appear better controlled to my eye. If the extra material under the insole made for improvements, then we talk about custom orthotics. If it made no difference, then I just advise an upgraded insole. Ultimately, we are looking to improve both the alignment of the knee as the ankle dorsiflexes AND improve balance.

    All of that said, here are my top three exercises/drills for ski-specific balance–the basic shape. Ideally, these are done barefoot, without the additional support of an insole and shoe (opposite of the previous conversion), so the muscles have to work harder and get stronger. The basic cues are the same for all three:

    • Tripod Foot: A tripod gets its stability from three legs and we want three primary pressure points on the foot–the ball of the foot, the pinky side ball of the foot, and the heel. Weight should be slightly biased forward off of the heel. The toes should be on the floor but relaxed and not gripping for dear life.
    • Nose, Knees, Toes: My preferred way of thinking about this is if snot is dripping from your nose, you want it to land on your shoe not down the front of your shirt. Bend at the ankle, knee, and hip to accomplish this. 
    • Weight Shift: comes from the pelvis/hip not leaning the trunk. Park yourself into the hip. If your glutes aren’t burning, you’re doing it wrong (or the exercise is too easy).
    • Posture: neutral spine is the goal. Forward trunk lean occurs through the hips, not the spine.
    • Forward Gaze: Avoid staring at your feet. You’ll need to keep your head up to look down the track while skiing, so best to get used to it in training. It will also remove some visual dependency and help with maintaining a neutral spine.
    • Quality vs Quantity: the emphasis is on how you do the exercise, not just going through the motions. 
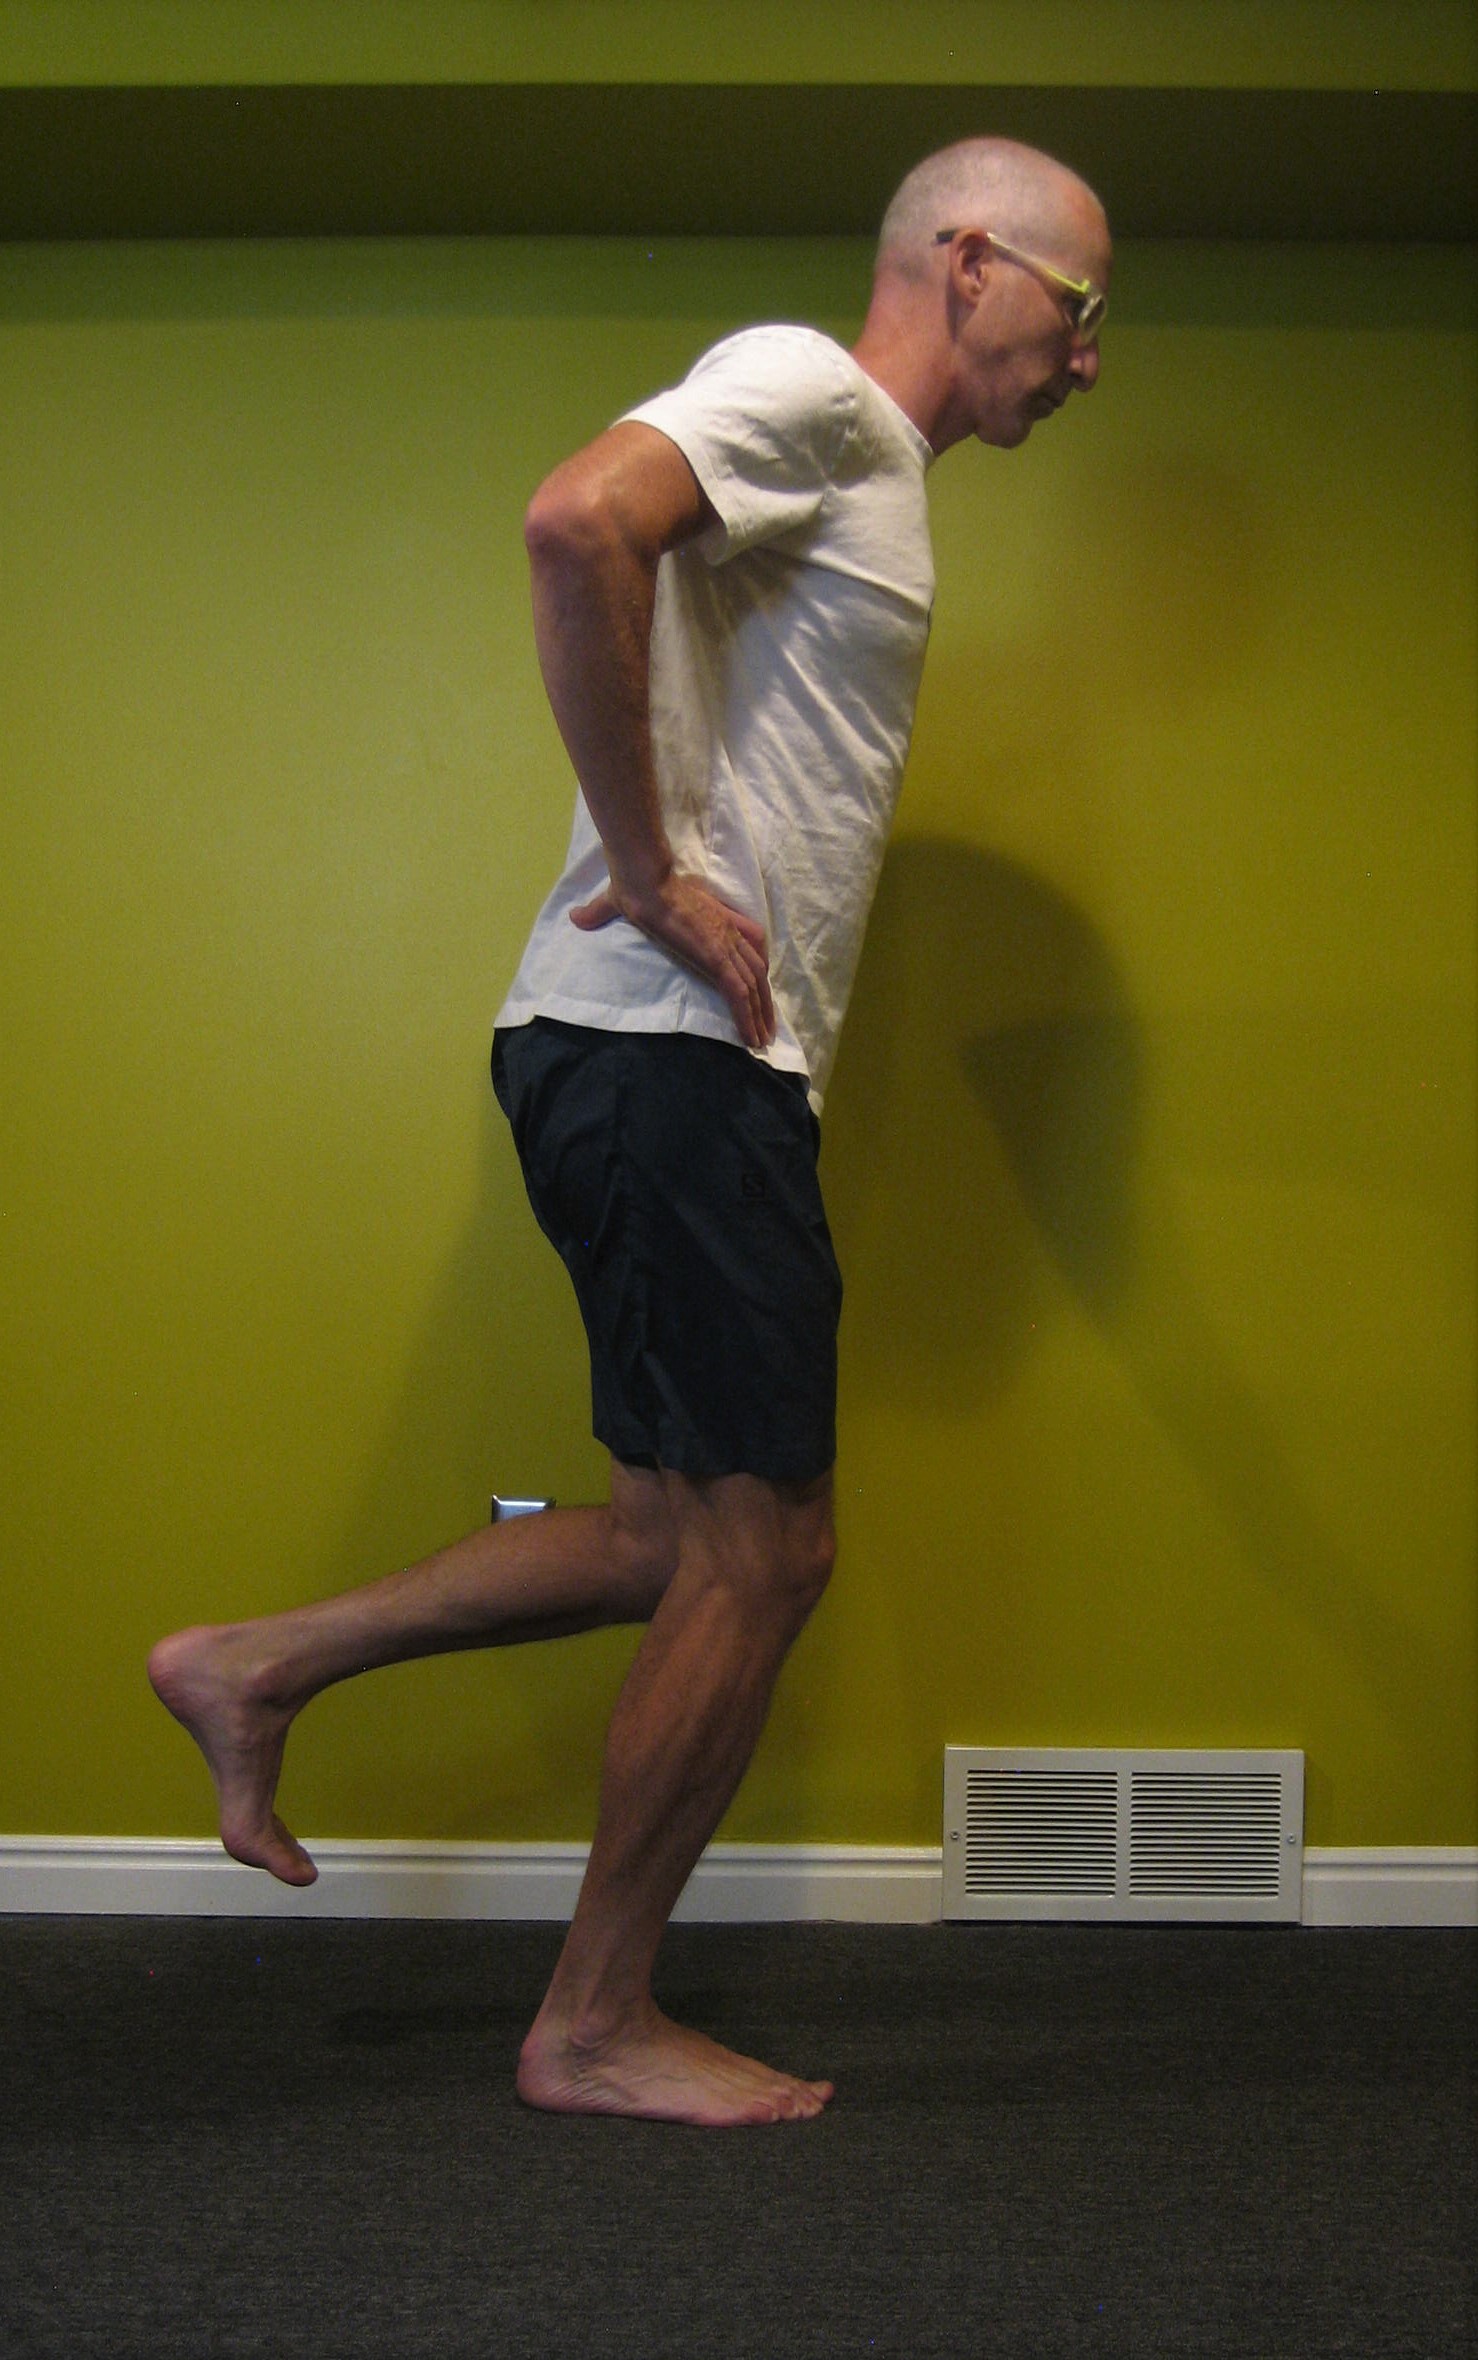
    The author models “the basic shape”.

    Start by forming the basic shape. If this is challenging to maintain, then do not progress until it becomes natural and thoughtless.

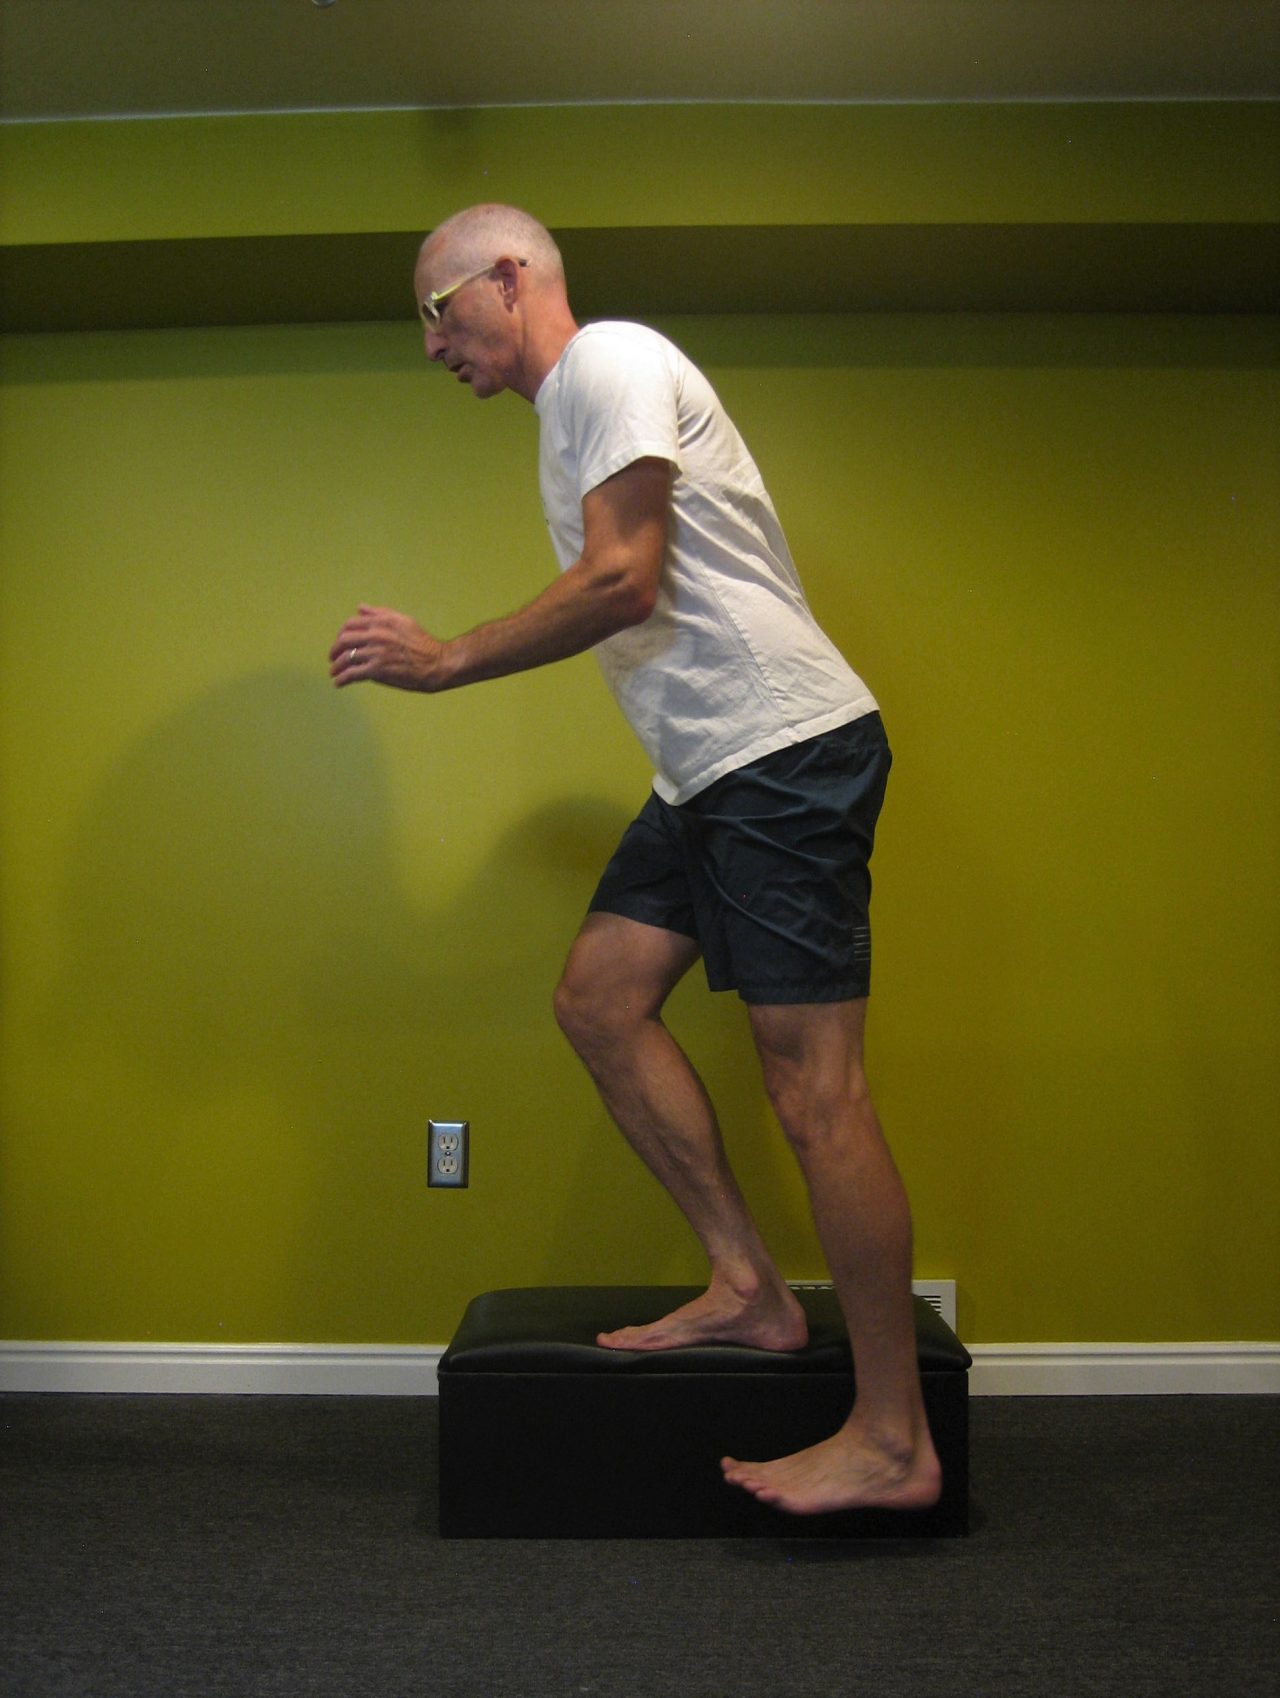
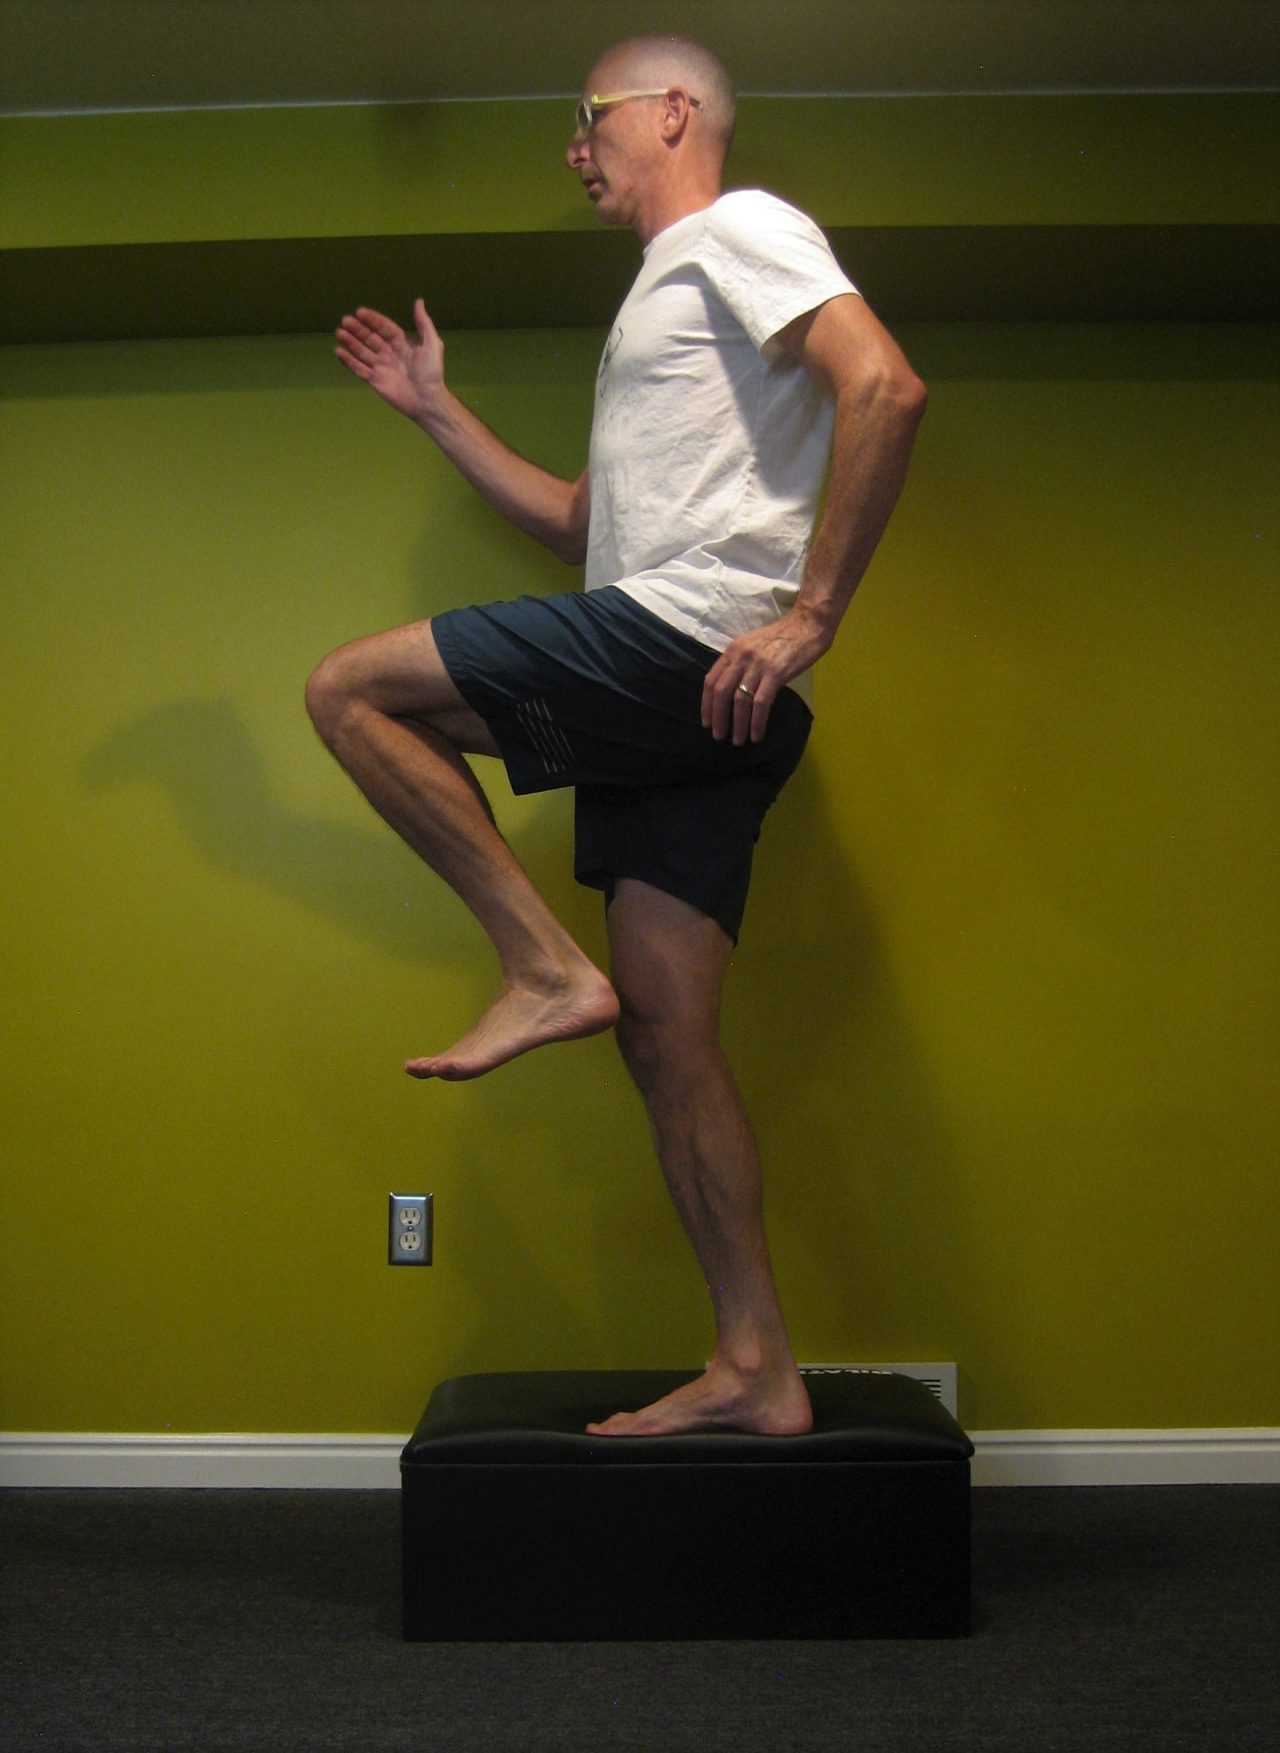
    Exercise #1: Step Ups

    Stand sideways on a step (preferably the bottom, not top, step). Lower your outside foot towards the floor. As you lower, you should be going into the basic shape. Return to the tall starting position. Don’t worry about trying to fully touch the floor–that’s not the goal. The goal is to move up and down, in and out of the basic shape. For added challenge, hold a dumbbell in the outside hand. 2-3 sets of 10-15 reps should be adequate to bring on some fatigue and challenge your balance.

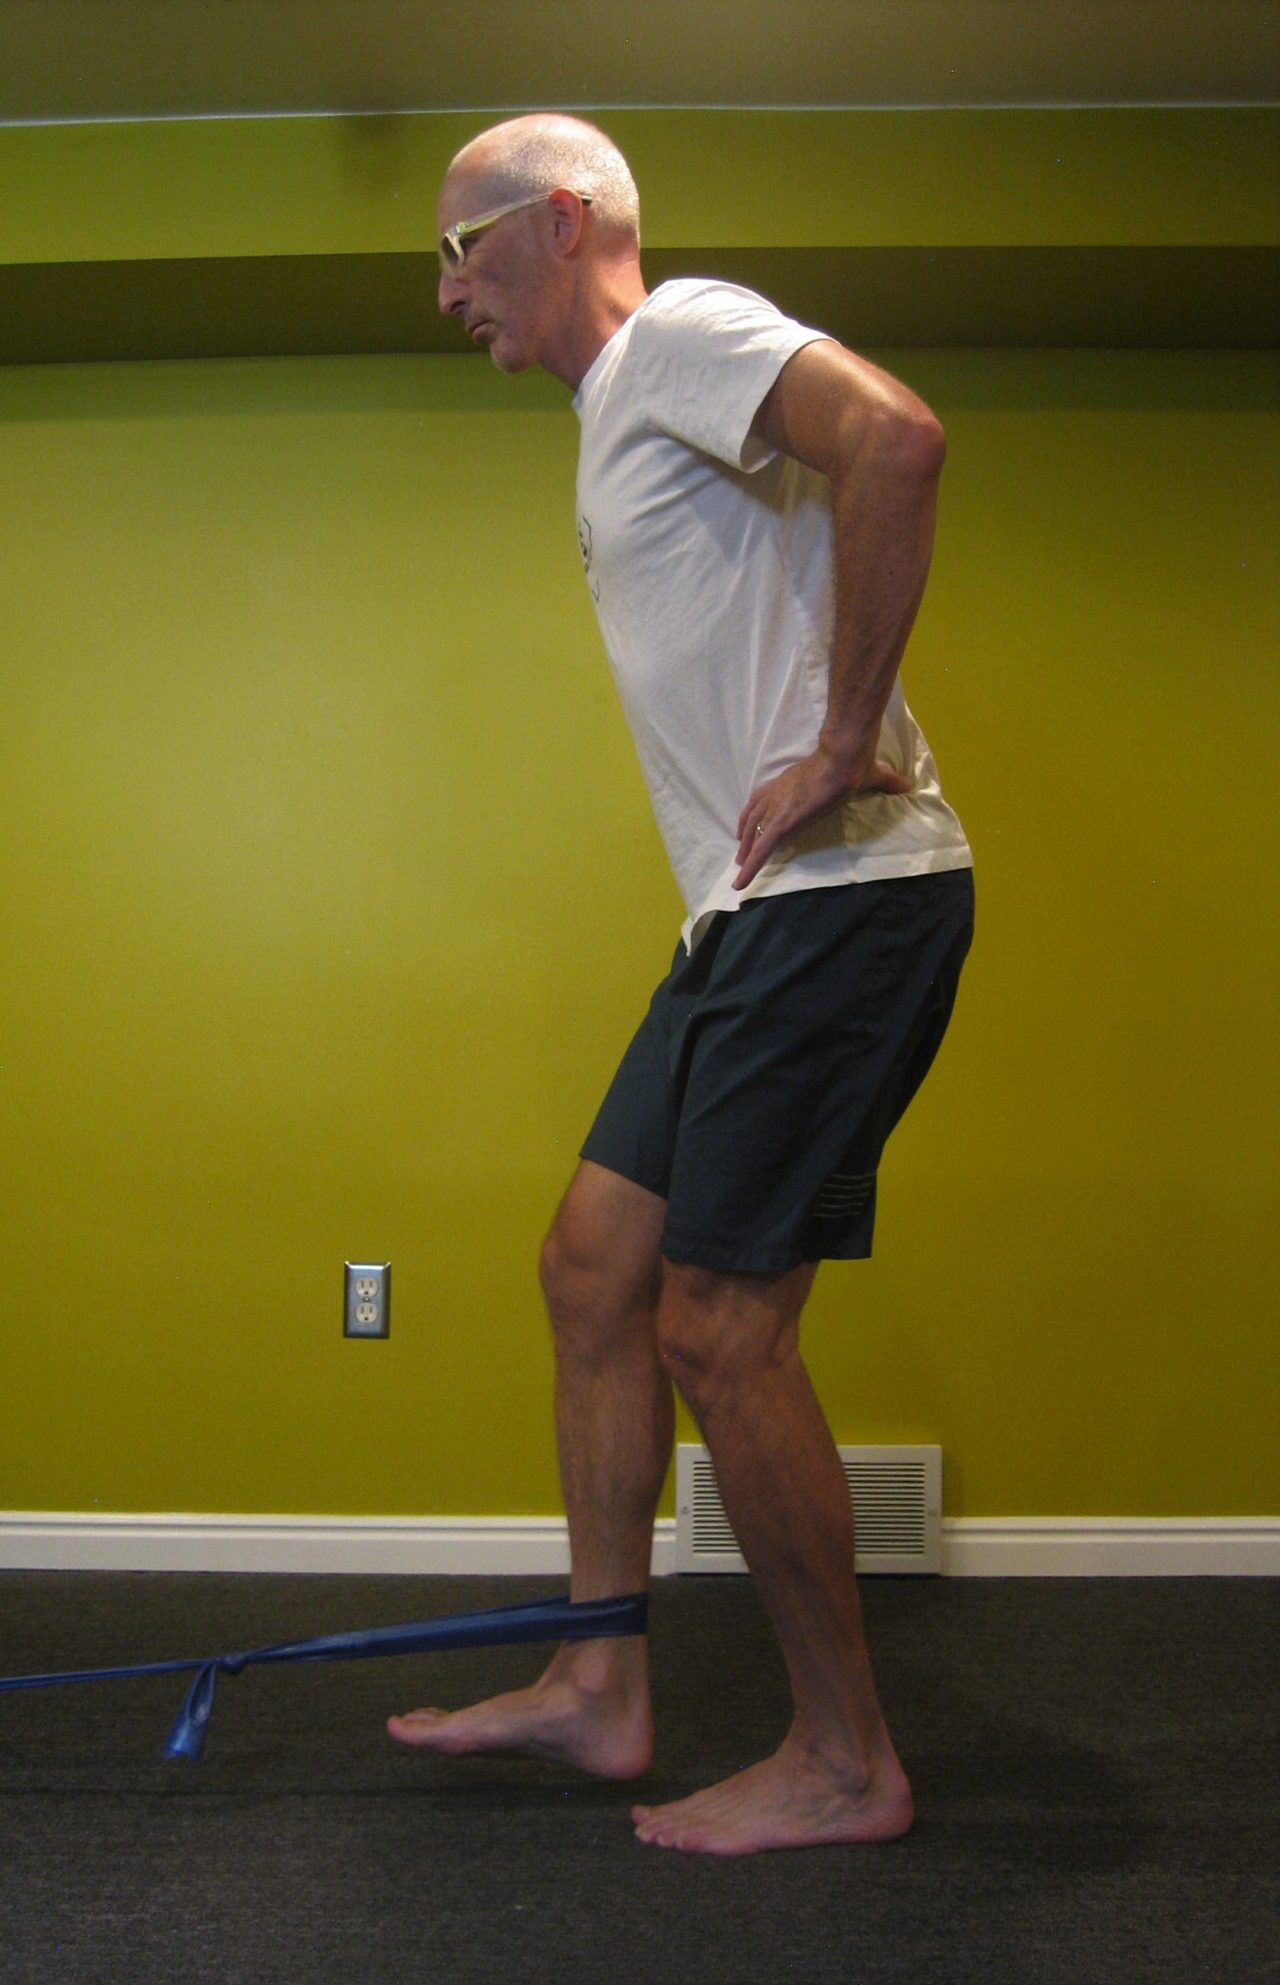
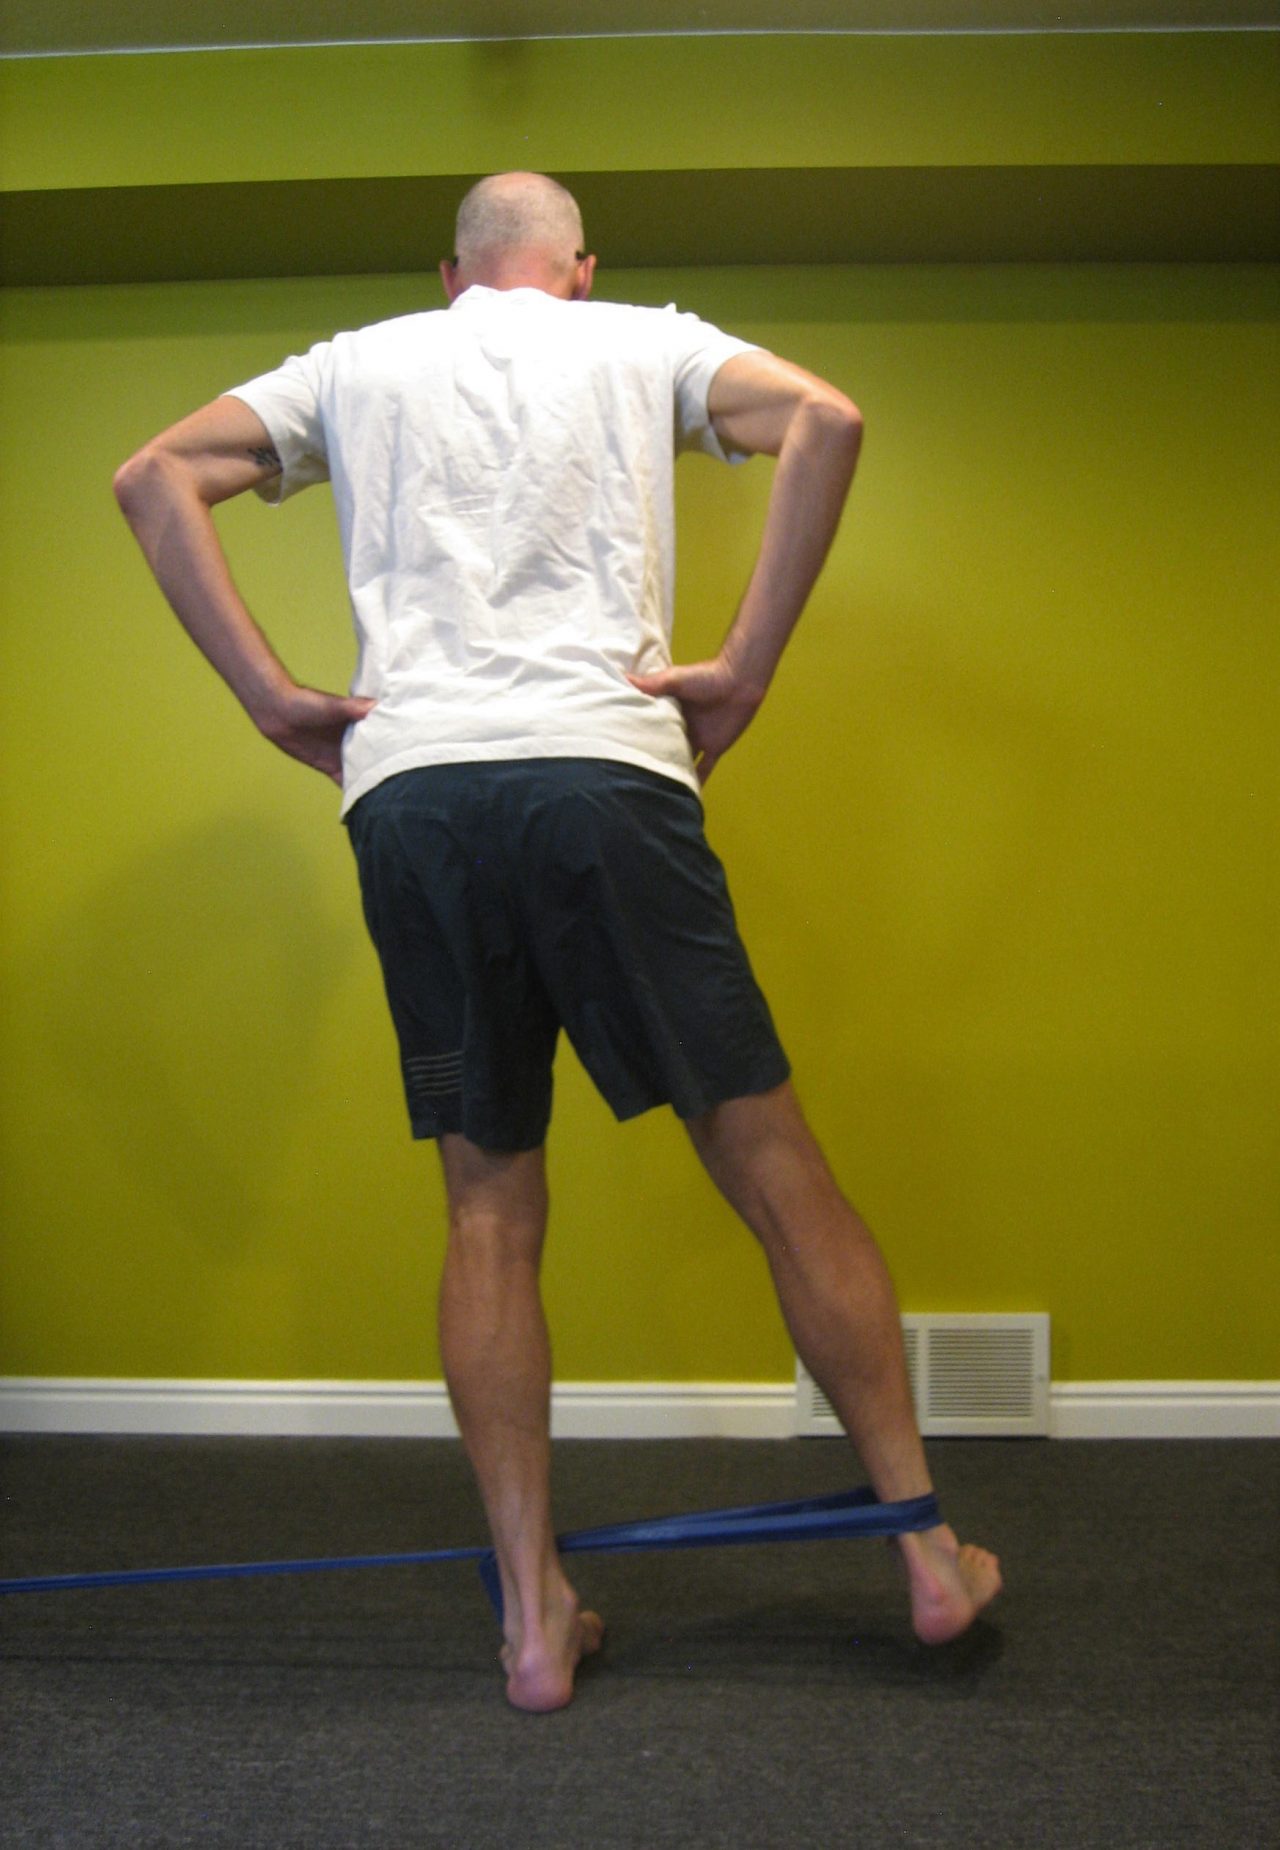
    Exercise #2: Single Leg Series with Band

    Loop a long exercise band around one ankle and face the anchor point of the band. Than, assume the basic shape standing on the unbanded leg. While maintaining the basic shape, pull straight back against the band to bring the foot in line with the standing leg, then follow through to kick the foot a few inches behind. Turn your body 90 degrees in either direction and repeat the process; extending the banded leg outward to work the gluteus medius muscles of the outer hip, or pulling the banded leg toward the standing leg to stimulate the inner adductor muscles. Ultimately, you will face four different directions but the force against the band is always in direct opposition to the anchor point of the band.

    If you can only source a “mini-band” loop, put it around both ankles and skip the pulling-in motion. A little resistance goes a long way with this exercise. Aim to perform 10-15 repetitions in each direction and do two laps on each leg.

    Exercise #3: Lateral Hops

    Form the basic shape on your right leg. Step onto the left leg, shifting your weight from the pelvis, and again form the basic shape. Progressively increase the distance between steps, turning it into more of a sideways hop than step. Keep the unloaded leg extended to the side as if skiing — do not let it flag behind the stance leg unless you are a speedskater.

    Keep it honest: make sure you are sticking the landing and holding your balance for a second or two on each leg before pushing off to the next side. This is meant to be a balance exercise, not plyometric strength work. The next progression is to hold a resistance band anchored from the side. I prefer to base this exercise on time (1-2 minutes) vs repetitions so there’s no question of whether that botched one was good enough to count.

    Notably absent from this article is the neurological component of balance. Many of my PT colleagues would absolutely berate me over this; however, I wanted to stick to the basic kinesiology and this article is long enough already. The brain receives massive amounts of information from vestibular, neural receptors in joints and soft tissue, and vision. In fractions of a second, it processes this information and directs muscles to act. If any link in that system is compromised, so too is your balance. If you think about the difference between skiing on a sunny, bluebird versus flat light or a storm, you can quickly appreciate how vision affects balance. There are certainly ways to challenge and train these systems, but that is beyond the scope of this article. However, an excellent way to progress any balance exercise is to do it with your eyes closed. 

  • Building a Better Skier Part 2: The Spine, When to Move it, and When to Keep it Still

    Building a Better Skier Part 2: The Spine, When to Move it, and When to Keep it Still

    Finland’s Krista Pärmäkoski racing during the 2021 Tour de Ski. (Photo: NordicFocus)

    This is Part 2 of a series delving into how biomechanics and movement patterns affect skiing technique. If you haven’t already, start with the introduction and Part 1, which introduces the concept of a neutral spine posture.

    There are many ways to conceptualize biomechanics, but they all need a starting place. If we think about ski technique, where do we want to start? On the glide leg? With the poles? At the hips? For this series, I have opted to start with the core and work outward. I could have started with the foot and moved upward; however, I see posture as an integral part of any movement. If the posture is compromised to begin with, then that deficit permeates the activity. 

    As was emphasized in Part 1, posture exists on a bandwidth of acceptability–everyone is a little different. But postures that fall outside of the bandwidth, especially when occurring within a dynamic activity like cross-country skiing, compounds load on the body. In the best case scenario, this increased load is inefficient and bleeds power. Worst case scenario, the additional load can exceed the body’s tolerance and lead to musculoskeletal injury.

    And yet the spine does move. Perhaps one of the best examples is the thoracic rotation that occurs with running. The shoulders do not stay pointed straight ahead. As the right leg and left arm swing forward (with the left foot on the ground) the shoulders are going to rotate to the right. This should be a product of rotation in the thoracic spine. If the thoracic spine has limited mobility, the motion will occur elsewhere, most often in the lumbar spine which has less motion available and will likely be less tolerant of this load. A case in point may be this recent study which found that the addition of thoracic mobility exercises decreased the incidence of low back pain in cross country skiers. 

    If you’re not already, sit with a neutral spine posture. Cross your arms with hands-on opposite shoulders. Rotate your body to the left and to the right. Make a mental note of how these movements felt. Now let your back flex forward in a slumping position. Try the same rotation to the left and right. I suspect they felt different. When the thoracic spine is flexed, its ability to rotate is decreased.

    Use it or lose it. Our bodies are use it or lose it machines. If we do not stretch a muscle to its full length, it will tend to shorten. If we do not move a joint to its end range of motion, it will tend to stiffen. As we get older, this becomes even more pronounced. If you are of Masters age, you should probably think of stretching and mobility exercises as more about maintaining what you have versus expecting to gain flexibility. The older we get, the less pliable our bodies become. But there’s a lot to be said for maintenance.

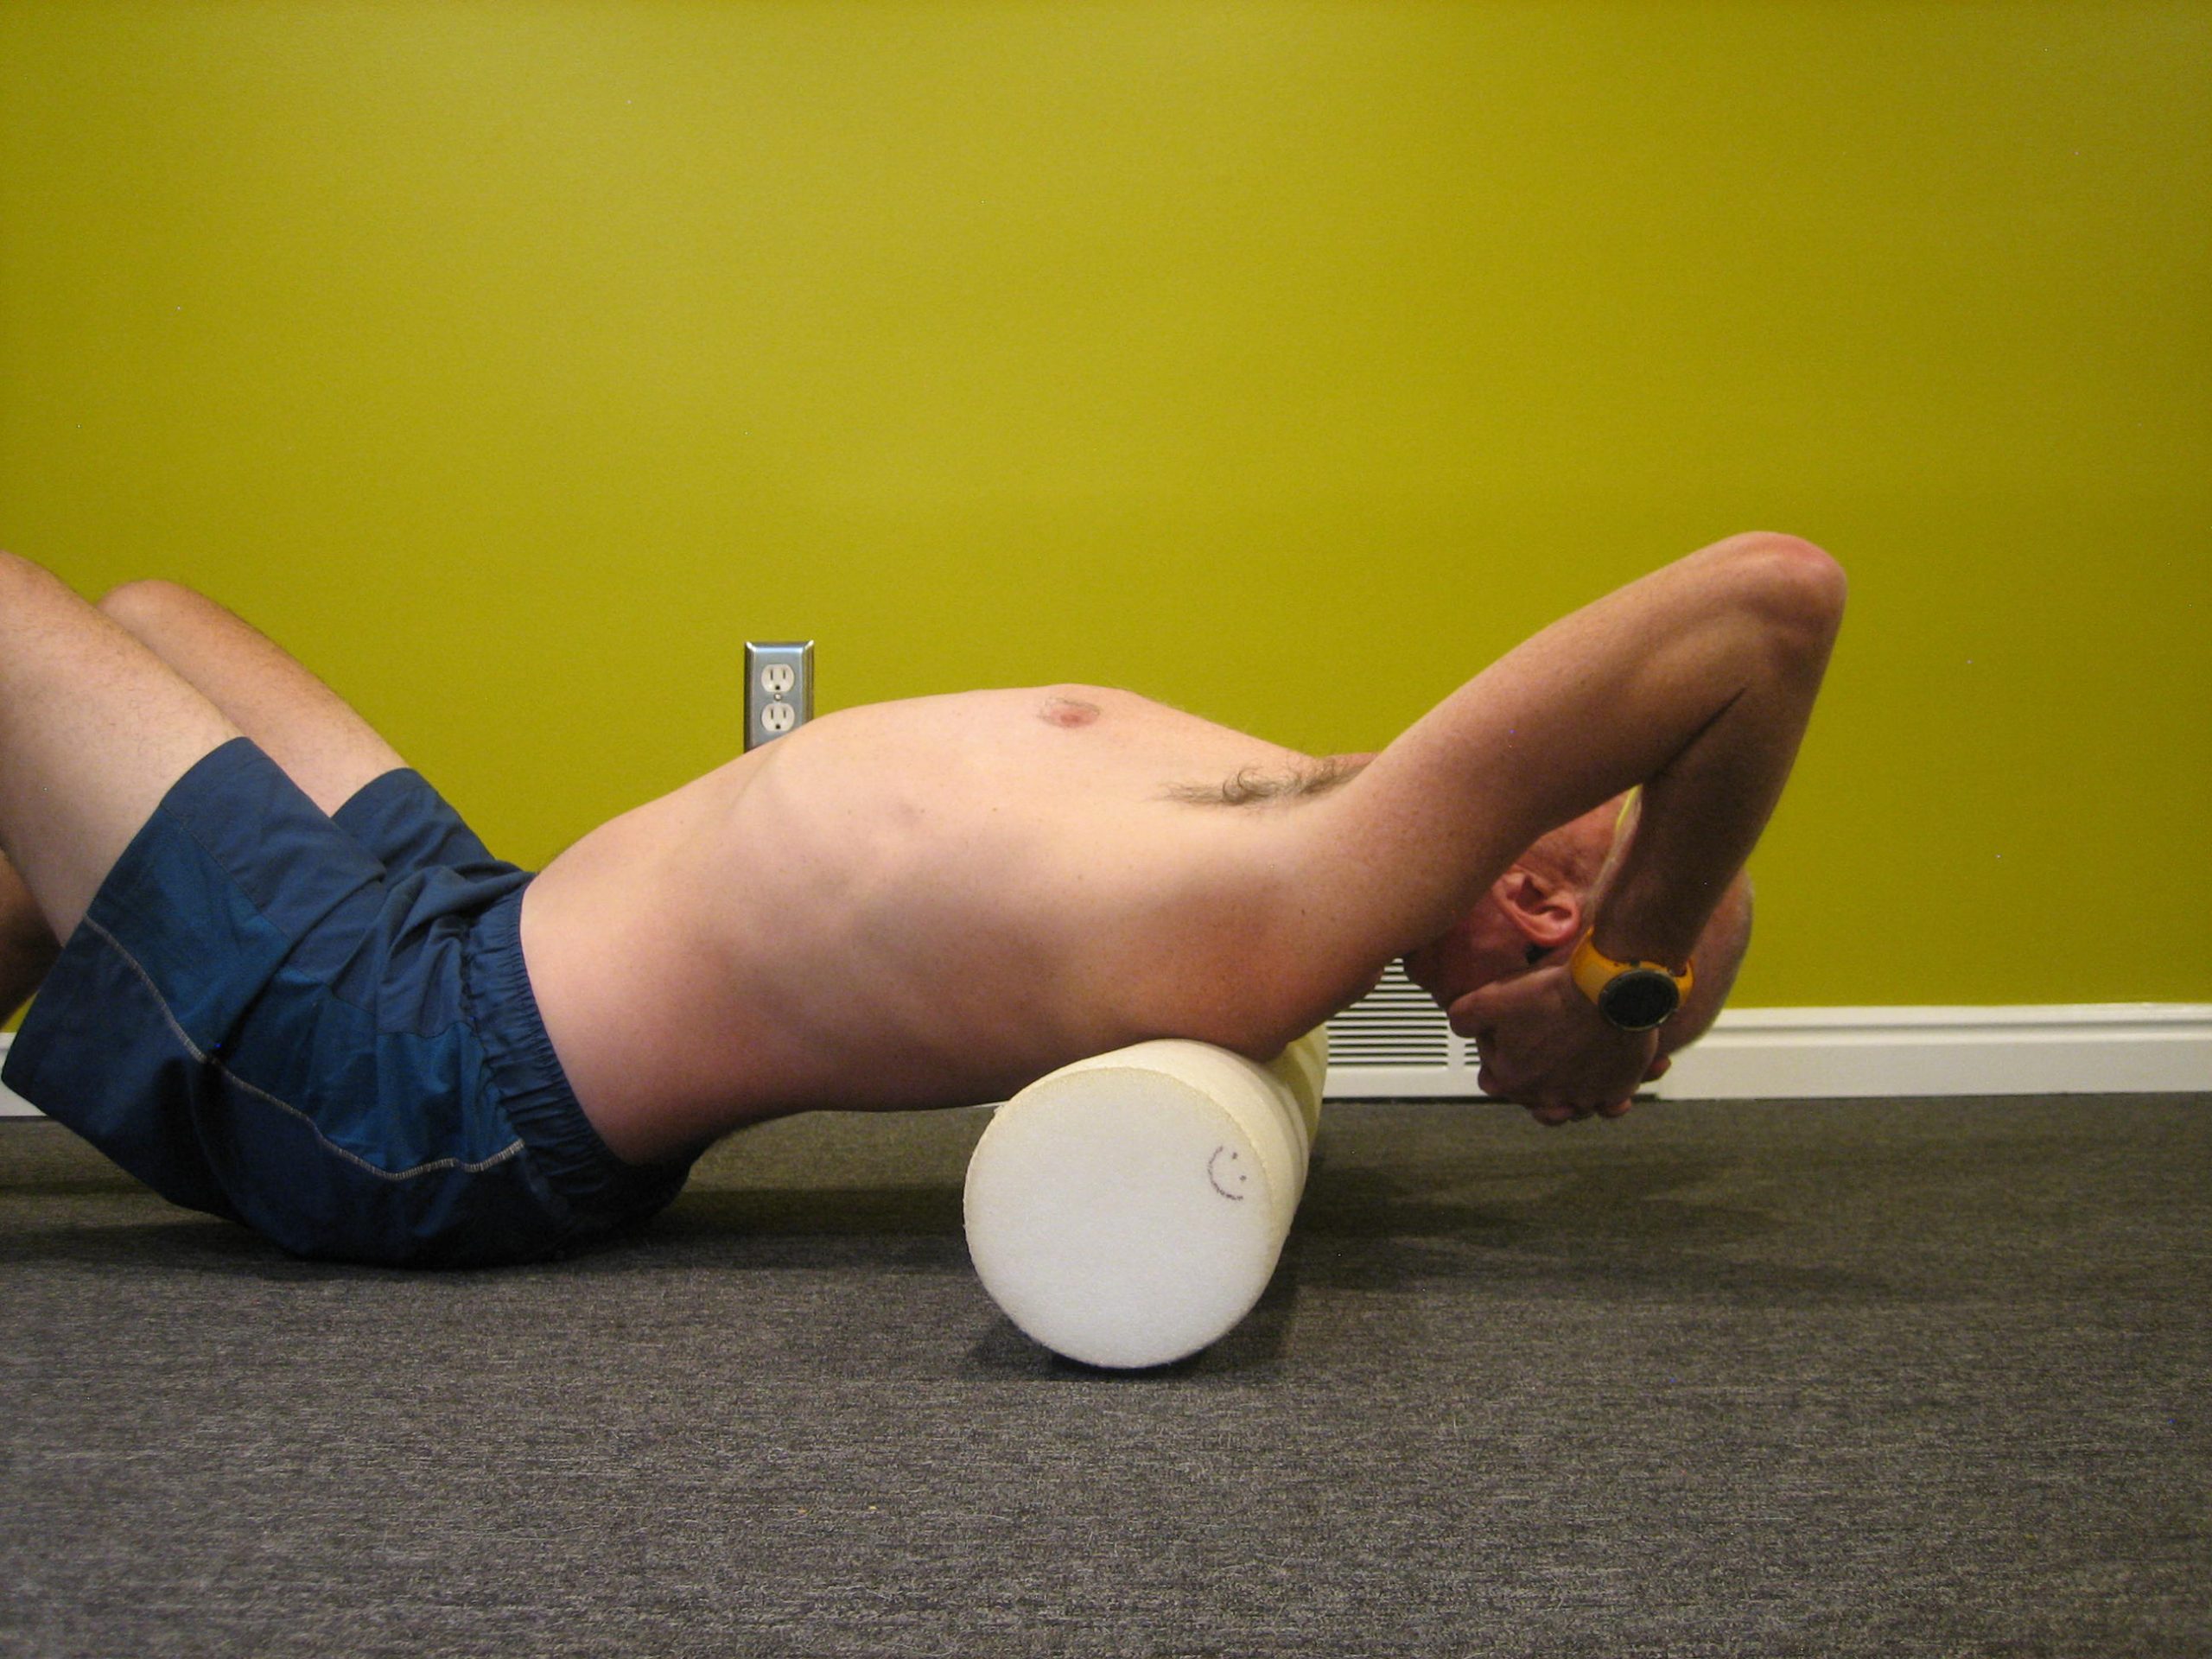
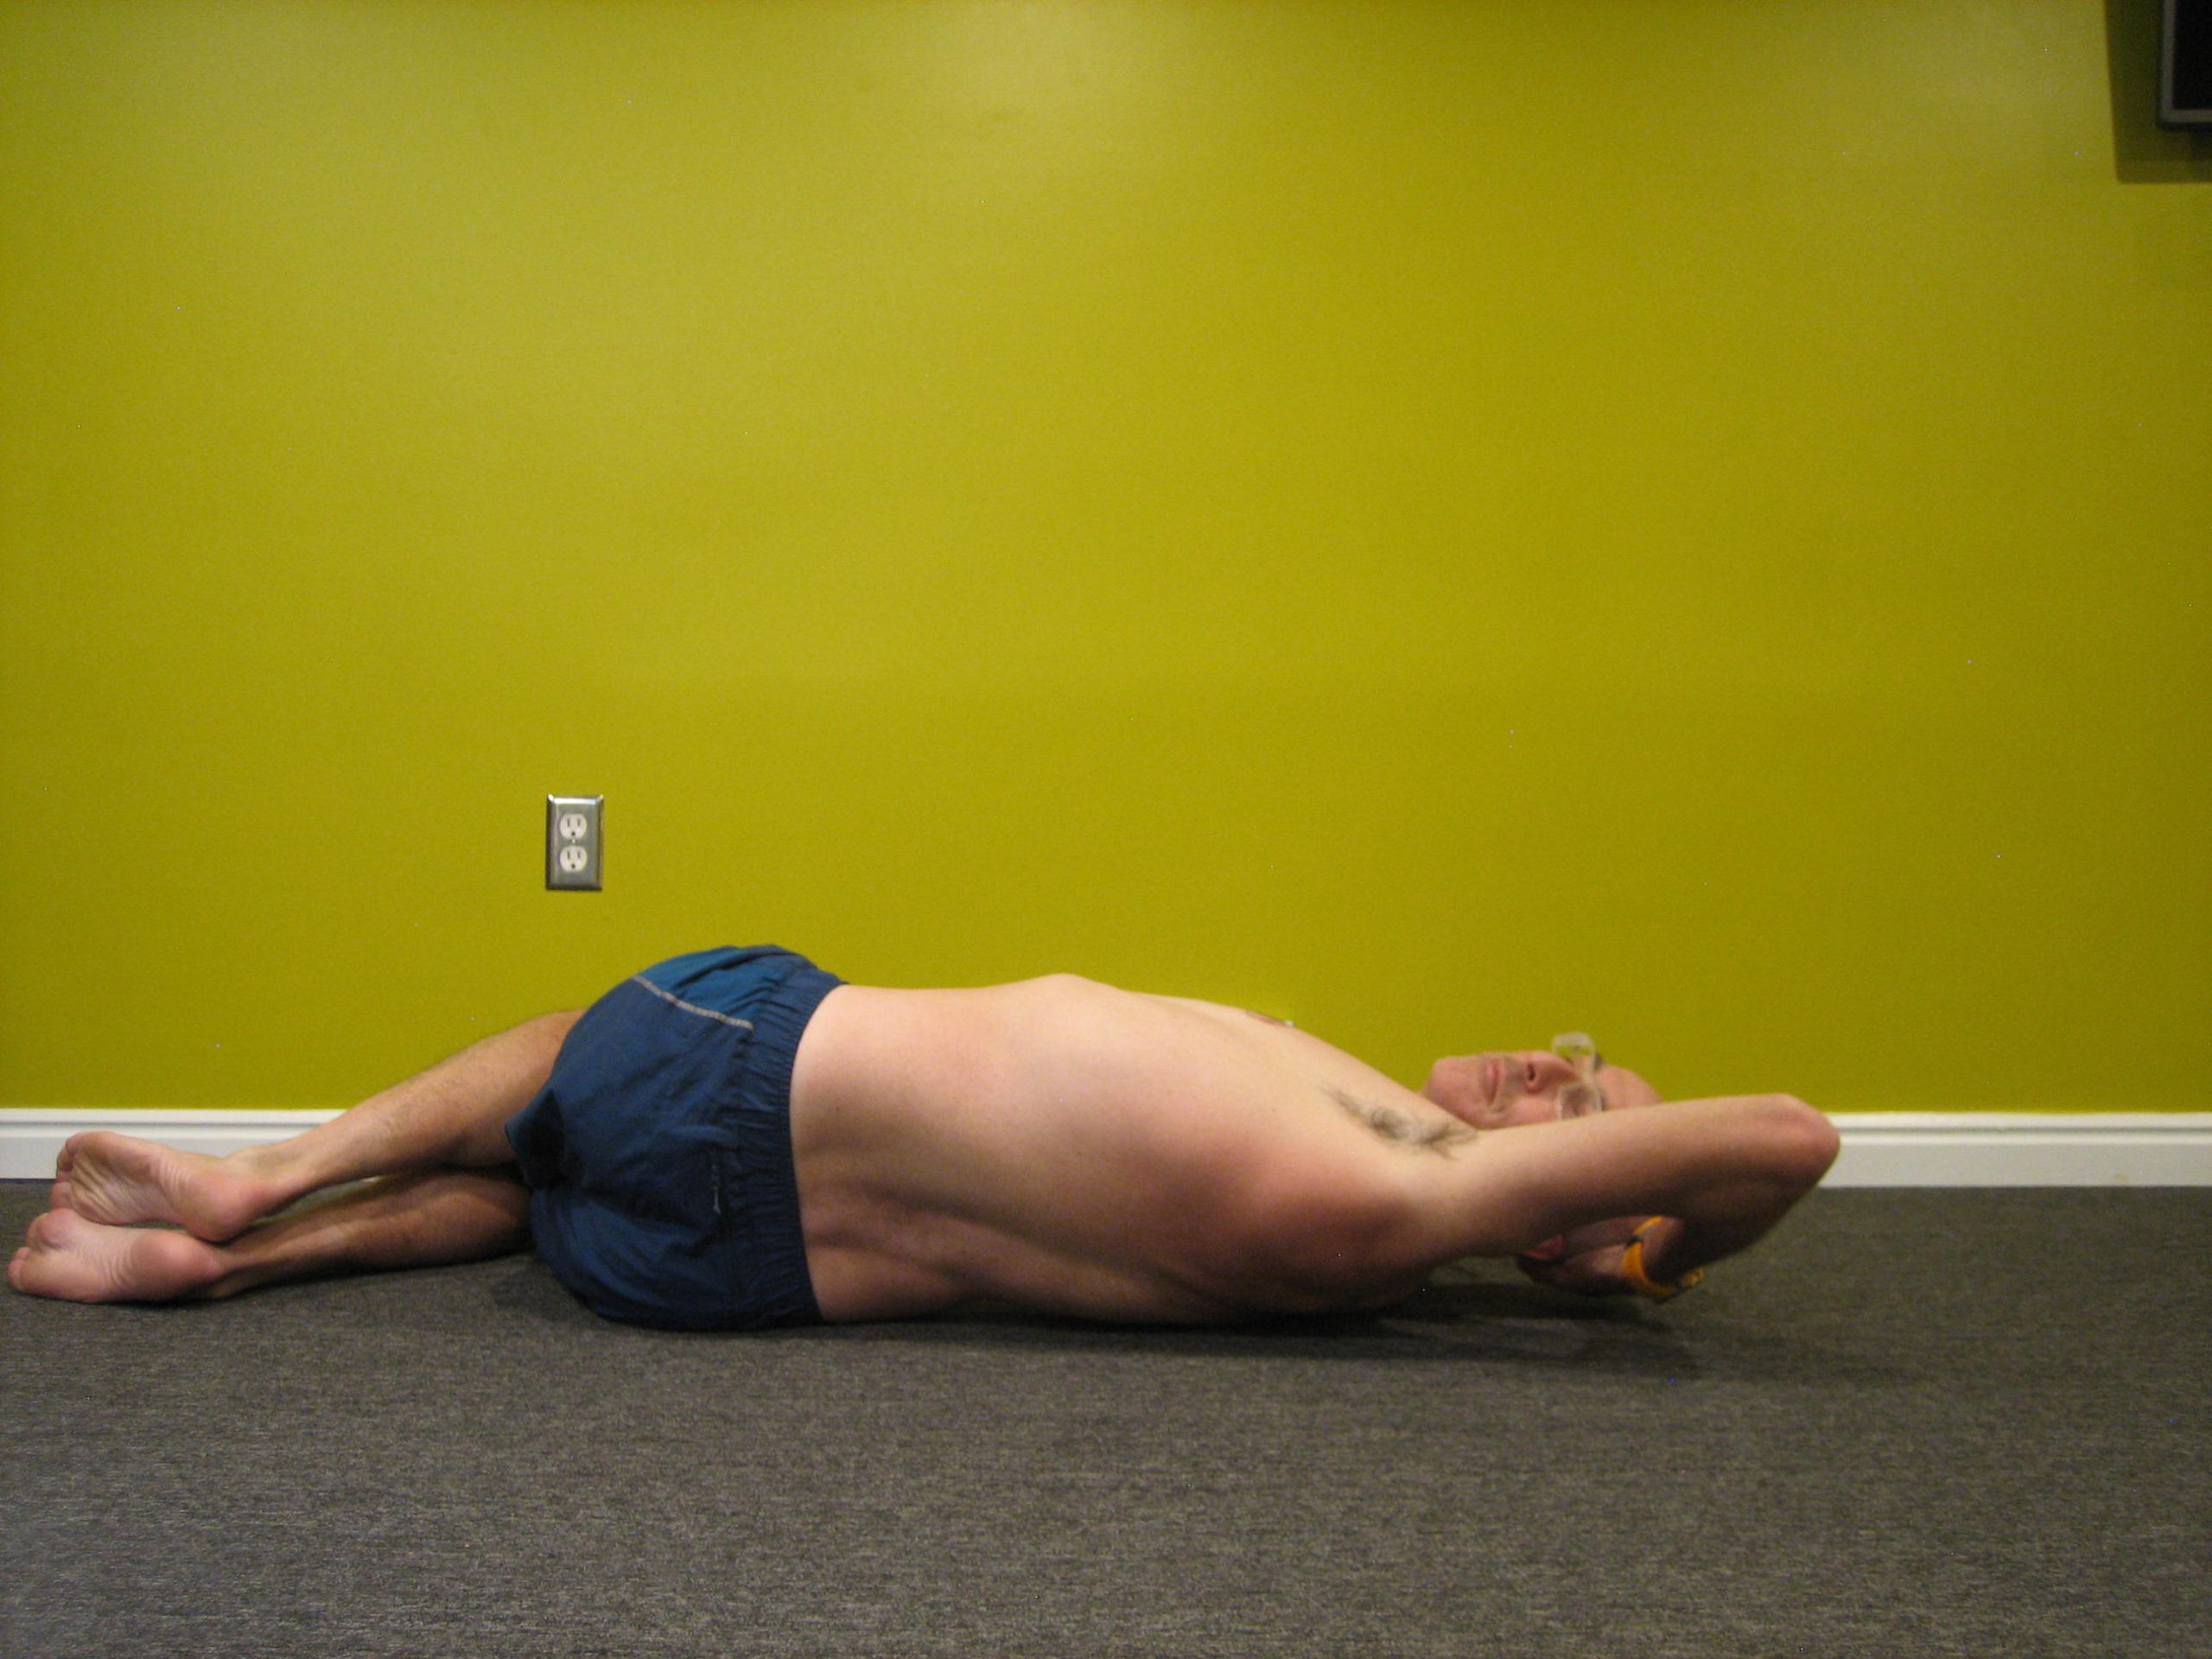
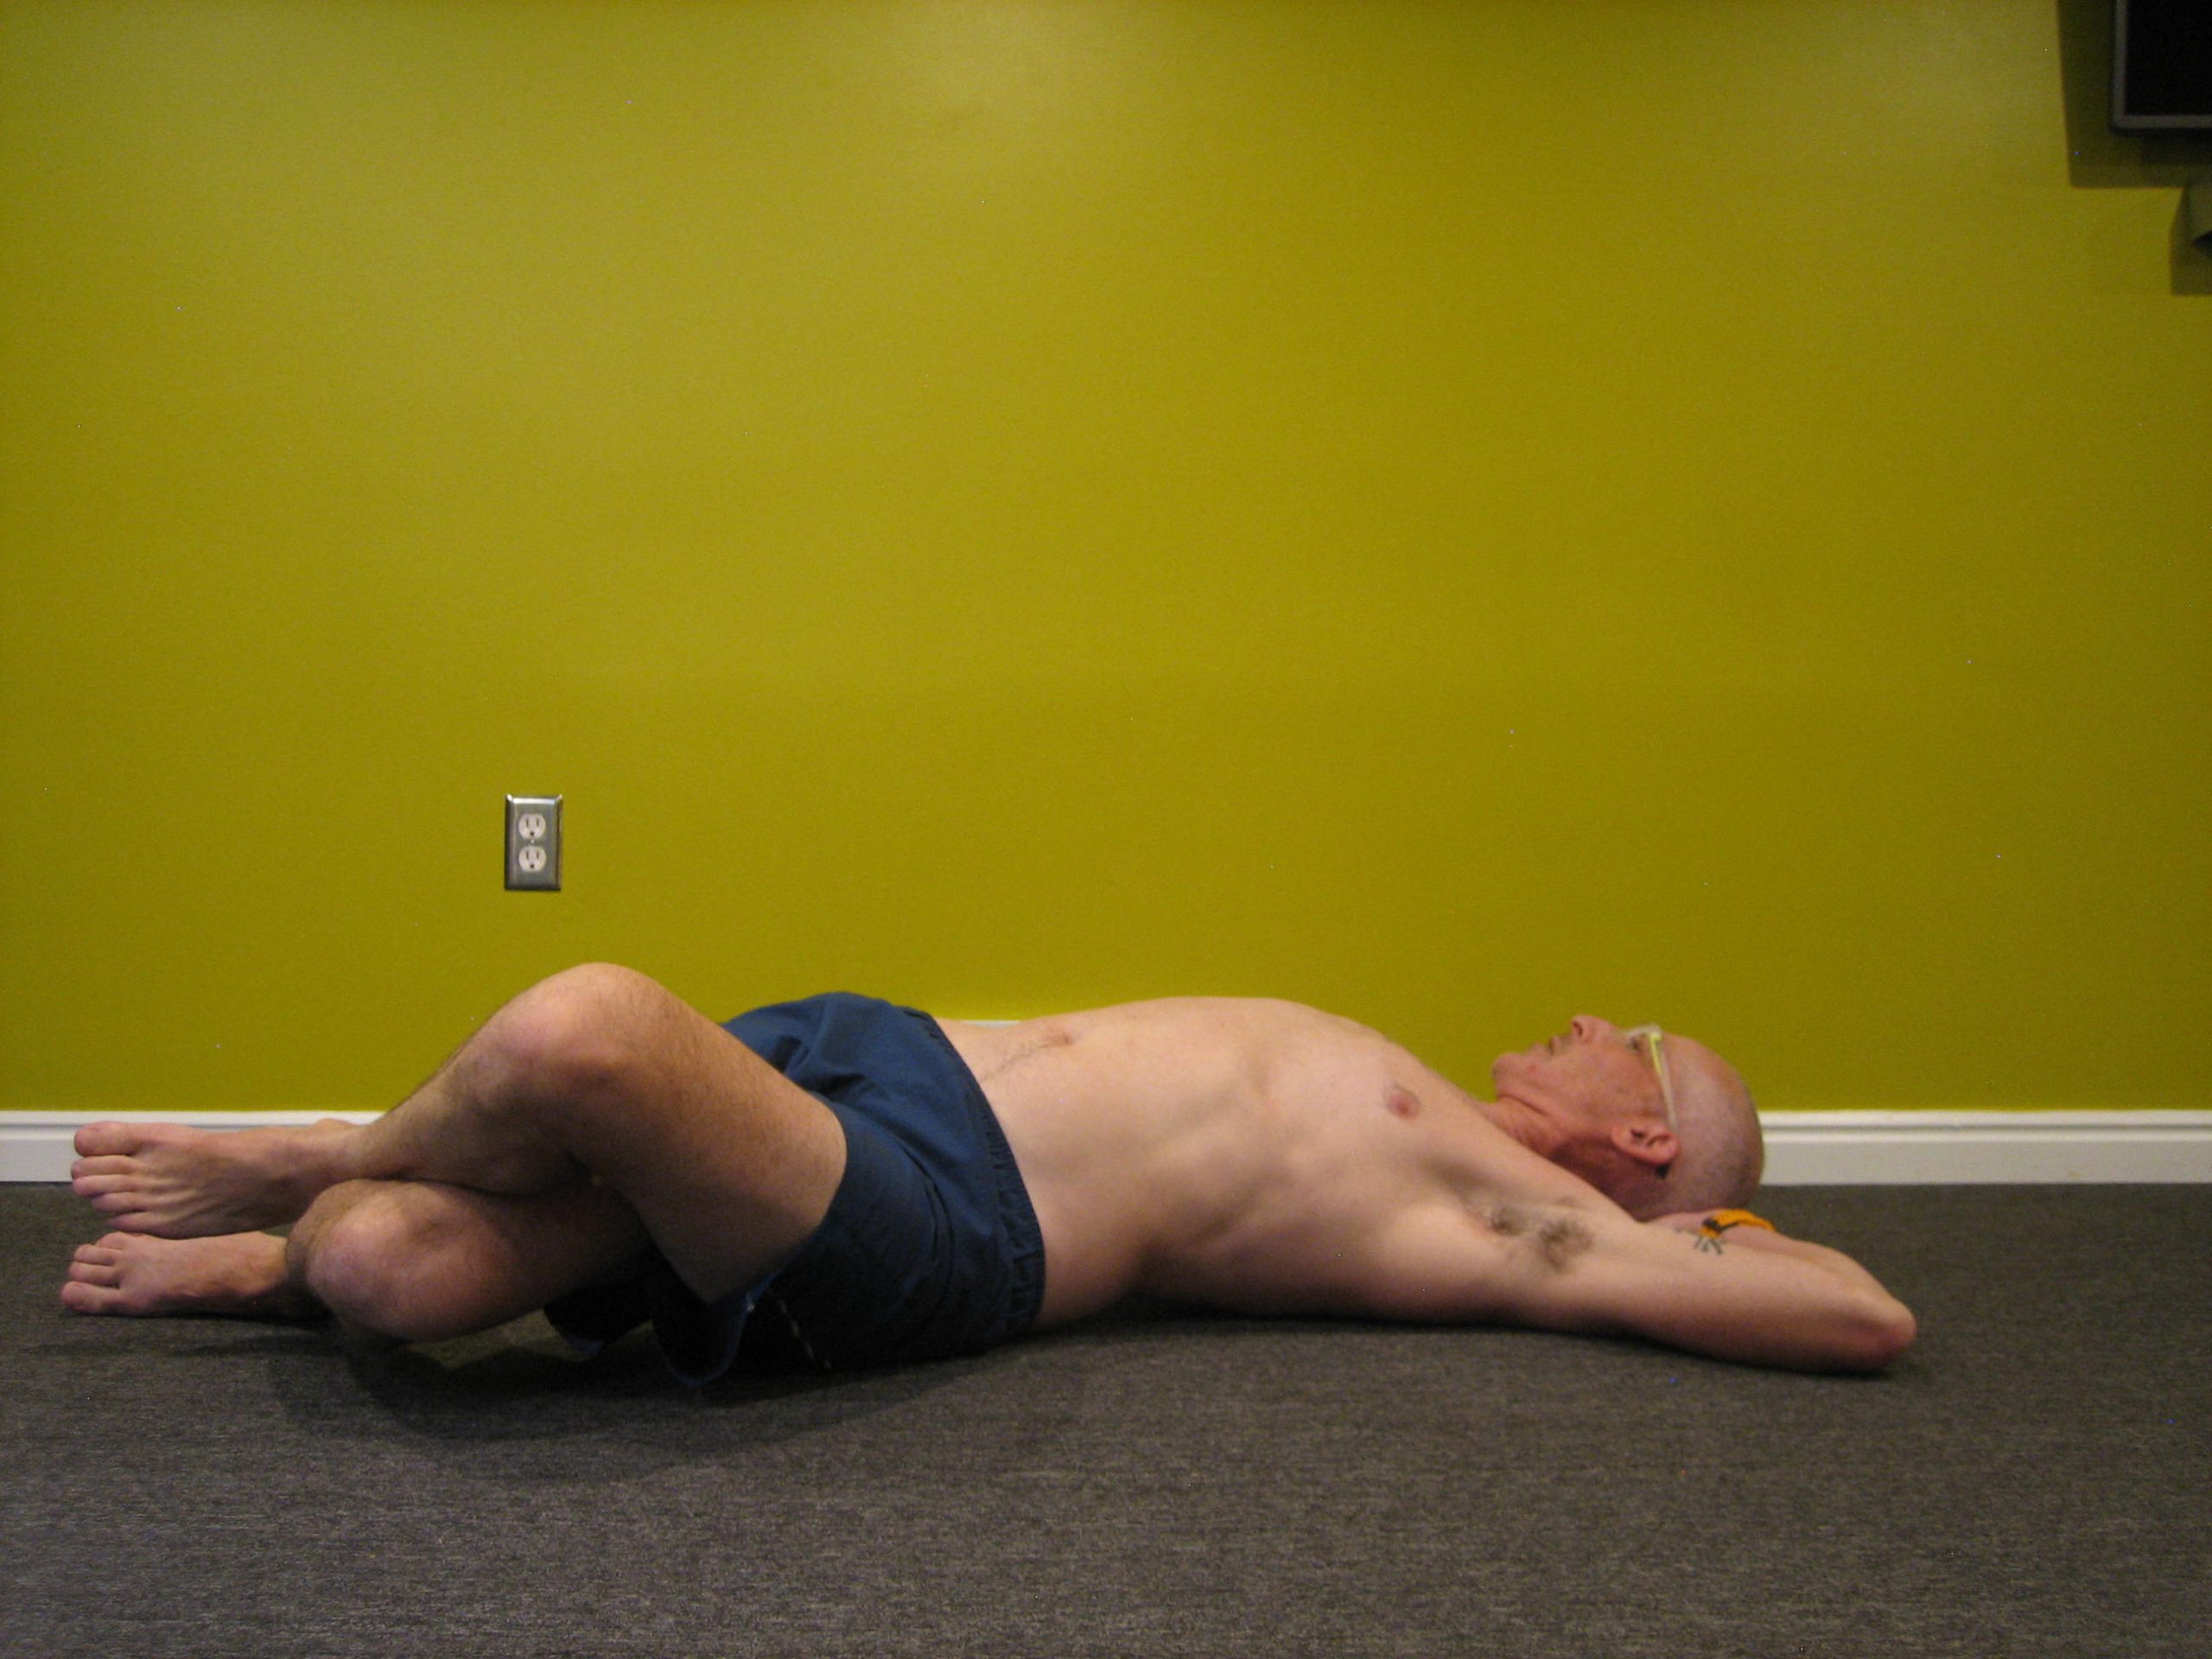
    Here are my three favorite thoracic mobility exercises – (aim to do these daily–1 or 2 minutes on the foam roll, 10x to each side with the rotation).


    Foam roll thoracic extension: lie on your back with a foam roll perpendicular to your spine. Support your head with your hands. Drop your shoulders towards the floor. Pause here for a few seconds then return to your starting/neutral position. Scoot on the floor so the foam roll moves up your spine. Repeat the extension motion dropping the shoulders towards the floor. Continue this process until you have worked the length of your thoracic spine. Avoid going into the lumbar spine as the fulcrum of the foam roll tends to be too sharp. On the upper end, once the foam roll is under the shoulder blades, it’ll be tough to get much motion. This exercise can also be done with an exercise ball.


    Book openings: Begin lying on your side with your knees bent and hands behind your head. Rotate your trunk like you are trying to get the top shoulder down to the floor. Pause here for a second or two and return to the starting position. This should be done on both sides.


    Lower Trunk Rotation: Lie on your back with both knees bent. Cross one leg over the other. Let the legs drop towards the floor to the side of the top leg. Pause here for a few seconds and return to the starting position. Do this on both sides.


    Stability could be defined as the opposite of mobility. If we are striving to maintain available mobility of the thoracic spine, perhaps it makes sense that we are striving to maintain stability at the lumbar spine. Anatomically, the body is well equipped to stabilize the lumbar spine. We have multiple layers of abdominal and back muscles that create a stable platform for the arms and legs. While the lumbar spine is lacking in rotary motion, it has quite a large range of available motion for bending forward, backward, and to the sides. Depending on the activity, this available motion needs to be either locked out like keeping a rigid trunk with skating V1 or well-controlled while bending over to put on your socks.

    If we are working under the assumption that neutral spine is the ideal, then it makes sense that our core strengthening or stability work should be done in neutral spine. Traditional sit-ups that involve considerable lumbar flexion are great for building those six-pack abs that look good on Instagram, but the exercise itself only contributes to a greater tendency to over-flex the spine during activity. “Flatten your back into the floor” is a frequent cue with core exercises. While this cue, and the associated posterior pelvic tilt, is effective at recruiting abdominal muscles, it also has the effect of training the body to rely on a flexed position for muscle activation. 

    Lie down on the floor with your knees bent and feet on the floor. Your lumbar spine will now be in its neutral position. If you slide a hand under your low back, your hand will likely have a bit of wiggle room between the floor and your back. This is the natural lordotic curve, and we want to maintain this during exercise (and activity). It’s easy to feel the increase in pressure on your hand when you tighten your abs and flatten your back. Conversely, if you tilt your pelvis in the other direction, arching your low back, you will have much more wiggle room. This excessive lordosis tends to be less stable since the abdominal muscles are in a lengthened, disadvantaged position for dynamic stability with much of the burden placed on the static stability of the joints.

    If you had a hard time controlling movement or differentiating between the flat, neutral, and arched positions, the following exercises can be helpful to train your awareness and coordination.


    ***

    Lumbar spine proprioception


    Pelvic tilts: Lie on your back with both knees bent. Start by trying to tilt your pelvis towards you. Think of trying to flatten your low back into the floor or of shortening the distance between your ribcage and pelvis. Now tilt the pelvis in the other direction like arching your back away from the floor. These motions should be isolated at the pelvis and lumbar spine–your legs shouldn’t feel like they are doing any work.


    Cat/Cow: This involves the same pelvic tilt motions but without the feedback of the floor. Again, the idea is to isolate the motion at the lumbar spine not by arching the upper back.


    A quick Google search for “core exercise videos” brings up over 66 million results. Clearly, we are not lacking in the number of possible exercises. But what about quality? In the treatment of chronic low back pain, there is no best exercise. From the perspectives of performance enhancement and injury prevention, while there is an argument for simply being strong, there is perhaps a better argument for incorporating exercises that help the body meet the specific demands of the activity or sport. If good ski technique demands maintenance of a relatively neutral spine, then exercises should be performed in a neutral spine. If the sport includes load through the upper extremities, like poling with skiing or weighting the handlebars with cycling, then core exercises that include weight-bearing through the arms should be included. Skate skiing places a large rotational force through the core; thus we ought to have exercises that train the body to counter-rotation. Conversely, running and classic diagonal stride involves thoracic rotation so it makes sense to train the body to perform lumbar stability and thoracic rotation simultaneously. 

    Here are my Top 3, best-bang-for-the-buck-exercises in each category. Remember, the goal is to maintain neutral spine. If you are unable to control the motion, then the exercise represents too much resistance/load and needs to be regressed. These are quality-intensive exercises. A reasonable program would include 2 or 3 sets of 5 to 10 repetitions (depending on fatigue) of each exercise. Doing the routine twice a week should be adequate.


    ***

    Stability exercises: these will challenge your ability to maintain a neutral lumbar spine


    Femur arc progression: Begin by lying on your back with knees and hips bent at 90°. Your back will be in its neutral position, which you are striving to maintain (there will be a little wiggle room between your low back and the floor–the amount will vary by the individual but the goal is the same). The basic femur arc is performed by lowering one foot to the floor while keeping the knee bent at 90°. The motion is isolated at the hip. There should be no motion in the low back–it will have a tendency to want to arch away from the floor as the leg goes down. Return to the starting position and repeat on the other side. Continue alternating legs. Progressions include straightening the knee as the leg lowers, lowering both legs together with bent knees, lowering both legs together with straight knees. 


    Mountain Climbers: These can be done with frisbees on carpet, socks on hardwood or tile, or with a TRX. The goal is to move alternating legs back and forth with no motion in the low back. There will be a tendency to flex as you pull a leg underneath you. This should be controlled by the core but also recognize that if you are trying to pull the leg through too far, you will run out of hip range of motion and be forced to flex the spine.


    Roll Out: Start on hands and knees with your hands on frisbees or a laminated placemat on the carpet, a towel on hardwood, TRX, or an old-school ab roller. The roll/slide-out motion will be a combination of shoulders and hips, but the spine stays in its neutral position.


    ***

    Anti-rotation exercises — as the title would imply, the resistance will try to twist your spine and your goal is to fight it


    Plank with Shoulder Tap: From a straight arm plank with shoulders, hips, and knees in line, tap a hand to the opposite shoulder. There will be a bit of a weight shift that needs to happen to maintain stability, but this should be in the form of a side-to-side movement of the pelvis, not a rotation. This can be made easier by doing from your knees. Make it harder by substituting the shoulder tap with a dumbbell row. 


    Paloff Press: The Paloff Press is a great lesson in the physics of levers. Stand using both hands to hold a resistance band or handle from the cable column weight machine. Push your hands straight out in front of you. As your arms straighten, the length of the lever increases and the resistance will exert more rotational force. Fight the twist. For more of a challenge, other than just increasing the resistance, stand with your feet together or in a lunge (with the band coming from the opposite side of the front leg).


    Lunge with unilateral shoulder extension: Go into a static lunge with a resistance band in the opposite hand of the lead leg. Keeping the elbow straight, pull on the band until your hand is just past your hip. This can also be done with a cable column weight machine.


    ***

    Combination lumbar stability with thoracic rotation: simply put, the lumbar spine stays still while the thoracic spine rotates 


    Seated Unilateral Row: This is a twist (sorry, bad pun) on a standard one-arm row. Sit on an exercise ball or chair facing the resistance band’s anchor. As you pull on the band, bend your elbow so your hand aims for the side of your ribcage, and rotate your chest and shoulders towards the band. Your butt should stay firmly planted and not rotate.


    Lunge Rotation with Band: Stand with the resistance band coming from one side. Go into a lunge with the opposite foot forward (band from the right = left foot forward). Keep your hips pointed forward while your upper body rotates against the resistance. 


    Seated Rotation (aka Russian Twist): This exercise gets a bad reputation because it’s very easy to do incorrectly, potentially placing a lot of load on the lumbar spine. It is often done in a V-sit position (like the photo but with the feet off of the floor), which is very difficult to maintain without collapsing into lumbar flexion. Add the potential to rotate through the lumbar spine and the combined motions create high loads. But we’re going to keep the lumbar spine neutral and isolate the rotation to the thoracic spine. The key points are attaining and maintaining a neutral spine while sitting with your knees bent and feet on the floor. Think about the rotation coming from the shoulders. Your belly button should stay pointed straight ahead. You can start without weight and progress to a medicine ball, dumbbell, or resistance band coming from the side. 

    Notably absent in this list are exercises that target the glutes. As the primary stabilizers of the hip joint, the gluteal muscles should not be ignored in any “core” routine. However, for the sake of organizing this series, the glutes will be addressed in Part 3 on single-limb stability. If you want a head start, this Faster Skier article includes some excellent exercises. 


  • Building a Better Skier Part 1: Posture

    Building a Better Skier Part 1: Posture

    Posture matters. Norway’s Therese Johaug racing last season in Lahti, Finland. (Photo: NordicFocus)

    Building a Better Skier is a multi-part series born from the inquisitive mind of a physical therapist and late-blooming Nordic skier. (You can find the intro to the series here.) The objective is to explore how biomechanics and movement patterns affect skiing technique, and more importantly how you can apply these concepts to improve your skiing. To cover this topic thoroughly would likely require a hefty book, so apologies in advance if these articles lack depth or specificity. Please feel free to email the author with any questions: ned.dowling@hsc.utah.edu.


    Posture is loosely defined as our body’s position or the way we hold ourselves. We tend to think of posture only in a static form like sitting or standing. But posture can be observed with dynamic activities like running, cycling, or skiing. Truly, we can talk about posture with anything the human body encounters. 

    The primary influencers of posture are mobility and awareness. (It could be argued that strength plays a role in posture, and that is true for many sedentary people, but the readers of FasterSkier are far from sedentary.) 

    The mobility or range of motion that is readily available through joints and soft tissue (muscle, tendon, ligament, and fascia) will affect our posture simply because we will always default to moving through the path of least resistance. If a joint is stiff, we will find a way to move around it. If a muscle is tight, it changes the position and efficiency of its associated joint. But also, if the ligaments around a joint have become loose like with recurrent ankle sprains, the muscles and associated tendons will have to work harder to maintain stability. Like with skiing technique, and posture in general, mobility occurs along a bandwidth. There is no single optimal measure, but there is a range that if exceeded on either end will lead to inefficiency. The old saying that everything in the body is connected is not an understatement, but it is a bit of an oversimplification. That everything in the body has the potential to affect everything else in the body might be more appropriate. 

    The awareness of our body’s position in space is called proprioception. This is a broad concept that simply relates to the incoming signals the brain receives from the body so it knows how to move the body—how far, how fast, how powerfully—across multiple joints, muscles, and tendons. The brain receives this information via nerve receptors in our muscles, tendons, joints, and arguably even skin and fascia. It is what allows you to close your eyes and touch your nose without poking out your eye. Also without looking, you know that as you read this your left elbow is not fully straight and could tell us the angle of the joint with pretty good accuracy. 

    So if we put the two concepts of mobility and awareness together, the former will dictate what shapes the body is capable of making and the latter will determine how accurately those shapes are made. If you are trying to make a hypothetical circle but a joint is restricted, you’ve only made an oval. If your mobility is good, but you are lacking in awareness, then you’ll be making squares or pentagons because you can’t smooth out the motion required for a circle.

    While I’ve just made the case that posture is a product of the whole body, it is commonly thought of as related to the spine. As the foundation of our movements and literally the center of the body, the spine is an ideal place to start. 

    The human spine itself consists of 24 vertebrae with a skull on top and ending with the sacrum and coccyx. That stack of bones is held together by countless ligaments. Between each vertebra is a disc that acts as a spacer, a shock absorber, and as a pivot point for motion. The vertebrae articulate with each other through small sliding joints located bilaterally. The orientation of these joints, which changes with the region of the spine, will determine the available motion and optimal movement pattern. Running through the center of the spine is the very precious spinal cord. Simplistically, the spinal cord is a superhighway with on and off-ramps between every vertebra. It carries information both to and from the brain. Movement and dynamic stability are provided by numerous muscles, which we will get to in more detail shortly. 

    Anatomy of the spine or spinal curves infographic illustration. (Photo: www.freepik.com)

    Basic anatomy having been covered, perhaps the more important implication for posture is the architecture of the spine. Contrary to the instructions to “sit up straight,” the spine, when looked at from the side, is not straight. (It’s not always straight from the front either, but the functional implications of scoliosis are beyond the scope of this article.) The spine, in fact, curves in a bit of an S from the head down in what is referred to as neutral spine. The cervical portion, comprising the 1st seven vertebrae, makes a concave curve. The next twelve vertebrae in the thoracic region have a convex curve. The last five in the lumbar are again concave. 

    The appropriate amount of curve in each region is also on a bandwidth; however, the curve in one region can have profound effects on another such that they cannot be looked at in isolation. Stop reading for a moment and “sit up straight.” Now tilt your head and look up at the ceiling. Make a note of what that felt like or what you saw on the ceiling. Next slump down like a texting teenager. Look up at the ceiling again. Any difference? You probably noticed that it was much harder to look up from the slumpy position. This is because the increased flexion or convex curve of the thoracic spine changes the starting point for the extension (looking up) motion that occurs in the cervical spine. Think about how this might affect your neck when sitting on a bike. You can do the same experiment with your arms. Sit up tall and raise your arms overhead. Then repeat in a slumped position. Much easier when done in a neutral spine. 

    A functional application here is how easily (and quickly) you can get your poles up to begin the next stride.

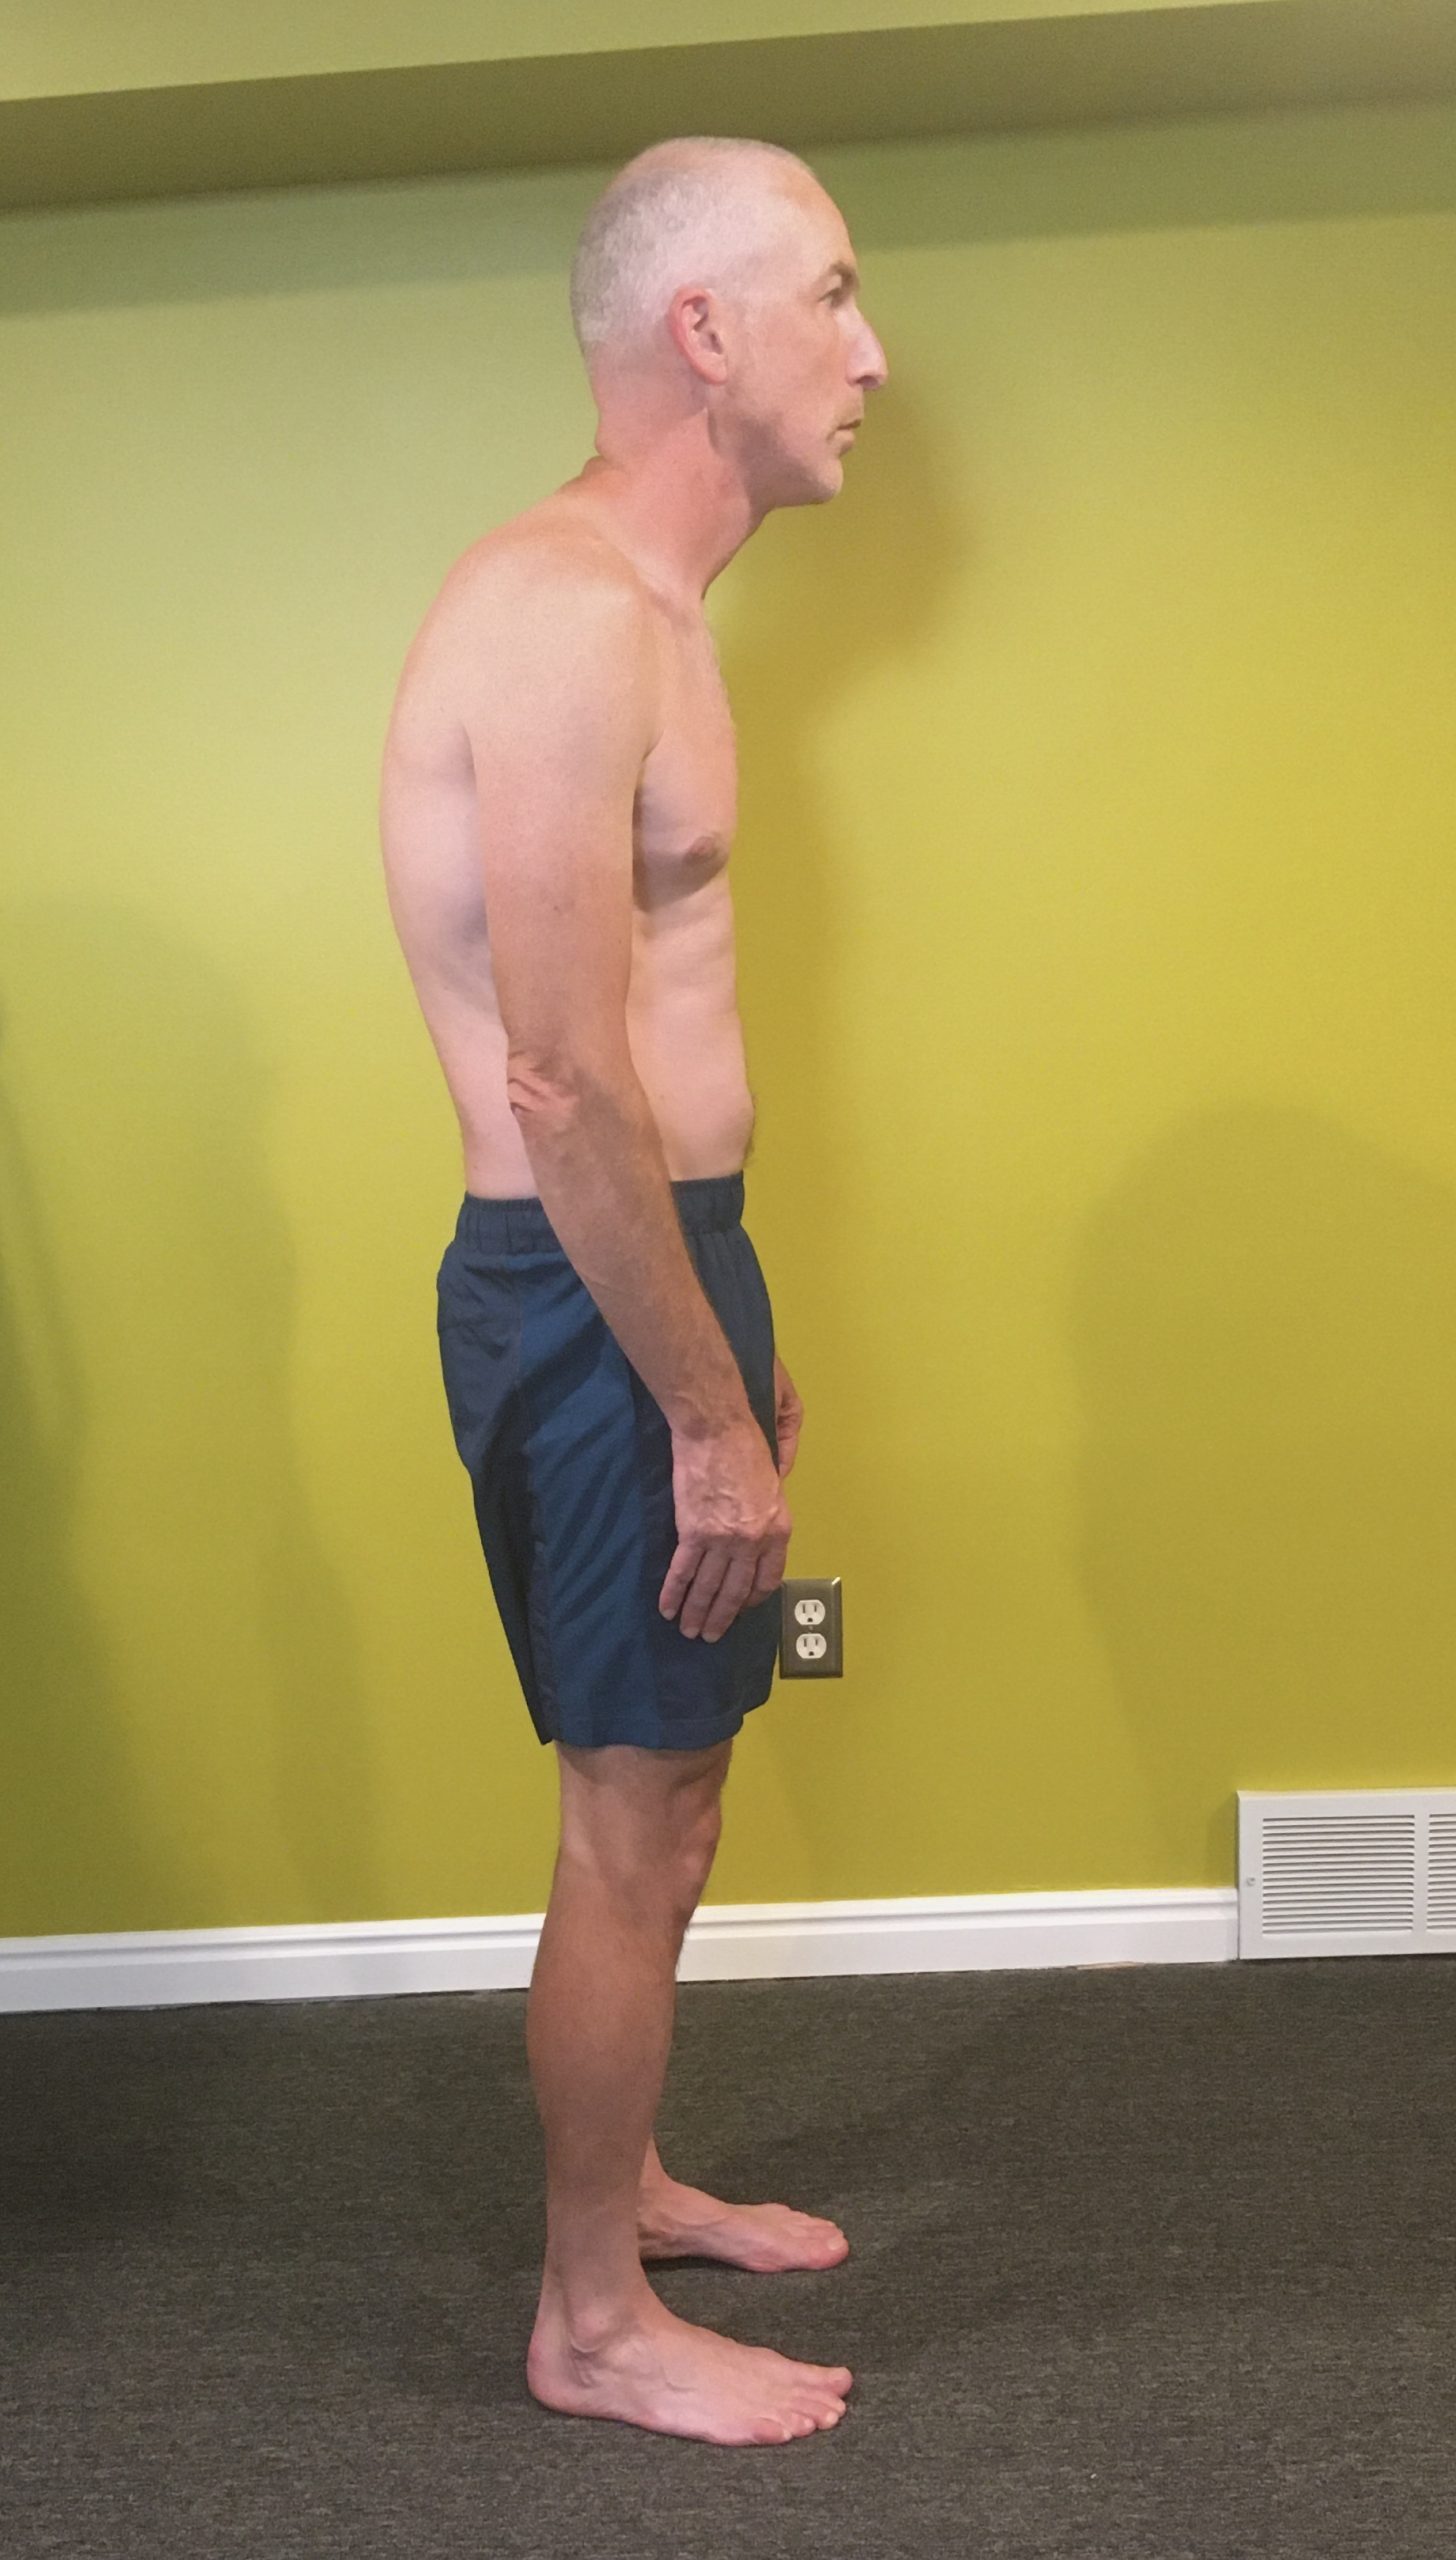
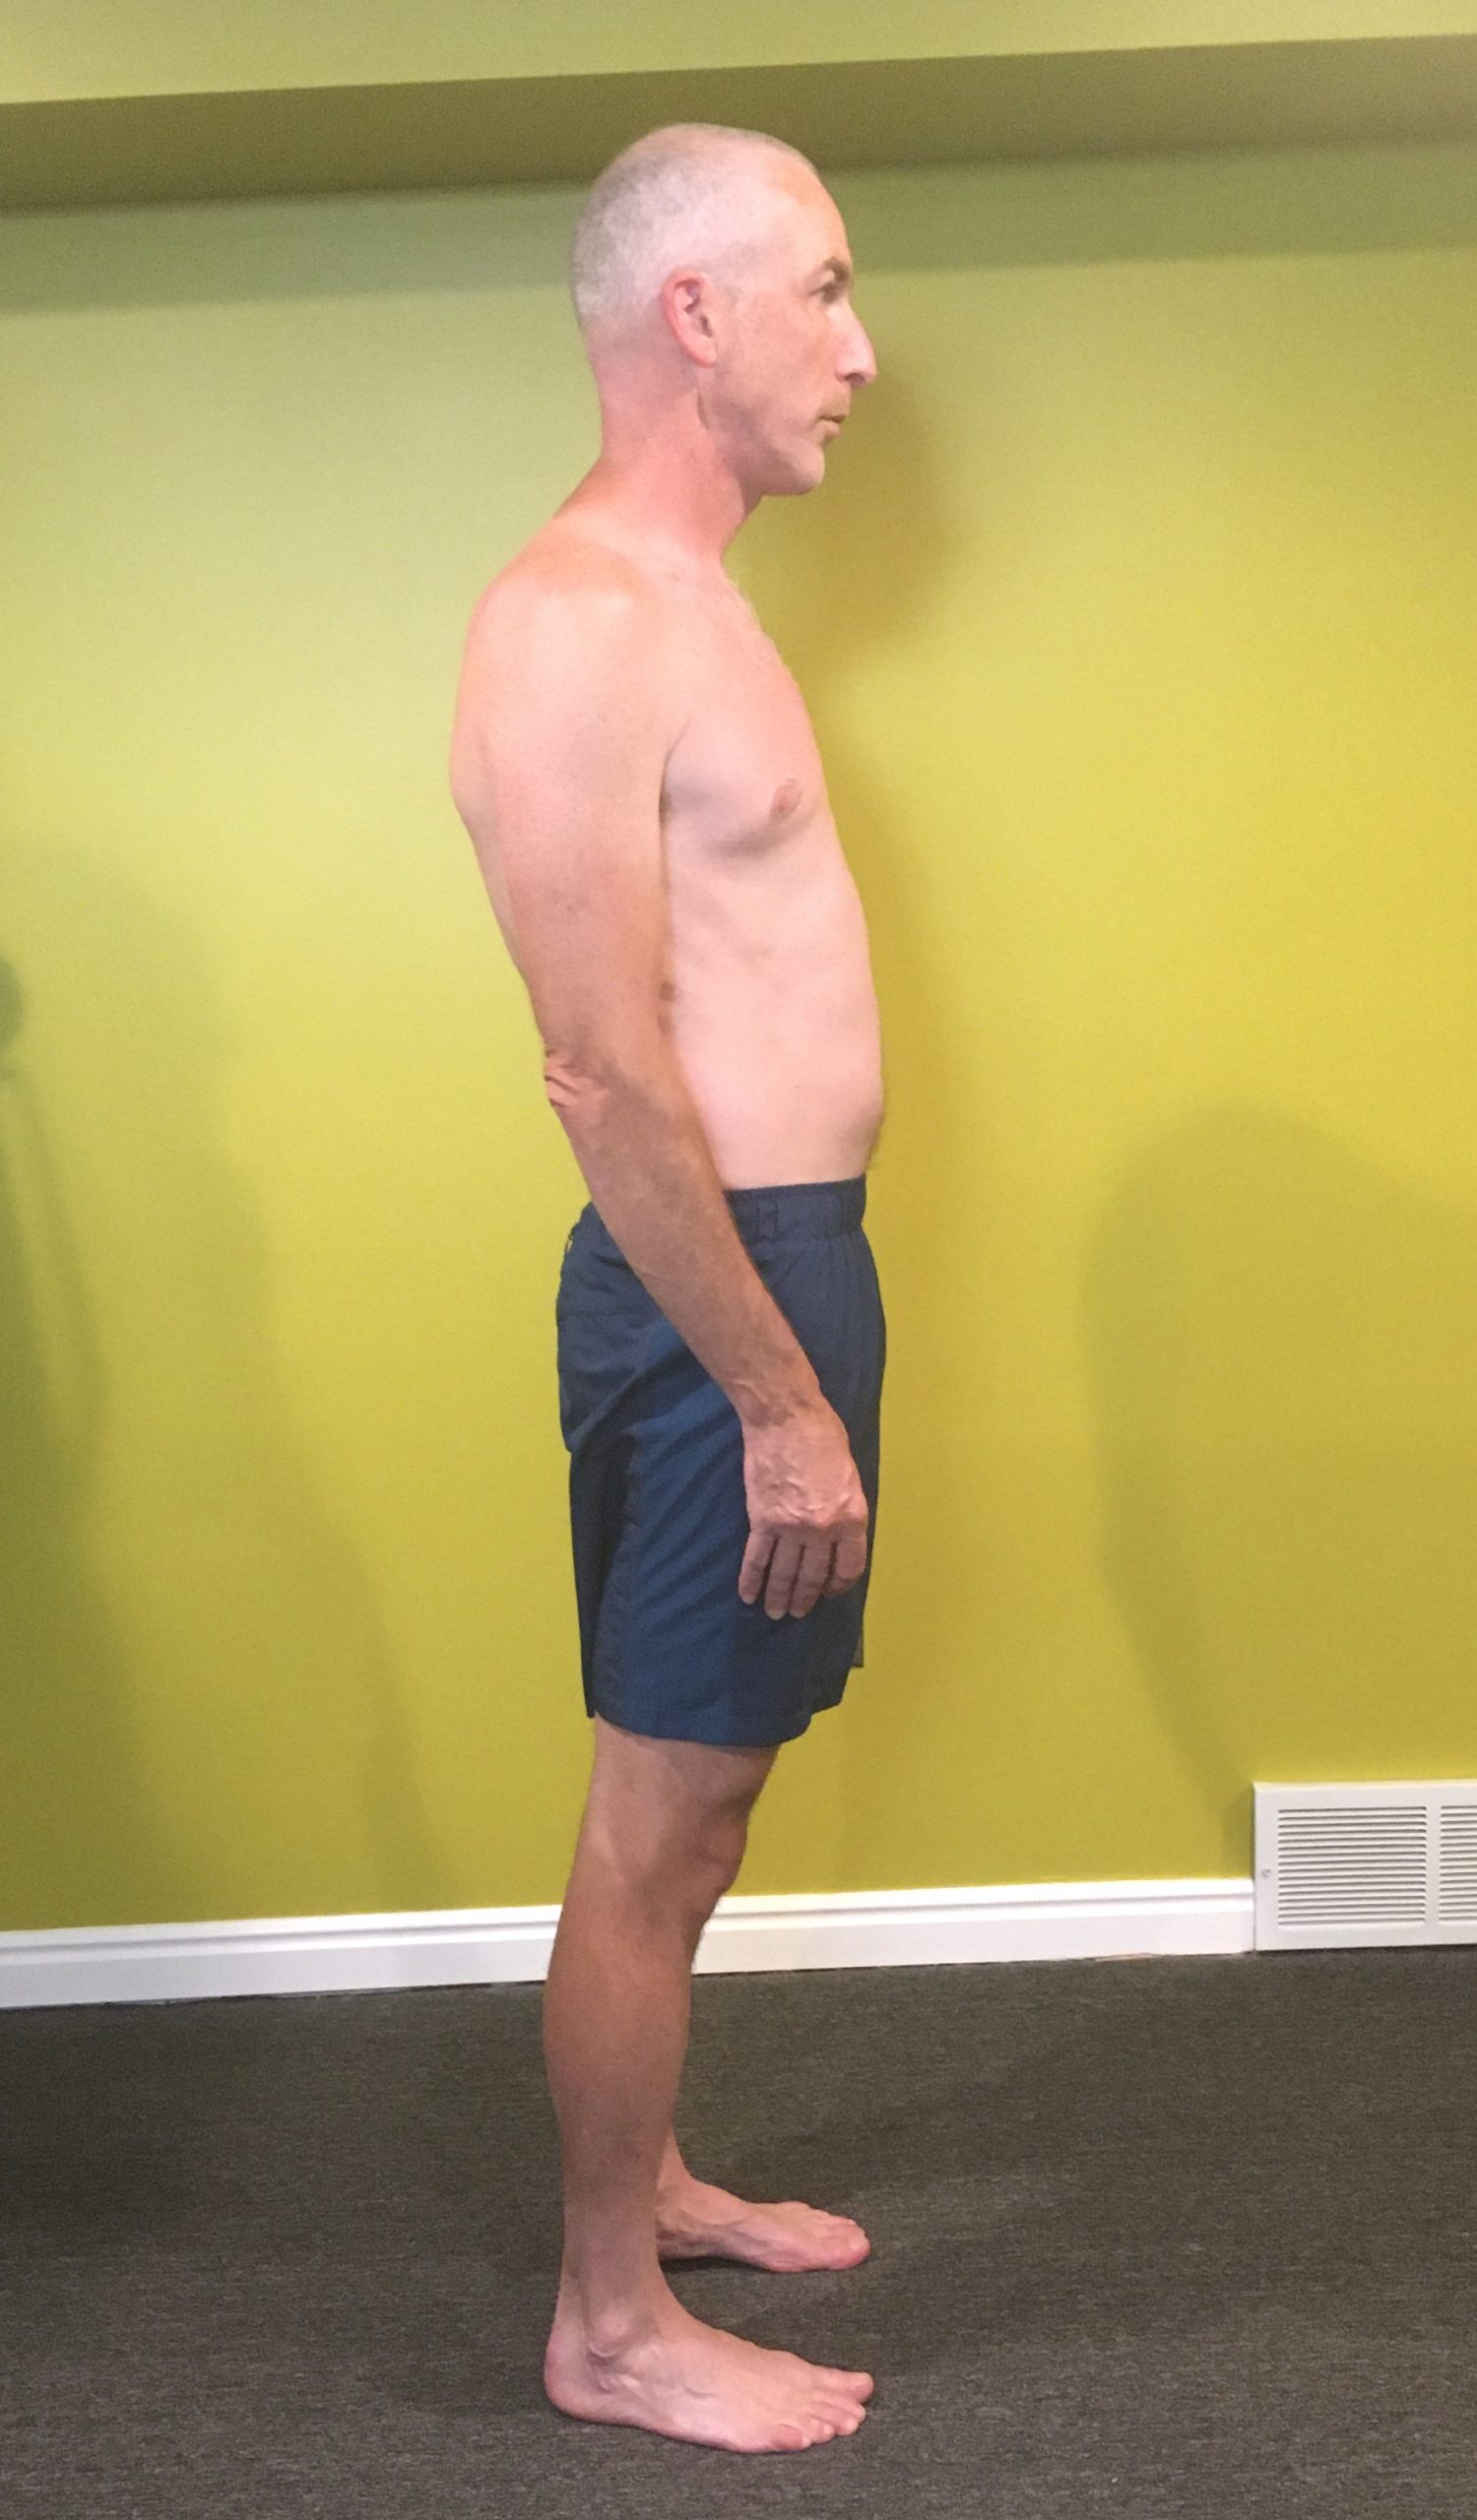
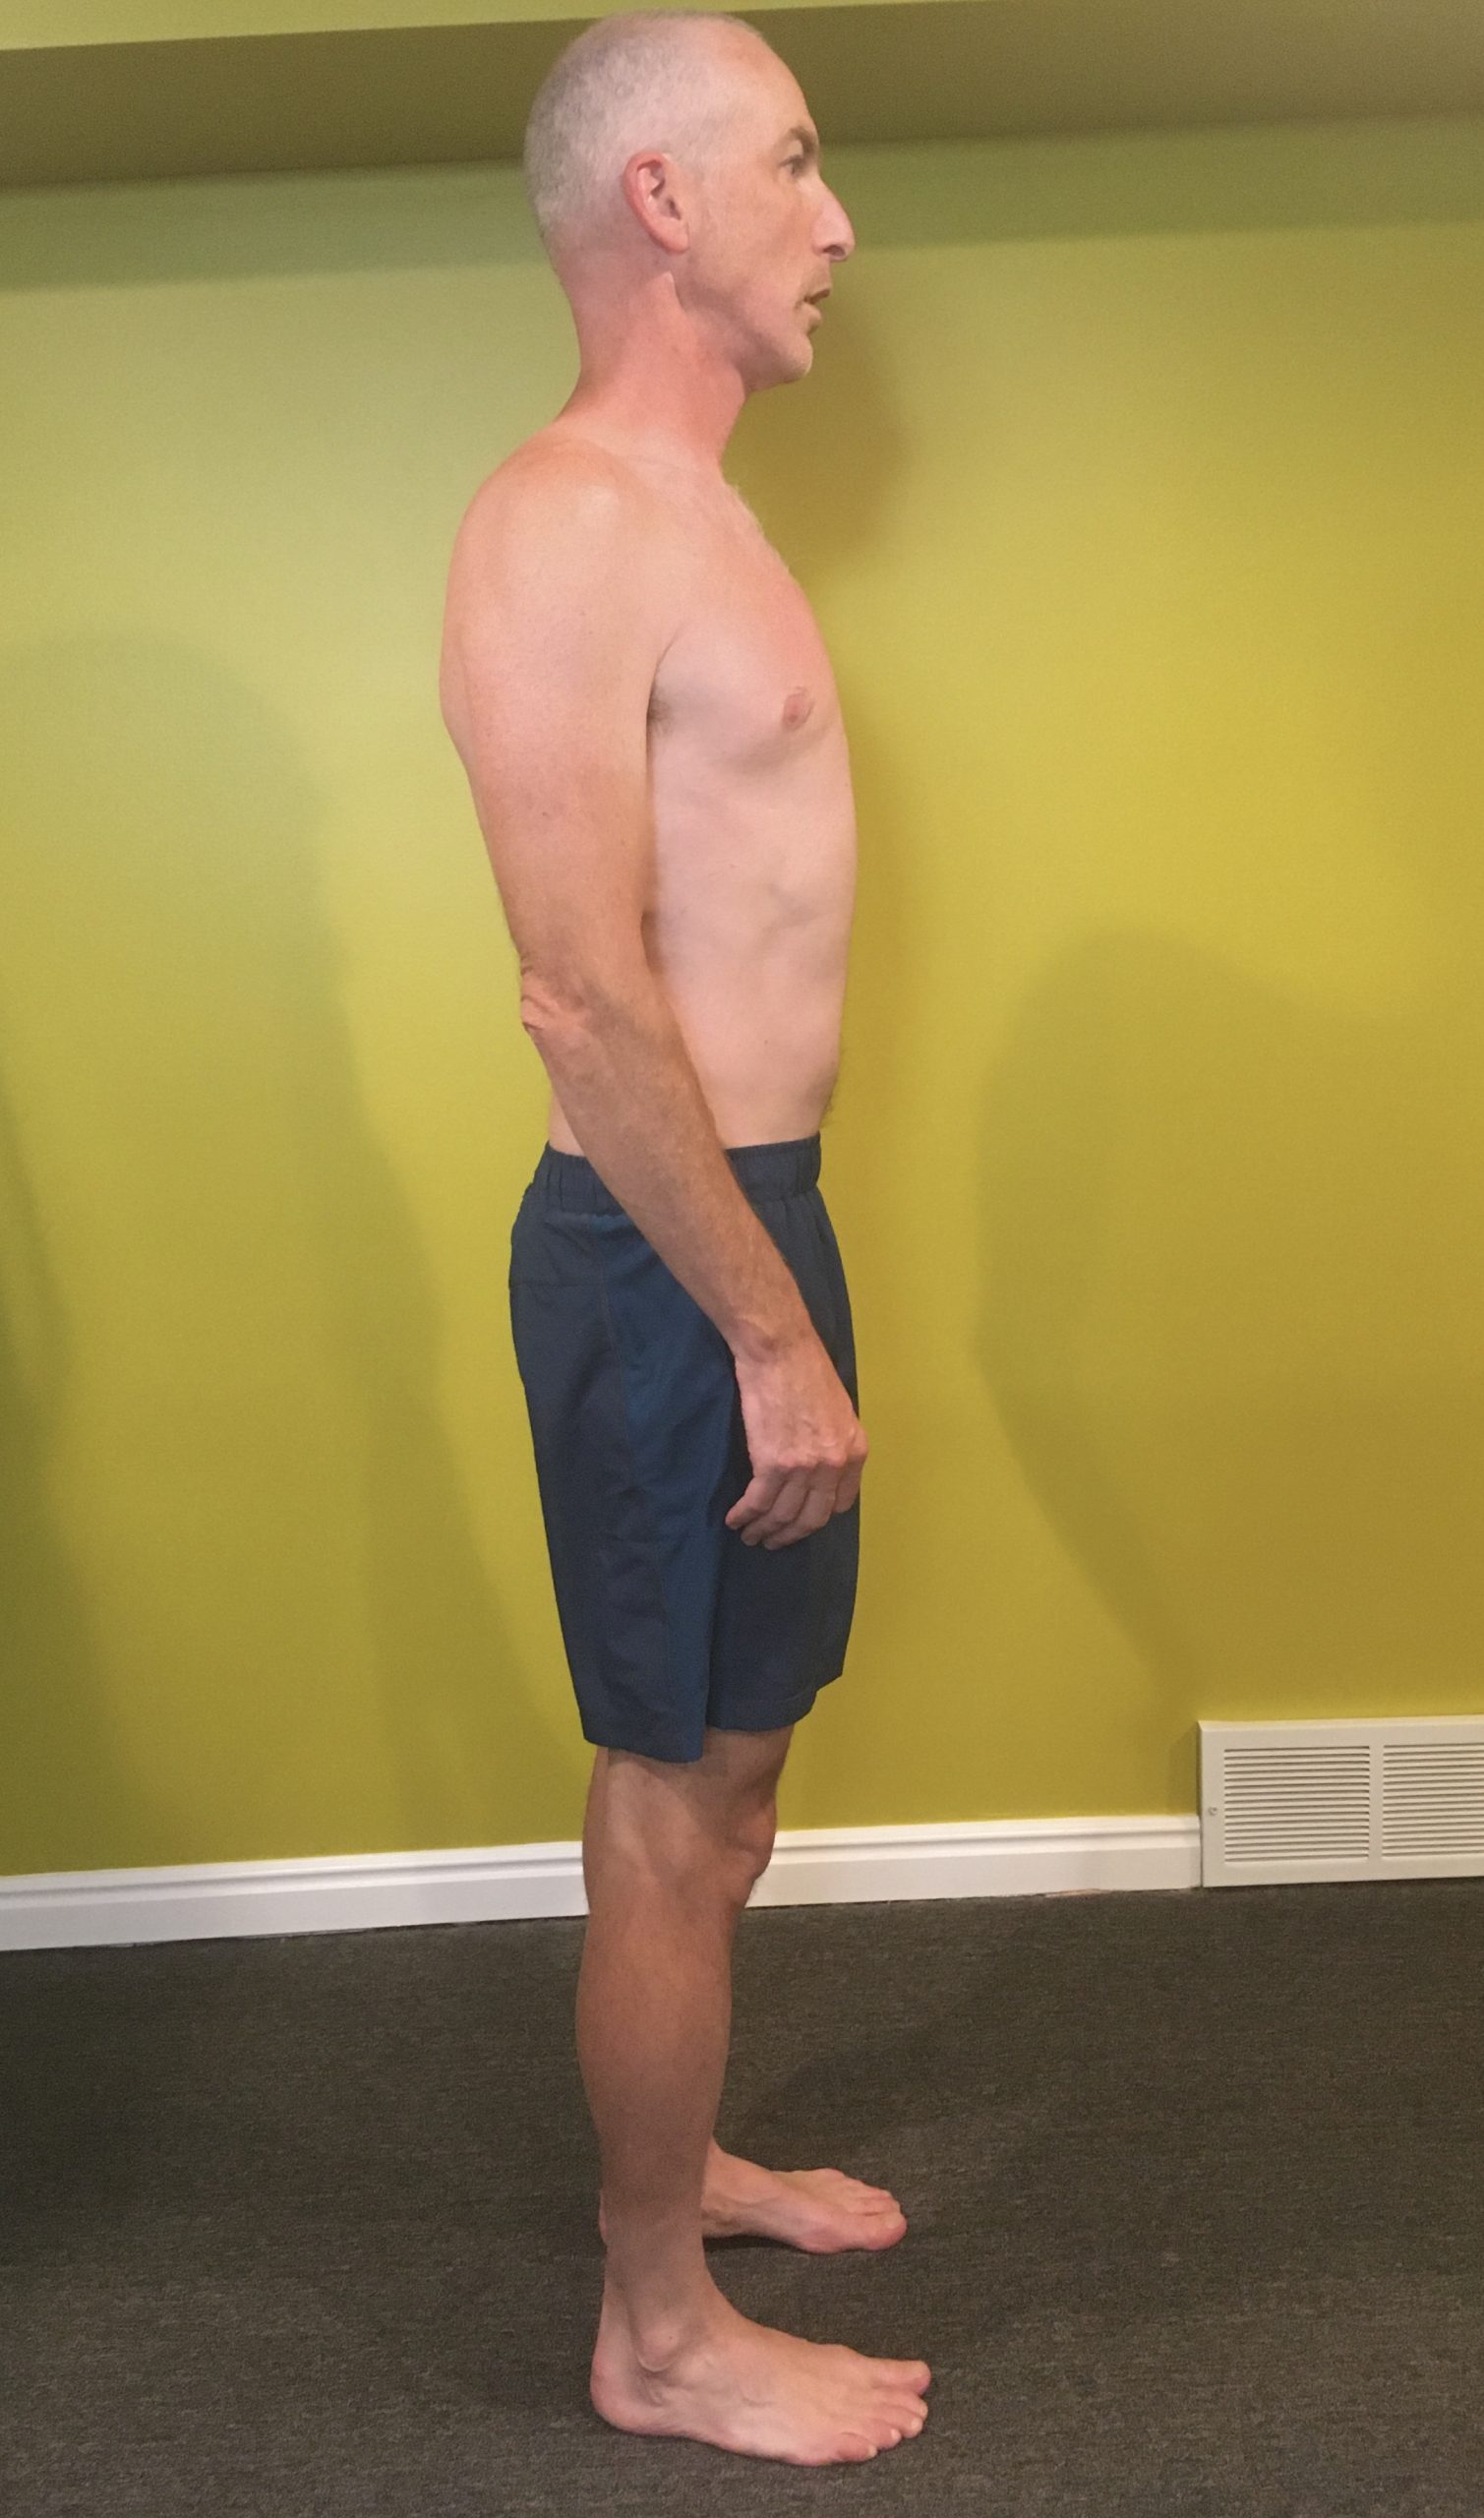
    So what exactly does “good posture” or a neutral spine look like? Remember that a neutral spine occurs along a bandwidth of variability. Just as we all share the same basic anatomy, we all come in different shapes and sizes. However, the ears, shoulders, hips, knees, and ankles should generally line up while standing. Sitting is the same with a straight line connecting ears, shoulders, and hips. Again, there should be an inward curve at the low back and an outward curve through the mid to upper back. The neck will also tend to have an inward curve. 

    In clinical practice, the majority of postural deviations appearing outside of bandwidth tend to fall into two categories: excessive thoracic kyphosis (to much flexion or outward curve in the upper back) or too much lumbar lordosis (excessive extension or inward curve at the low back). It is also worth noting that in clinical practice, the research would tell us that there is no evidence of “poor” posture causing musculoskeletal pain and is merely correlated with pain—not everyone who slumps all day has neck pain; not everyone with “sway back” has back pain. 

    But posture that falls outside of the bandwidth creates an increased load on the body. The majority of nontraumatic musculoskeletal injuries arise as a result of an imbalance between load that is placed on the body and the body’s ability to tolerate load. So from a clinical perspective, improving posture is unlikely to be the Holy Grail, but it may be part of the solution, especially when a change in posture creates a change in pain levels.

    Thoracic kyphosis tends to be an issue of mobility and/or awareness, at least in static postures. With dynamic movements, the complexity of the task may outweigh either the neuromuscular coordination or simply the requisite strength to maintain a neutral spine. Both of these scenarios will be discussed further in the next article. 

    Thoracic kyphosis

    Excessive lumbar lordosis that is observed in standing, but decreases in sitting, tends to be much more complex. A simple explanation may be that the knees are hyperextending while standing. This has a simple solution: Stop hyperextending your knees! But this is way easier said than done. 

    Lumbar lordosis

    This is a pattern that has developed over years and is a tough habit to break. A much more complex pattern is one of relatively tight hip flexors along with relatively weak glutes and hamstrings. This effectively tilts the pelvis forward thereby increasing the curve in the lumbar spine. Again, this scenario might not be an issue with static posture but will be exacerbated by activities requiring hip extension such as running and skiing. This will also be covered further in the next section. 

    Sitting is the new smoking. If you spend long hours sitting in front of a computer, STOP! Not your job, but the prolonged sitting. Height adjustable desks have become much less expensive and allow you to move frequently between sitting and standing. My typical advice is to change positions every 20-30 minutes. Standing is likely better, but put in one position too long and we’ll still get lazy with posture. If you don’t have this option, getting up and moving every hour can help. 

    With both sitting and standing at the computer, keep your elbows at your sides and bent 90 degrees or a little less. When sitting, keep your pelvis vertical and all the way back in the chair. You should be on your sit bones. If you roll back onto your tailbone, it’s all over. The pelvis needs to remain vertical (or horizontal from front to back) in order to maintain a neutral spine. A lumbar support, or even a folded towel, placed in the small of the back will make it easier to maintain this position.

    Maintenance of neutral spine with dynamic activities is no different, just harder. Again, posture falling outside of bandwidth equates to increased load which equates to inefficiency. Cycling is the easiest, at least conceptually, to transfer the ideals of sitting posture. It just requires tilting the pelvis forward on the saddle. “Bellybutton to the top tube.” Bike fit and hip mobility will both have a significant impact on how comfortably this can be accomplished. 

    Neutral spine

    Running, swimming, and classic skiing get more complex due to the inherent rotation involved; however, a neutral spine as observed from the side remains ideal. A full discussion of form and technique for these sports, excepting Nordic skiing, is well outside the scope of these articles. It should also be noted that the human spine is fully capable of motion in all planes. It should not be inferred that the spine should be forever fixed in neutral. 

    Stay tuned for the next part of this series which will dig deeper into spine mobility, stability, and proprioception.


  • Wednesday Workout: Exploring Macro and Micro Terrain with Bernie Nelson

    Wednesday Workout: Exploring Macro and Micro Terrain with Bernie Nelson

    Bridger Ski Foundation out for a first ski in West Yellowstone in 2015. (Photo: Courtesy Bernie Nelson)

    This Wednesday Workout comes from a true cross-country coaching whisperer: Bernie Nelson. First off, if you aren’t familiar with Bernie — she’s not a dude as the name might suggest. It’s Bernadette, but its Bernie on the name tag.

    Nelson grew up in Truckee, California as a cross-country ski racer and you’d have to ask her yourself, but she came into her own mentoring aspiring skiers. An informal or formal on-snow technique session with Nelson is like sitting in on a master class in theoretical physics with Stephen Hawking or being guided up El Cap by Tommy Caldwell. Hyperbole you say? Not so much when you find yourself thinking of your classic or skate technique in eye-opening ways.

    Nelson is currently pursuing a nursing degree in Bend, Oregon but teaches cross-country skiing classes off and on at the Mount Bachelor Nordic Center and has a regular Friday morning class for women.

    Here’s Nelson in her own words:

    “For this workout, we break the terrain into macro sections (uphill, downhill, flat – the obvious) and micro sections (all of the transitions that connect the macro terrain together AND all of the micro-terrain within those bigger more obvious pieces). The point of this workout is to emphasize the micro terrain in an effort to find a flow state in our skiing — a balanced state of effort and ease. From this place, we can learn to maintain momentum and build momentum. It takes some diligence but the payout is worthwhile, and it’s a fun way to explore your gears!

    Warm up: Easy 10-15 minutes skiing. Warm yourself up, get centered on your skis, and chase that “feeling” as best you can. When you are feeling warm, take 10-15 minutes to do some of your skiing chores. These are the things we don’t like to do. Maybe it’s cornering. Maybe it’s agility. Maybe it’s climbing. Get curious, have fun with it! It’s okay if you look goofy, or fall down. The bobble is important, being uncomfortable leads to changes, and as nordic skiers we really have to learn to love living in that space!

    Alright on to the workout!

    Find a 2-3 k loop with a good mix of terrain. It’s okay if you don’t see all the rolls and transitions right away, we’ll get there. Once you find your loop, drop your water at the start and get ready to roll. You’ll be skiing four laps at a moderate effort (L2/L3). Time each lap for personal reference/learning, or don’t… it’s okay to go out without a watch and just feel your body working, your skis gliding, and your gauge your effort. This workout is less about your HR and more about technique and your adaptations to the terrain. So as tempting as it might be to jump into L3/L4 intervals, before you do, make sure that is going to make you a better skier (not just fitter)!

    Lap 1 – Skier’s Choice

    Preview your course at a moderate effort (L2). While you are skiing, focus in on the terrain. What are the major sections in your course? What are the less obvious sections? Are there any sections that throw you off?

    Lap 2 – Macro Terrain

    For this lap, head out at a moderate effort (L2). Focus on the larger, more obvious pieces of terrain. For these sections, increase your effort (L3) but do not sacrifice good technique, if you start to fall apart, decrease your effort.

    -5min Rest-

    Lap 3 – Micro Terrain

    Same effort, moderate (L2). Switch your focus. Now you are looking for the micro terrain. These are all the places we bleed time. Over the tops of hills, standing too early out of a tuck, not accelerating out of corners. Plus! All the little segments of pitch change we steamroll right over when we are focused on Macro terrain – anticipate the changes, and ask yourself how will you change technique, tempo, or glide to accommodate the terrain’s fluctuations. Like the preceding lap, increase your effort slightly (L3) to help emphasize and differentiate the micro terrain.

    -5min Rest-

    Lap 4 – Maintaining Momentum

    For this lap, we put it together. Head out at a moderate pace (L2) and ski all the big sections of terrain at this level. It should be controlled, but not easy. All of the micro terrain discovered in the previous lap should be emphasized with an increase in effort (L3). The goal is to find yourself in a flow state, focused on small changes that sew together the big picture.

    Adaptation for higher intensity: have your intervals be structured with your Anaerobic Threshold as the defining line, so L3 / L4 mix. Good for lactate tolerance and clearance. Natural intervals/race simulation.”

    From left to right, Logan Diekmann, Bernie Nelson, Alayna Sonnesyn, Bill Harmeyer – all smiles. (Photo: courtesy of Bernie Nelson)
  • Wednesday Workout: U.S. Ski Team ‘Coaching Technique’ 101

    Wednesday Workout: U.S. Ski Team ‘Coaching Technique’ 101

    U.S. Ski Team (USST) members (from left to right) Scott Patterson, Erik Bjornsen and Ian Torchia working on classic technique last month in Bend, Oregon, while Sun Valley Gold Team Coach Chris Mallory (second from l) and USST coach Matt Whitcomb look on. (Photo: Bryan Fish)

    The U.S. Ski Team (USST) wrapped up its latest spring training camp in Bend, Oregon, on June 1. One of the primary aspects of the annual camp is for the USST coaching staff to work on technique in a low-stress environment. The following workout was provided by U.S. women’s coach Matt Whitcomb. Here are the goods:

    ***

    Coaching Technique at a U.S. Ski Team Camp

    The workout: 2-3 hours at an easy distance pace, with running or herringbone technique focus

    Technique focus: Stable core/upper body in both running and herringbone technique

    “This technique session framework is something we’ve used for several years,” Whitcomb explained in an email. “What makes this session effective is that we prime the team with a video clip for visualization and instruction immediately before the workout, and use iPads and light coaching feedback during the session. After the session, some athletes like to review the clips again or receive them over email.  I use an app for iPad and iPhone called Coach’s Eye, which has a great slow-motion and frame-by-frame feature, and allows the user to email individual clips or export a bunch of clips to iMovie so a more-complete compilation of the session can be sent as a YouTube link.

    Framing the Session

    •  Two or three-minute workout description in a space with a TV or projector.  If it is longer, there is a good chance we’re over-caffeinated and over-coaching. Too much to focus on kills focus. We try hard to work only on one technique goal per athletes per session.  While many of us coaches agree it feels purposeful as a coach to do a daily knowledge dump before or during training, less is generally more. Coach slowly. Here’s a simple pre-workout description example:

    ‘After you’ve warmed up for a few minutes, we’d like those whose elbows are feeling good to double pole easy for 30 minutes while we wait for the snow to soften. Keep it easy on the climbs by pecking your way up. Work high and ski very short on the climbs for this double pole specific strength. Let’s have the men meet on Screamer 45 minutes after we get on snow, and the women 1:15 into the session. Today we’ll do some technique work on running, which is basically bounding on skis, usually without any glide. The video we’re about to show has a clip of Sadie running in Ruka, and Belorukova in the same clip doing a modified herringbone.  Watch for upper-body stability. The next clip will be Sundby doing herringbone at maximum speed. As fast as it is, notice again how his upper-body is stable and calm, almost still. In running on skis, a stable upper-body provides the platform under which the legs can do a lot of work. The last two clips feature Sadie again, and then Klæbo, both running but at a more casual pace. Question about the session before we play the video? If you want more video on the iPad after your session, just talk with a coach out there. Extra water, klister, and sunscreen will be at Yuppie Junction. Alright, let’s dial in the focus and channel this video.’

    • Watch two- to three-minute visualization video. Key to the visualization session is that everyone is quiet and bringing focus. Longer than three minutes tends to yield diminishing focus for many.  We customize short videos from the most recent World Cup season for most skiing and roller skiing sessions. If the goal of the session is to work on kick double pole, we’ll find that technique for both men and women from a race, but we try to feature different athletes and a wide-range of styles. We’re not looking only at the best. If you want to do this on your own, we like Adobe Premier Elements instead of iMovie because you’re not required to convert the entire race to MP4 prior to editing.  This saves time. Here are three examples:

    Double Poling: Kalla / Weng / Bolshunov / Golberg ’18

    Herringbone / Running Ruka ’18

    V2 Tonseth / Haga ’18

    (If you want the link to our database to see more video links, just fire me an email: matt.whitcomb@usskiandsnowboard.org)

    Coaching the Session

    When the men’s team shows up for the technique portion of the session, the coaches tell the athletes who will be working with whom and will suggest they do about eight to 10 passes of the 300-meter loop. As coaches, we try to stand near one another to use each other as resources, and to pay attention to which athlete is hearing what so we can avoid over-loading them later in the session. This way we can reinforce what they were already working on with another coach. We use colored cones in some way for most sessions to clarify loops or surge points. Ideally, each coach works with not more than two athletes at a time, and all coaches have an iPad or phone to replay video. We’ll show an athlete their footage every several passes but otherwise encourage them to keep moving, possibly shouting out a simple cue as they ski by. Because developing fitness is our top goal, we do very little standing around. Stopping to watch their video means watching a clip twice in regular speed, and once in slow motion. This takes 30 to 45 seconds total if you’re good with your iPad. Standing in the shade (or anywhere in New England or Alaska) helps to see the screen clearly.

    Our goal is not to have a team that skis alike. While we have themes to focus on for a particular session, we want them all to ski in their own unique way. If an athlete has a chronically tight back, they are going to compress differently than an athlete with more mobility. An athlete with valgus knees can’t simply align their joints to please our coaching eye. They should all ski with their own unique style, and this can be healthy to reinforce on a younger team to minimize unhealthy comparison.

    Our goal is not to have a team that skis alike. While we have themes to focus on for a particular session, we want them all to ski in their own unique way.

    U.S. Ski Team member Ida Sargent doing a single-pole V1 drill at the team’s recent on-snow camp in Bend, Oregon, last month. (Photo: Bryan Fish)

    A few ideas for early-season sessions

    • Take a close look at how the athletes are skiing in May. It’s often surprisingly relaxed and natural. How can it be so good after so little coaching? Is this because we tie them up with too much technique feedback throughout the season?  Since we’re always pointing out what they could be doing better, have them focus on something they’re doing well. If the technique session makes them ski tense and like a drill we used, it might not have been the right approach for that athlete on that day.
    • Encourage the athletes to give feedback on the technique adaptation they trying to make. Sometimes something suggested by a coach ends up not working, or just being wrong.  It’s not a lost session if you and the athlete learn something through the coaching mistake.
    • No-pole or one-pole skiing.  If an athlete’s striding needs work, we revert to old-school, no-pole skiing as a go-to. If the back gets sore or tight, alternate using right or left pole only. Good striding includes learning how to subconsciously use the feet so the kick strength or style can be tailored to the snow, pitch, and wax job of that specific moment.  Even if the athlete is struggling with kick and can hardly move forward without the poles, there isn’t much that does more for classic striding than really scrambling the athlete’s comfort zone, and then returning to two poles.
    • Prioritize quality movements over velocity and tempo in your early speeds sessions.  Consider adding tempo late in the session rather than first.
    • If we’re asking the athletes to ski at high intensity, we think it’s important to do a dynamic stretching or mobility routine right on the snow (take off skis and poles) as a part of their pre-intensity warm-up.  The idea is to prevent injury and produce higher quality intensity. A coach can start with a group warm-up, but eventually, each athlete individualizes the routine to fit their needs.
    • Everyone learns differently.  Know who you are coaching. Do they actually benefit from video, or is verbal instruction better for someone?  Perhaps the individual can make the best changes by following another skier. Mimicry can be very powerful.
    • Read your team. An athlete for whom the session flies by is probably focusing and spending more time in a flow state than someone that sees three hours as a dreadfully long ski.”
    Uptempo skiing at the U.S. Ski Team’s recent camp in Bend, Oregon. Erik Bjornsen leads, followed by Simi Hamilton, Ian Torchia, Scott Patterson, and Akeo Maifeld-Carucci. (Photo: Bryan Fish)
  • Wednesday Workout: Building Double Pole Capacity with Erik Bjornsen

    Wednesday Workout: Building Double Pole Capacity with Erik Bjornsen

    U.S. Ski Team member Erik Bjornsen during a 15 k classic rollerski last year at the USST’s October dryland camp in Park City, Utah. (Photo: Matt Whitcomb)

    This isn’t Erik Bjornsen’s first rodeo. The 26-year-old Washington native was named to the U.S. Ski Team six years ago, and since then he’s made his way from the development or “D” team ranks to the big leagues — spending the bulk of each winter racing overseas in Europe on the World Cup.

    Erik Bjornsen (U.S. Ski Team) anchoring the U.S. men to their best team sprint result of fifth place in the men’s classic team sprint at 2017 World Championships on Feb. 26 in Lahti, Finland. (Photo: John Lazenby/Lazenbyphoto.com)

    And at 6-foot-2 and roughly 175 pounds, according to his U.S. Ski Team bio, Bjornsen is one of the bigger skiers on the circuit, a fact he’s come to realize as the years go on.

    As you’ll learn in an upcoming Nordic Nation podcast episode, Bjornsen once thought the Russians, whom he’d watched race on T.V. as a youngster, were the titans of the pack. It turns out that television does wonders for certain athletes’ apparent as compared to their absolute buffness.

    And as big-time functional ski strength becomes a huge component to World Cup success, Erik Bjornsen (intentionally or not) is buffing up. Why not use his size to his advantage by developing more powerful and efficient double poling?

    Bjornsen shared the following double-pole-centric workout. And word on the Anchorage streets, where he spends his summer training with Alaska Pacific University, is that Bjornsen’s feeling strong as he prepares for racing in Europe later this month.

    The Workout: Solo, high-focus, double-pole distance session

    Find suitable terrain and timing: “I choose the terrain based on how hard I want the workout to be. I try to fit this workout in mid-week between intervals sessions,” he wrote in an email. “The point is to get the biggest benefit without fatiguing the body too much.  

    “Most often I head up Campbell airstrip road. It’s a five-mile-long road, with a majority of the terrain measuring out at a gentle 5% incline,” Bjornsen continued. “There’s one steeper climb in the middle that’s about 500 meters long. For this workout, I go out and back twice.”

    Warmup: 15-minute easy Level 1 (roller)ski to the start.

    Go-time: Typically takes him 1 hour and 20 minutes to rollerski the 5-mile section twice.

    “The steep 500-meter section is VERY hard to double pole — that portion of the road is something you would for sure stride in a race. During this workout, I try to spend an hour at L2 [Level 2] and end up bumping up to L3 [Level 3] only when double poling up that steep segment (2 X 5min in L3). I like having the two short but demanding double pole sections in this workout.

    “The important part of this training session is not the 2 x 5-minute L3 sections, it’s the time before and after that L3 effort. You have to figure out how to get the muscles to recover from the hill while still double poling and determine what gear/tempo to use while still applying power efficiently — and recover at the same time.”

    Cool down: 15-minute easy ski home.

    Notes:

    • “The idea is to work specifically on double pole and upper body strength. You get an opportunity to work on all gears, from long double pole to very quick choppy double pole up the steep section.
    • “You can gain a lot from just focusing on two intensity sessions a week throughout the summer. This is a way I find I’m able to gain quite a bit from specific double pole training. But ideally, you don’t fatigue the body so much that it takes energy away from the true intensity sessions.”
  • Closing the Gap: Brain Training

    Closing the Gap: Brain Training

    “Norwegian fjell running.” Team Asker doing some dryland mountain training during a training camp in Norefjell, Norway. (All photos: Maks Zechel)

    Editor’s Note: The following is part of a series proposed by Maks Zechel, a 20-year-old Canadian cross-country skier embarking on his first season training abroad. In August, he recently made the big move to Norway, where he’ll be training and racing with Team Asker for the entire winter. Through these updates, Maks hopes to share his personal “observations, stories and lessons learned” to help close the gap between North American and Scandinavian nordic skiing. Previous posts: #1, #2, #3, #4, #5, and #6.

    ***

    There is something about passion that drives people to push boundaries like nothing else. For many Canadians, this passion lies in hockey. If it’s January and you aren’t within walking distance of at least two outdoor hockey rinks, you probably don’t live in Canada.

    I’ve never been a huge hockey fan, but regardless I still went through a phase as a 9 year old when I practised my stick-handling skills religiously, making marks against the garage door or the basement wall. Black marks and dented aluminum are the proud checkmarks of passionate Canadian youth (and the source of endless frustration for Canadian parents). Canadian hockey drives youth and even adults to fervently practice a sport that only a small percentage will ever play professionally. Even on a weekday night in the middle of winter, if you bring a stick and skates to any Canadian outdoor rink, you will be allowed to join a game of shinny. No matter your gender or age, whether you claim to have been a AAA hockey legend or have never skated before, whether your family has lived in Canada for generations or if you are a newly landed immigrant, Canadians are brought together by something that transcends sport.

    National passion for a sport ensures that a large and diverse percentage of the population will actively pursue that activity in a multitude of ways. It encourages creativity and innovation. Similarly to hockey in Canada, albeit on a smaller scale, there are an astonishing number of Norwegian skiers who dedicate much of their time to just training and racing fast, even without sponsorships or national-team status.

    This creates a field of close to 500 open men at the Norwegian national championships. In the 10-kilometer skate race at last year’s national championships, the top-100 racers were separated by 1:47.6 minutes, the top 200 by 2:33.2 minutes, and the top 300 by 3:31.7 minutes (note that the conditions were fast that day). The medal winners, and many of the skiers far off the podium, were World Cup, World Championship and Olympic medalists (Anders Gløersen won, Martin Johnsrud Sundby was second, Emil Iversen was 11th, Sjur Røthe was 32nd (full race results here). The depth of field at Norwegian and Scandinavian Cups and national-championships races rivals that of World Cup races, with many believing it to be more difficult to crack the top 30 in the aforementioned three than it is at most World Cups.

    Team Asker skiers recover as they run down an alpine ski slope during 10- x 4-minute Zone 4 bounding intervals, with one minute rests in between, at a recent training camp in Norefjell, Norway.

    The success that we see in the Norwegian senior ranks begins with Norway’s junior skiers, and I am lucky enough to be training partners with some of these top-level athletes. One of Team Asker’s most successful junior skiers, Harald, has two medals from last year’s Junior World Championships. To put his level of skiing into a senior-racing perspective, he was 26th in the previously mentioned 10 k race at the Norwegian nationals — as an 18 year old.

    It can be deceptive to see skiers who still look quite young, but to know that they are already skiing fast enough to potentially crack the top 30 on a World Cup. I believe that much of this ability stems from the incredible amount of maturity in Norwegian junior racers, although not necessarily in the traditional sense. Not all of them are obsessive about the small things; I have seen top Norwegian skiers down two Cokes per day at training camps, eat Nutella for breakfast and stretch as little as possible. Their maturity becomes apparent in how they approach training and races, ready to learn to push their bodies in the best way that they can.

    With more skiers, you see more body types and different minds. My teammates have told me to expect many funny styles of double poling when I race Norwegian and Scandinavian Cups this winter. Already at the junior level, skiers spend hours working on their double-pole technique, not just doing exactly what their coaches told them to do, but practising different movements and seeing how it works for them. Double poling is a simple motion, in theory, but with different body types you can have countless different styles of double poling that all produce the maximum amount of power for those individual skiers.

    With Team Asker, we discuss technique with our coach and we do group-technique sessions, but then we are encouraged to try things out by ourselves and see how we can adapt those basics of power transfer to how our individual bodies work. The same goes with training plans. The spectrum of what type of training makes someone ski fast is all over the place, and that is something that many Norwegian skiers seem to accept. Some athletes on Team Asker disagree with certain things that our coach says, but they are not criticized for this and are supported in altering their training as they see fit, although they are encouraged to discuss why they are making these choices.

    In Canada, I have often heard repeated “golden rules” to technique and training, things that are accepted by most coaches across the country. In Norway, I learn a new philosophy every time I speak to a different coach or athlete. For some skiers, it is important for them to train long and slowly in Zone 1 so that they have the energy to focus on interval workouts. Other skiers do short Zone 1 workouts, but push the workouts so that they are in high Zone 1 or low Zone 2, skiing closer to competition speed. Many skiers do sprints with every workout, even long runs, while others add sections of Zone 3 pickups in the middle of their easy workouts. I have a teammate who builds up to a period in the training season where he is doing 30 short sprints per day. I know Norwegian 16 year olds who are training more than 1,000 hours per year, but there are also World Cup skiers who are barely training 600 hours.

    Team Asker finishing a combo rollerski/run workout at recent training camp in Norefjell, Norway.

    Some people think that too much base training (slow Zone 1) is a waste of time, so they do the bare minimum that is required to be able to absorb intensity training and the long race season. Johannes Klæbo’s big breakthrough in the past couple of years is said to have come from an emphasis on strength and sprint training, while Petter Northug has long sworn by doing intervals in “myra” (spongy and uneven bog/marsh), but for some people, those same things will make little difference to their speed on snow. Talent may have helped them in the beginning, but whether it was Klæbo or Northug, they didn’t reach the top level through talent alone, but by perfecting all the things that make them fast.

    There are skiers, some point to Therese Johaug, who many think could do almost any type of training, and they will be fast simply from general fitness, but for most people training is not so simple. Fortunately for us mortals there is no limit to what we can achieve, so long as we are willing to take chances and use our brains rather than just succumbing to that “training junkie gene” that so many skiers possess. Each one of us is so different, that it is not possible for us to do the same things and achieve the same results.

    Over and over I have heard coaches and athletes, who go to Scandinavia for a few weeks to learn the “secrets” of the best skiers in the world, come back and confidently tell us Canadians that “they do the same training as us” and therefore we can be just as fast as them. I agree that we can be just as fast, but from my first three months in Norway, I can tell you that we do not train anything like the Norwegians. We may do similar bounding, rollerskiing and running workouts, but training in Norway is taken to the highest level by the competitive dialogue that takes place among young skiers, old skiers, back of the pack skiers, and top skiers. From my perspective, training innovation and experimentation doesn’t happen in North America on the same small scale level as it does in Norway.

    The go-kart track where Team Asker held “King’s Court” style rollerski skate sprints (8 x approximately 1:30 minutes) during a recent training camp in Norefjell, Norway.

    In Canada we look to those that are better than us, whether they are national-team members or World Cup skiers, and try to copy them from afar. This puts us decades behind the competition. A lot of the technique innovations that we will see on the World Cup in the next two decades will have come from the Norwegian junior skiers of today, but by the time North American skiers take note of these changes, and adjust their training, the next generation of Norwegian juniors will already be working on the technique advances for the next decade.

    When I first came to Norway, the first thing I did was try to copy how the best skiers on the team double poled. I copied them for 12 weeks, but every time I looked at video footage of myself, I still looked completely different. It wasn’t until my coach explained a miniscule timing difference to me that I understood what the others were doing differently. With the switch flicked, my double poling has improved because of things that I could not figure out just by watching others ski. It is this type of interaction, between skiers and coaches of all levels, that causes breakthroughs in technique. Not all club-level coaches in Norway look to the Norwegian national team for advice on all aspects of skiing. Many coaches disagree with the common consensus on technique and training, and this opens up the discussion which is so important to moving forward.

    Most skiers love to talk about technique and the finer aspects of skiing, but when I was in Canada, I found these discussions usually revolved around what faster people were doing. In Norway I find myself having more discussions on what we individually think we should be doing, and even if someone is superior at a certain aspect of skiing, they are usually eager to try what someone else thinks might be better.

    As “Mad-Eye Moody” from J.K. Rowling’s Harry Potter series would say, “Constant vigilance!” and adjustment are required in all aspects of our training if we want to succeed. We have to seek variation in training, and learn together to discover the things that make us go fast as individuals, or else we suffer individually under the repetition of uniform training that cannot meet all of our needs.

    Norwegian Phrase of the Week:

    Norwegian: “Jeg er ut å mate.”

    Google Translate: “I’m out to feed.”

    True meaning: “I am training a lot.” (slang)

    Team Asker during a long run through the mountains at a recent training camp in Norefjell, Norway.

    ***

    About Maks: Maks Zechel is a competitive cross-country skier who secretly wants to become a professional mile runner. He loves hiking and going on canoe trips with his family, as well as peanut butter cups in ice cream. Johan Olsson is his favourite skier and he hopes to race the Cortina-Toblach stage of the Tour de Ski one day. He enjoys writing about his experiences. Follow him on Instagram @makszechel.

  • Wednesday Workout: Getting Adaptable with NSCF-FXC

    Wednesday Workout: Getting Adaptable with NSCF-FXC

    The NSCF-FXC crew points toward home (some 7,000 kilometers away) at 2017 Junior Nationals this past March in Lake Placid, N.Y. (Photo: Peter Leonard)

    The following workout comes from Alasdair Tutt, interim coach for the Nordic Ski Club of Fairbanks/Fairbanks XC (commonly known as NSCF-FXC). Tutt recognizes that while training in central Alaska has its perks (like reliable snow), it can also be tough for skiers to excel outside of their familiar environment (like on significantly warmer snow). This is true for anyone racing in variable climates and at both high and low elevations across North America. So for NSCF-FXC, the goal is to get develop speediness for races in the lower 48. 

    ***

    Training in Fairbanks, Alaska, may have many advantages: skiable snow for six months a year, tough homologated loops at Birch Hill and the endless wilderness to explore regardless of the season. However, it presents many challenges for the 33 junior athletes who are part of our summer Comp Team when they compete out of town in temperatures often >30 degrees warmer than the average Fairbanks day.

    (From left to right) NSCF-FXC skiers Ben Keener, Ari Endestad and Ti Donaldson work on diagonal striding during a summer workout near Fairbanks, Alaska. (Photo: Alasdair Tutt)

    This workout is designed to counteract the effect of always skiing on slow snow and steep terrain at Birch Hill mid-winter so the athletes can be competitive in faster conditions at the U.S. Cross Country Championships (a.k.a. Senior Nationals) or Junior Nationals. It can be completed skating, bounding, double poling, or diagonal striding. We have primarily focused on using it to improve diagonal striding this summer.

    We have no problem getting our skiers to be strong or have a high-aerobic capacity, but we often struggle to further develop the neuromuscular capacity of our skiers once the snow hits the ground. This can also be true when our athletes compete in high-school cross-country running, as their training can become pretty monotonous and low volume unless they make a considerable effort to add their own ski training on top of the running. This workout is applicable to all athletes though, as I believe all junior athletes need to first develop their capacity to go fast before learning to use that speed over a longer distance.

    The workout: Alaska-Specific (Speed) Training

    • Warmup: Preparation and Mobility
      • Our warmup is typically 20-30 minutes long consisting of about 10 minutes easy skiing to our start point, followed by 10-15 minutes of mobility and preparation exercises specific to the technique being performed on the day (we do this workout skating, double poling and striding depending on the goals of the team as a whole from last year)
    • Intervals: 2-3 sets of 3-5 x 150-250 meters at 2-3 k pace, and 50-80 m at 400 m pace over a course with two separate hills — not so steep as to lose full range of motion, but to challenge the athletes’ balance a little. Then, take a short recovery to return to the start of the next interval.
      • The course should cover around 150-250 m for the longer interval and 50-80 m for the shorter one on a gradual hill that is typically able to either be climbed in double pole or diagonal striding to induce a high speed.
      • First do the ~200m interval at a speed similar to how you would a hill in a 2-3 k event, then after a short recovery, complete the ~60 m interval at a speed just below that of an all out sprint (about 400 m pace). The idea being to have a repeated sprint stimulus and a clear difference in pace between the short and long speeds, without exhausting their capacity in one set.
    • Recovery: About 4-6 minutes active recovery between sets.
      • Between the longer and shorter sprint, just a rolling recovery back to the base of the hill repeated 3-5 times. Between each set there is a 4-6 minutes of active recovery with a chance to grab a drink or watch some video of technique.
    • Cool down: 30-45 minutes of easy rollerskiing back to the starting location.

    Technique Notes: We are looking for full extension through the arms to the back, a pendulum arm swing to return and a relaxed body position with hips over the heel when gliding on a ski during these intervals, as it quite easy to get into a posture with limited range of motion through the shoulders or a “back-seat” body position with little glide and a late kick when mostly skiing on green hardwax. As always when striding on classic rollerskis, we are careful to emphasize an early initiation of power with the lower body and a quick weight transfer from the center of mass over the gliding ski.

    NSCF-FXC skier Jenna DiFolco (r) leads Mackenzie Parrott (l) and Zoe Ratzlaff (c) during a diagonal-striding workout near Fairbanks, Alaska. (Photo: Alasdair Tutt)

    ***

    Have a workout you want to share? Email info@fasterskier.com with the subject line: Wednesday Workout.

  • Wednesday Workout: Developing Classic Skiing Economy with Lustgarten

    Wednesday Workout: Developing Classic Skiing Economy with Lustgarten

    Craftsbury's Ben Lustgarten (4) dueling with Stratton's Ben Saxton (l) during men's classic sprint final at the SuperTour at Auburn Ski Club on Jan. 21 near Truckee, Calif. Lustgarten won the race, ahead of Saxton in second and and Reese Hanneman (r) in third.
    Craftsbury’s Ben Lustgarten (4) dueling with Stratton’s Ben Saxton (l) during the men’s classic sprint final at the SuperTour at Auburn Ski Club on Jan. 21 near Truckee, Calif. Lustgarten won the race, ahead of Saxton in second and and APU’s Reese Hanneman (r) in third.

    For much of the U.S. nationals men’s 30-kilometer classic mass start on Jan. 11, Ben Lustgarten of the Craftsbury Green Racing Project (CGRP) seemed very much in control. Never too full-throttle, never too tempered; not a quick-strike performance but a methodical, boa-like squeeze with a sizable result: an off-the-front solo win. A few weekends later, the Vermont native struck again at the Truckee SuperTour. There, Lustgarten revealed his mastery of up-tempo classic sprinting as he won the day.

    Before we get to Lustgarten’s ski-imitation workout prescribed by CGRP Head Coach Pepa Miloucheva, here’s a questions-and-response with Lustgarten. FasterSkier reached out to the 24-year-old Lustgarten via email to get his thoughts on how he’s developed and raced with powerful and economical classic skiing.

    FasterSkier: Can you describe how you managed to keep such fluid and smooth technique during the 30 k classic at U.S. nationals?

    Craftsbury Green Racing Project's Ben Lustgarten on his way to winning the 30 k classic mass start at U.S. Cross Country Championships on Jan. 11 at Soldier Hollow in Midway, Utah.
    Craftsbury Green Racing Project’s Ben Lustgarten on his way to winning the 30 k classic mass start at U.S. Cross Country Championships on Jan. 11 at Soldier Hollow in Midway, Utah.

    Ben Lustgarten: I focused really hard on skiing smooth and not wasting any energy in the 30km classic. To be honest, I did not feel amazing during my warm up, so I figured I shouldn’t waste any energy during the race until I absolutely needed it. I wanted to feel out the race, and see what people would do. My kick was very good around the whole course, but a bit slick on the first 1/4 mile climb (the track was a bit more glazed there). I focused on transfering my weight completely over each ski, and throwing my foot out in front of me and kicking sharply but smoothly in order to get full purchase from the ski and not wasting energy slipping. I also tried to relax my arms, swing them naturally, which helped to lengthen my stride and combined with throwing my foot forward, getting more glide. The steeper hills I tried to have a good short impulse and also throwing my foot ahead of me and running lightly. Staying light and smooth was key, and I saved a lot of energy for the last two laps.

    FS: How might you attribute your consistent classic technique during something like the 30 k classic to the workout you will describe?

    BL: I think that ski imitation, or skipping with poles, trains the body to mimic and be able to handle the impulse and load that goes with classic skiing. When I got tired my muscles still remembered and could have a good sharp impulse without even thinking about it. Ski imitation also mimics the timing of classic skiing, so my arms would swing in time with my kick, and there is a glide phase (or when you are in the air skipping). Focusing on staying relaxed really helped keep my skiing consistent. My skis and great kick also kept my skiing consistent. I did not have to alter my technique too much throughout the race because my skis kicked well the whole time. I think my increased endurance, strength, and technique work along with my consistent skis allowed me to keep a solid relaxed technique for the whole 30k. Saving energy through technique allowed for increased energy expenditure for the last 7.5km.

    FS: Do you have an internal mantra or a physical cue you use to maintain your classic technique at race pace?

    BL: I do not necessarily think too hard during my best races. However, I personally use a lot of positive self talk, especially when things hurt. I tell myself “I can do this,”  “I can keep going,” “I can hurt more than this,” “I can go faster,” or “I got this” over and over again. But as for skiing smooth, I just focus on technique and kicking the skis well and getting as much glide as physically possible. Sometimes I think about trying to get even just another few inches more with each glide, which helps keep my technique long and relaxed. Of all of the best races of my life, I usually can’t remember what I was thinking about because I was just so focusing on skiing as fast as possible.

    FS: In Truckee, you were exposed as a classic sprinter as well. What are the connecting points between maintaining good classic technique at 30 k pace and sprint pace? And how might this be associated with Pepa’s ski imitation?

    BL: We did a speed workout a few days before the sprint including an uphill running speed. The video analysis looked almost comical as I had such incredibly high tempo but wasn’t really moving that fast. Pepa told me to bound as long as possible and stay long, which is what I did in the sprint. I brought the intensity down from 100% to 90% and skied longer and smoother, and I ended up winning the race! I think technique is truly important for speed at sprinting or distance. I probably used about 70% of the energy with a long bound up steep hills in the sprint than going as fast as I could running with high tempo. On skis technique means you ski faster, longer, and more relaxed. More watts does not directly correlate to faster speed in skiing, unlike other sports. Obviously being fit and strong is useful, but applying proper technique with less energy can make you go much faster. I saved a ton of energy during the sprint day just staying relaxed, punching it a few times where I needed some speed, staying long and getting good glide and distance. The ski imitation trains the impulse and timing, on skis the glide phase is longer than skipping, but the impulse is there. The quick second step during a skipping motion is when you kick the ski into the snow, followed by a bound or glide phase. That really helps with classic skiing.

    ***

    Remember Lustgarten’s ski-imitation workout is a dryland endeavor. Even though it’s full-on winter in most places, keep this workout in your back pocket when you’re thinking about how to improve the classic striding as hard wax morphs to klister morphs to rock skis morphs to rollerskis — it’ll happen.  

    And here’s a direct disclaimer from Lustgarten to differentiate bounding from ski imitation: “Ski imitation trains endurance and motion good for distance skiing while explosive ski bounding more accurately represents the long bound technique of classic sprinting up steeper hills.”

    And what is classic “ski imitation”?

    “Classic ski imitation is essentially skipping with poles,” he wrote. “While using short bounding-length poles, the upper body mimics a classic stride rhythm in sync with the skipping motion of the lower body.”

    The Workout: Classic-Ski Imitation with Lustgarten

    • Throw speeds in maybe every 10 minutes if you feel good, but it’s not mandatory. Mostly, try to maintain good Level 1 distance training.
    • Find terrain similar to a ski-race course such at the Craftsbury 5 k race course. Get ready for many laps of ski imitation on a hilly course
    • The workout just takes the place of a standard distance workout, usually between 1.5 – 3 hours in the summer and fall, instead of just doing a run or rollerski or bike ride.
    • On the hills you can continue to skip or do uphill lunges with good depth to load the muscles more. Lustgarten worked up to skip all the flats and downhills, but because of the demand on the calves from the impulse, some people may want to start with jogging the downhills. Lustgarten also recommends adding in a skate specific version where you jump side to side and use your poles in a V2 style of poling on the uphills — on his 5 k Craftsbury loop, Lustgarten sometimes mixes in 30m of classic imitation followed by 30m V2 imitation. 
    • Lustgarten explained the workout won’t feel incredibly taxing. But be warned. “A few hours later you will feel more drained than just a bike ride or distance run, similar to the first on-snow ski workouts of the year because it takes more energy. Expect your calves to be sore the next day or two,” Lustgarten added.
  • Time to Ruminate on the 83% Rule: The Future of Classic at the Highest Level

    Time to Ruminate on the 83% Rule: The Future of Classic at the Highest Level

    American Noah Hoffman (43) racing to 35th in the men's 30 k skiathlon, a best for the U.S. men in the sixth stage of the Ski Tour Canada in Canmore, Alberta.
    American Noah Hoffman (43) racing to 35th in the men’s 30 k skiathlon, a best for the U.S. men in the sixth stage of the 2016 Ski Tour Canada in Canmore, Alberta.

    In so much as a social-media statement, the International Ski Federation (FIS), the governing body of cross-country skiing, proclaimed itself a curator. For some context, here is the definition of “curate” from an old-school source, Merriam-Webster: one who has the care and superintendence of something; especially  :  one in charge of a museum, zoo, or other place of exhibit.

    Back to the FIS tweet from last Friday.

    FIS Tweet regarding the 83% rule.
    FIS tweet regarding the 83% pole length rule.

    Assuming FIS’s words were chosen carefully, the words “defend classic technique” stand out. It makes the assumption that FIS perceives that classic technique was/is under attack — that it requires protection from those tainting its technical sanctity.

    All the rumbling has to do with the decision to enforce a new rule limiting the maximum pole length to 83 percent of a skier’s total height (with boots on) during FIS-sanctioned classic cross country ski races.

    This Wednesday, FIS Cross Country published a Q & A on its website. In response to why the rule was accepted, FIS reiterated that it believed desperate times warrant desperate measures. “The evolution of double poling has been challenging the core of the Cross-Country Skiing sport. Several measures to slow down this development have been put in place (see paragraph 5),” it stated.

    Paragraph five in the document notes: “This will not stop anyone from double poling even in steep uphills but it is expected to stop the unwanted evolution of classic technique. The experiences from the upcoming season will be carefully examined next spring and further steps including a lowering of the percentage may be discussed.”

    Field of play

    Moving forward, let’s assume those percentages for pole length are a moving target. Rather than being relegated to museum status, classic technique remains living history.

    In recent years, if the image you’re seeking is to watch World Cup skiers stride up hills exclusively, then perhaps you’re wanting.

    On certain World Cup distance classic courses like Toblach (Italy) or Davos (Switzerland), and sprint courses like Drammen (Norway) and Stockholm (Sweden), it’s just as likely a double poler on skate skis prevails than a nordie with the magic combo of bomber kick and zippy skis. Some call it evolution, others, like FIS, call it an affront to a technique that has historically defined the sport and anchored it to the past.

    It does beg the question, what is the responsibility of a sport’s international governing body when it may have promoted that evolution in the first place?

    “In skiing, the field of play has changed tremendously and it has been driven by the governing body and that has driven the evolution of sport,” Zach Caldwell, of Caldwell Sport, said in a recent phone interview. “That’s why athletes are more powerful. Classic technique is totally different from what it was 30 years ago, 40 years ago. Completely different. Some of it is just plain equipment innovation, but mostly the equipment innovation reflects the field of play.”

    What Caldwell is referring to when he mentions “field of play,” which he did several times during the interview, is the actual classic-ski course. The ups and downs, course width, tracks, and resulting new-school skiing speed. FIS homologation requirements are extensive and technical. According to the 2016 FIS Cross Country Homologation Manual, modern FIS-approved courses should be “⅓ uphill, ⅓ downhill, and ⅓ undulating terrain”. Those uphills are broken down into “A”, “B” and “C” climbs where percent of the course’s total climbing and a specific hill’s percent grade have strict parameters. To fully understand the homologation document, be prepared for some basic math.

    PyeongChang, Korea Homologated Olympic Skiathlon Course. Source: Page 70 2016 FIS Cross-Country Homologation Manual
    The homologated Olympic skiathlon course in PyeongChang, South Korea. (Source: 2016 FIS Cross-Country Homologation Manual, page 70)

    FIS also opines on the subjective and murky territory of correlating course design, or field of play as Caldwell says, with human emotion when it states boldly in section 2.3 of the manual that, “The joy of skiing should be the ultimate goal”. (Note: FIS’s underline, not FasterSkier’s).

    Joyful or not, Caldwell asserts that FIS has made an effort in its course requirements that have inadvertently promoted the use of double poling.

    “Sport governing bodies need to understand that innovation is a product of the field of play that they have put in front of skiers,” Caldwell explained. “The FIS has made a series of decisions over the last decade to push the sport toward ever-faster speeds. The homologation requirements. The course width requirement. They apply a best line to the width of the course that they have got now and the speed, the average speed that they are producing on the average course permeation, demands double poling. It becomes compelling because of the sport that FIS has built. FIS has built this sport purposefully because they think they think it is going to be more compelling for a TV audience. They wanted a faster sport. They wanted a sport that looks better on televisions … it doesn’t look so much like old folks grinding it out. It looks like a flashy fast thing: that’s double poling … But to respond to innovation based on the field of play that they have put forth by deducing to add regulations about equipment or whatever else, it is kind of disingenuous and it’s a demand made by a bunch of people thinking really only about World Cup racing, not about the vast number of FIS races out there or about the practicalities of growing junior skiers or any of this. And frankly it’s not going to make a difference. People are going to double pole because that is the sport that FIS has built.”

    Another nordic lifer, Fairbanks resident, former U.S. Ski Team coach (1990-1993) and passionate ski-course designer, is John Estle. In an email, Estle pointed out that Europe’s snow conditions have played a part in the emergence of double poling.

    “Last winter many, if not most World Cup competitions were conducted on exclusively or primarily man-made snow,” Estle wrote. “The sometimes icy (and often rock-hard) quality of that snow, as well as races held in sketchy waxing conditions also promote double-poling.  Not to mention the influence of the use of double-poling by winners of all the major classic marathons.”

    At the core of evolution is the premise that evolutionary change is prompted by changes in environmental conditions — crudely put, it’s survival of the fittest. Estle agrees with Caldwell in that the modern field of play has incentivized double poling. “To this point, double-poling by many or most skiers in an event is correlated most closely with terrain … That may change in the future as skiers become stronger but for now the closest correlation is indisputably between ‘flat’ courses and double-poling,” Estle commented.

    Like courses, all skiers are not equal. For some double poling may be a practical answer to modern course design, for some it is not. Caldwell asserts that on the World Cup and the vast series of FIS races like its Marathon Cup, double poling will have its day, but it most likely will remain an option for a few.

    “If they [FIS] left it alone, if they let the top guys double pole, you would have the entire rest of the population of the skiing world try it, fail and continue to wax their skis,” Caldwell said of FIS’s broad-stroke solution to what he sees as a non-issue. “The level that is required to double pole is really, really high … The vast majority of skiers are not going to be well served by double poling entire marathons or distance cross-country races.”

    The trend of more double poling, according to Caldwell, may eventually wane as skiers bump up against their maximum power output. “It’s going to balloon, it’s going to bubble and it’s going to burst because there are physiological reasons to use your legs more, to use your legs more actively in less of a static mode,” Caldwell said. “You know, just as soon as everyone figures out they can double pole races really fast, some kid’s going to show up and start striding them and beat everyone.”

    “It’s going to balloon, it’s going to bubble and it’s going to burst. … Just as soon as everyone figures out they can double pole races really fast, some kid’s going to show up and start striding them and beat everyone.” — Zach Caldwell on the double-pole trend

    Estle asserted that how sport is played by elite athletes does not categorically promote seismic change at lower levels. “I don’t dunk, but I like to watch NBA and college basketball and occasionally to shoot hoops; I don’t throw a baseball 100 mph, but I like to play catch now and then, and still like to watch major league baseball.  Sport at the highest level IN NO WAY resembles sport as practiced by the vast majority of practitioners.  Where the elite level of sport competition has long since been out of the reach of the other 99% of participants, sports remain very popular to both spectators and participants. The fact that I can’t dunk doesn’t make me not want to watch the Golden State Warriors, nor does my lame arm prevent me from enjoying an MLB pitching duel between two flamethrowers.”

    And as far as keeping the sport viable and exciting, Estle offers this: “If classic skiing at the highest levels evolves naturally into double-poling, that may not be a problem. On hilly courses, skiers will have to make an important strategic decision about whether to wax or not to wax. That makes the sport interesting.”

    Ski Boots and Poles on the Ground: Hoffman’s Thoughts

    Current U.S. Ski Team member Noah Hoffman, who is coached by Zach Caldwell, has the pole rule on his radar. For now, Hoffman hasn’t done the math, but he believes his poles will have to be cut by a centimeter or two. Amongst his U.S. teammates, he says he may be the only one unable to continue using his current length classic poles.

    Of the skiers double poling classic courses on the World Cup with skate skis, Hoffman is not one of them.

    Noah Hoffman en route to a podium finish in the 2012 U23 World Championships. Hoffman strides it out.
    Noah Hoffman striding en route to a podium finish in the 2012 U23 World Championships.

    “Double poling is a weakness and I have worked on it a lot of course,” Hoffman said on the phone. “But I don’t think it will ever be world-class and competitive internationally as a stand-alone technique.”

    Hoffman knows his strong points and his limitations. “From an athletic standpoint, this rule change absolutely is a benefit to me because any rule that limits the amount of double poling is helpful to me in my career. … I respect the FIS council and the politics that go into it, but I don’t have a super-strong opinion.”

    Running through this year’s World Cup venues, Hoffman explained he thought FIS had remedied the double-pole conundrum in the short term.

    “Ulricehamn, the new venue in Sweden, is apparently quite flat. I have never skied there and that was pegged as a 15-kilometer classic race and that was the only other significant decision that came out of the FIS meetings last week: they switched that to a skate race and swapped it with Falun which will now be a classic race. So they have taken away the one venue where I think it was an issue,” he noted. “That being said, there were guys talking about double poling in Falun last year, which has the Mördarbacken. At least the loop they ran us on last year closes with three or four kilometers with gradual downhill terrain. It is a huge advantage not to have kick wax on your skis, and so I see the logic there. I don’t think that I can double pole a course like Falun faster than I can classic ski it, but I wouldn’t be surprised if some athlete can.”

    Davos and Toblach are on the schedule, both slated as freestyle events. There’s Kuusamo (Finland), Lillehammer (Norway), Val di Fiemme (Italy), and Val Müstair (Switzerland) all hosting classic races. And skiathlons in La Clusaz (France) and Oberstdorf (Germany) — all scheduled before World Championships in Lahti.

    “So you run through the venues and it’s all not an issue for me,” Hoffman said. “I don’t see any venue where it’s even close for me. But, I won’t be surprised if we see athletes double pole more hilly courses this year, but I won’t be one of them.”

    Estle thought pole-length restrictions might impact those choosing kick wax as their best fastest option on the World Cup — athletes like Hoffman.

    “Restricting the length of poles creates additional problems,” Estle wrote. “First, there may be (likely are) some skiers who like to classic ski, with wax on their skis, with poles that are longer than 83% of body height. Keeping them from using the poles they want in classic technique events doesn’t really accomplish anything. It will only make maximizing performance more difficult for those skiers.”

    “There may be (likely are) some skiers who like to classic ski, with wax on their skis, with poles that are longer than 83% of body height…” — John Estle, former U.S. Ski Team coach (1990-1993)

    Classic gasping on its death bed? Possible solutions

    Caldwell believes classic technique is safe and double poling part of its natural evolution. Although he mentioned several solutions to incentivize striding on the field of play.

    “The single biggest change that FIS could make to preserve striding is to create the need to accelerate from low speed to high speed on climbs; that’s really damn hard to do,” Caldwell advised if FIS wanted to ensure the preservation of kick and glide. The simple physics of gravity, steepness, inertia, and friction are restrictive.

    “You start from a stop on an uphill and you have to accelerate that is not an easy task,” Caldwell said of how to modify courses to promote kick and glide. “If they were to put a series of hairpin corners on the uphills … what if they were to go to the groomers and say, ‘Hey look, give us a nice track pan, but then let’s just till up the snow and not compact it on either side for you know forty centimeters wide outside the track and create a mess of a poling platform so there is no good poling platform.’ There are tons of ways that they can prepare the courses, lay out the courses, and set them up to be disadvantageous for double poling.”

    Norway's Martin Johnsrud Sundby racing to third in Wednesday's 10 k classic, the fourth stage of the Tour de Ski in Toblach, Italy. (Photo: Fischer/Nordic Focus)
    A double-poling machine: Norway’s Martin Johnsrud Sundby racing to third in the 10 k classic, the fourth stage of the 2016 Tour de Ski, in Toblach, Italy. (Photo: Fischer/Nordic Focus)

    Estle’s solutions? “For now, my recommendation would be: 1) DO NOT implement no double-pole zones under any circumstances, 2) have classic races on courses with big/long/steep uphills, 3) apply the pole-length rules only at the highest level of competition and 4) make enforcement the responsibility of the Jury.  The sport is already complicated enough!”

    In its Q & A, FIS made some clarifications in terms of enforcement. Athletes will be able to check the legality of their poles during training. “The controls will be performed randomly and/or will be targeted,” it stated. “It will be possible to perform the measurements before the start and after the finish. If necessary, more than one measurement device will be available.”

    Break a single pole during the race, FIS has you covered. Snap a single pole and receive a replacement greater than the 83-percent rule, you’re still in compliance. Break two poles, then it’s a strict application — “the poles must comply with the 83% body length rule.”

    Former U.S. Ski Team member and Alaska resident Tim Kelley had this observation: “The fate of classic skiing is up to the younger generations. There was a couple of years in the mid 80’s classic pretty much disappeared as all races were ‘freestyle’, your choice of technique.  So it was skating in classic boots and with short poles for a bit.  But it seems classic skiing has resiliency.  It survived a short death in the 80’s and was revived.  Should be interesting to see how classic skiing bodes in the future.”

  • Double-pole Revolution? Thirty Percent of Teams Penalized at Norwegian Nationals Relay

    Double-pole Revolution? Thirty Percent of Teams Penalized at Norwegian Nationals Relay

    One of the many examples of classic technique violations described by the FIS Cross Country Sub-Committee for Rules in an exhaustive November posting, which you can find here.
    One of the many examples of classic technique violations described by the FIS Cross Country Sub-Committee for Rules in an exhaustive November posting, which you can find here.

    Race officials put cross-country skiers on notice early this year that those who tried to double-pole classic races on skis without kickwax would be held to strict technique standards: in the first weekend of racing in Norway, defending World Cup Champion Martin Johnsrud Sundby (along with two others) was disqualified for skating in a 10 k classic race.

    The message got even more clear this weekend when 15 men’s teams and one women’s team were given time penalties in the National Championships relay in Tromø for classic technique violations.

    The race jury placed a video camera on a section they had identified in their course inspection as a place that would be tricky to navigate on unwaxed skis.

    “It’s actually quite a steep uphill, a herringbone hill,” explained John Aalberg, the Technical Delegate for the weekend, in a phone call on Monday. “If you classic ski, probably 99% of all skiers would herringbone up it… It looks like a corner, but it’s a corner on a hill that’s very steep. It’s a tricky situation because there’s no tracks. You don’t set tracks on a herringbone hill, they’d just be washed out after warm-up anyway if you did. It’s kind of a new situation.”

    The video showed that some of the racers double-poled carefully and painstakingly up the steep pitch, while others threw in one push off their outside leg to straighten their trajectory. Others pushed off their outside ski several times in a row, and a few even tossed in a stride of V1.

    “We felt that this is not classical technique,” Aalberg said. “You gain so much advantage skating up there… We reviewed very carefully back and forth. We allowed those that did a stride or two getting into the hill and maybe at the top of the hill. We didn’t judge that as a violation. But those that were skating several strides up, those were the 15 teams that we reacted to.”

    While a standard FIS jury consists of three members, Aalberg explained that for the championships there were four: him, two Assistant Technical Delegates, and the Chief of Competition (a position titled Rennleder in Norwegian), Sylvi Ofstad.

    There were also two technique controllers. All six members agreed on the action, which gave a three-minute time penalty for technique infractions. The podium remained unchanged by the penalties – Lyn, a club from a northern district of Oslo whose roster included Hans Christer Holund, came out on top – but fourth-place Henning moved down to sixth place.

    “So we discussed: either we let it go, or we treat everybody the same,” Aalberg said. “We thought, if we do nothing and let it go, then everything we have done this year is wasted. The racers, especially the World Cup racers, are telling us to be strict and consistent. So it was a tough decision, but we wanted to prove a point or put it on the agenda: if everybody starts to double pole, and if you loosen up the rules at the same time, that’s the end of classic skiing.”

    The sanctions shook up the results sheet considerably (15 teams represented almost a third of the 50 teams who finished without lapping). Racers and coaches were angry.

    “It was interesting,” Aalberg said. “We showed it to a couple of them and they agreed it was skating. And then they started pointing out, well how about this guy? How come you didn’t take that guy? It’s like when you’re driving too fast, and then you complain that someone else was also driving fast and didn’t get caught.”

    Some coaches are still angry. Øistein Lunde of FIS told Norwegian ski website Langrenn.com on Monday that four teams had filed appeals and that an appeals committee had 72 hours to look at the evidence and come to a conclusion.

    “In the jury room, we were greeted with a very arrogant attitude,” Svein Riseth told Norwegian broadcaster NRK. “They had no clear evidence… If they have balls they will send the video to the clubs who were affected so we can see it.”

    Riseth may have simply not had time to converse with the jury, as he was catching a flight; Aalberg mentioned that they had shown the video to some racers.

    And, the race organizers posted the video online so that not only could the affected clubs view it, but so could everyone else.

    The topic was discussed by FIS Technical Delegates before this season, as well as by technical staff in Norway. Both groups meant to make a concerted effort to be more strict in enforcing technique rules this season.

    The FIS Cross Country Sub-Committee for Rules, which Aalberg is part of, posted an exhaustive set of diagrams of appropriate and illegal technique for classic races back in November. That has been freely available on the FIS website with other competition rules documents for ten weeks now.

    The increased focus was also mentioned in a FIS media article of the “most important rule changes” for the upcoming season.

    “I’ve spoken to some of the national team coaches and the coaches that I know, and they are all in support of being strict,” Aalberg said. “They are all saying that this is good and it needs to be done in order to clean up a bit. Coaches or team leaders that are not usually on the high level races don’t understand the rules and they think that this is allowed. So there’s a discrepancy somewhere.”

    He doesn’t believe that the skiers caught on tape were breaking the rules on purpose. Instead, it’s simply that more and more athletes are pushing to double-pole classic races. This challenges them in new ways.

    “It’s not intentional at all,” Aalberg said of the infractions this weekend. “Think of yourself. If you double pole up the hill and you peter out, your foot automatically goes out. It’s not intentional at all. But it doesn’t matter if it’s intentional or not, you still get a big advantage.”

    He noted that some of the top skiers know the technique rules well, and are also strong enough to follow them. That’s why they podium was unaffected by technique violations.

    “The good skiers, the stronger ones, they are strong enough to do proper technique,” Aalberg explained. “It’s the next ones, who are trying to hang on, but they aren’t strong enough. So that’s when you see them do the wrong technique. Then you have the slowest ones, who are waxing, and they are doing proper technique. But it’s in the middle group where we saw most of the issues.”

    Even though the violations are unintentional, he is hopeful that strict enforcement can improve technique.

    “It has been a lot better this year on the World Cup level,” Aalberg said. “I was the TD in Kuusamo and have been watching the World Cups live. I think it’s much better classic skiing on the World Cup level. We don’t really see much anymore. We’ve had a few cases but nothing like we saw last year and the year before, now that we are stricter and more consistent.”

  • Wednesday Workout: Ski Specific Strength with Rocky Mountain Racers

    Wednesday Workout: Ski Specific Strength with Rocky Mountain Racers

    The 2015/2016 Rocky Mountain Racers jump for joy for a team photo. (Photo: Maya MacIsaac-Jones)
    The 2015/2016 Rocky Mountain Racers jump for joy for a team photo. (Photo: Maya MacIsaac-Jones)

    This week’s workout comes from Maya MacIsaac-Jones of Rocky Mountain Racers in Canmore, Alberta. A dryland workout, it’s meant for strength-and-technique prep for snow skiing, if not now, hopefully in the very near future.

    ***

    To get ready for on-snow skiing, Rocky Mountain Racers increase their power and efficiency by pulling their coaches on a bike, uphill, while coaches apply brakes. This is the RMR dryland Ski Specific Strength (SSS). The workout, which is legs-only and arms-only, helps coaches and athletes easily identify technique issues, and athletes are able to see the immediate effect of any technique changes.

    Andrea Dupont, RMR athlete and last season’s NorAm Sprint leader, uses SSS to help her prepare for the season’s sprint races.

    “I find SSS to be the best way to teach your body to generate max power in each push, which is critical in sprinting,” she says. “When you’re pulling your coach up a hill, if you aren’t generating a lot of power, you literally don’t move. It’s pretty black and white if your power is going in the wrong direction.”

    The Workout: Ski Specific Strength (SSS)

    What you need: Skate rollerskis and poles, 3-4 mountain bike tubes tied together in a line, and a coach on a bike.

    Warmup: Prepare for SSS as you would for any hard interval workout; your warmup should be between 30- and 45-minutes long, and include some Zone 3 and Zone 4 intervals. It also helps to add some easy legs-only and double poling into your warmup, so that your legs, core and arms are warmed up and ready for the workout.

    Workout: 

    For this workout, during each set, you will be pulling your coach uphill on a bike. Ideally, your coach should be applying the brakes, timing you and yelling encouragement.

    – 5 x 15 seconds of max effort with 45 seconds rest between each, double poling.

    – Rest 5 minutes.

    – 5 x 15 seconds of max effort with 45 seconds rest between each, legs only skate.

    – Rest 5 minutes.

    – 5 x 15 seconds of max effort with 45 seconds rest between each, double poling.

    – Rest 5 minutes.

    – 5 x 15 seconds of max effort with 45 seconds rest between each, legs only skate.

    Cool down: 30 minutes easy ski in Zone 1.

    Other SSS Workouts:

    As you become more confident in your leg and arm strength, you may want to progress to new SSS workouts. SSS progressions include:

    • Replacing legs only with one-skate.
    • Replacing legs only with classic striding.
    • Lengthening the interval time from 15 max-effort seconds to 45 max-effort seconds (you will likely need to increase the rest to 4-5 minutes between each interval).
    • Lengthening interval time to 2 minutes of controlled Zone 3 intensity, with 10-second sprints throughout (you will likely need to increase the rest time to 5 minutes between each interval).
    Andrea Dupont (Rocky Mountain Racers) pulls a coach on a bike during a Ski Specific Workout in Canmore, Alberta. (Photo: Maya MacIsaac-Jones)
    Andrea Dupont (Rocky Mountain Racers) pulls a coach on a bike during a Ski Specific Workout in Canmore, Alberta. (Photo: Maya MacIsaac-Jones)
  • Running: National Champ Stephen’s Secret to Keeping Skiing ‘Happy and Fresh’

    Running: National Champ Stephen’s Secret to Keeping Skiing ‘Happy and Fresh’

    U.S. Ski Team member Liz Stephen competes in the XTERRA Trail Run National Championship on Sept. 20 at Snowbasin Resort near Ogden, Utah. (Photo: Liz Stephen)
    U.S. Ski Team member Liz Stephen competes in the XTERRA Trail Run National Championship on Sept. 20 at Snowbasin Resort near Ogden, Utah. (Photo: Liz Stephen)

    Since wrapping up a successful camp in Norway with two top-10 results at Toppidrettsveka, U.S. Ski Team (USST) veteran Liz Stephen has been enjoying some time at home in Park City, Utah, working on her double pole and preparing for another busy winter. She skipped the weeklong USST camp in Lake Placid, N.Y., so she would not have to travel and could instead work more on some personal goals.

    “As you get older, and apparently I am doing that, [traveling] definitely begins to wear on you a little more,” Stephen, 28, said in a recent phone interview. “I want to be ready to be on the road for four months, and I needed to stay close to home for a little bit to settle before the season.”

    So stay home she did. But for Stephen, staying at home does not mean taking it easy. She, as well as several other USST athletes, left Norway wanting to improve her double-pole strength and technique. Even though double pole had already been a main focus for Stephen this summer, she learned even more improvement was necessary if she wanted to compete amongst the world’s best. So Stephen has been doing a lot of lower-core-activation exercises, both before double-pole sessions and before strength workouts. She has also been doing some shorter duration double-pole sessions where the focus is on having high-quality technique and energy rather than double poling for extended periods of time and risking a relapse to her old double-pole habits.

    However, improving her double pole has not been the only thing Stephen has been doing during her extended time at home. She has also been enjoying one of her favorite activities, running. According to Stephen, the fall weather in Utah has been gorgeous, and there is no better way to enjoy it than by going for a run.

    “I feel so lucky every time I can lace up my shoes and I am healthy enough to go run a 17-mile loop just quick in the morning. I hope I am able to do that my whole life,” she said. “When you’re running, you’re just enjoying being active and healthy and I think that keeps all the other workouts that maybe you don’t love as much in perspective because you know at least once a week, you are going to get a big run in.”

    Liz Stephen holds the lead over Austria’s Veronika Mayerhofer running up the Olympic ski jump in the Red Bull 400 hill climb at the Utah Olympic Park ski jumps. (Tom Kelly/USSA)
    Liz Stephen holds the lead over Austria’s Veronika Mayerhofer while running up the Olympic ski jump in the Red Bull 400 hill climb at the Utah Olympic Park ski jumps. (Photo: Tom Kelly/USSA)

    For the two-time Olympian, going for a run is the perfect way to clear her mind, but it also is a great workout. Stephen even uses running as a means to improve her classic technique, sometimes running with poles for a more classical-style workout and bounding up hills to improve kick power. After all, skating has traditionally been Stephen’s stronger technique, and in order to achieve her goal of being on the podium either at the end of the 2016 Tour de Ski or Ski Tour Canada, she said her classic skiing has to improve.

    “When you’re running, you’re just enjoying being active and healthy and I think that keeps all the other workouts that maybe you don’t love as much in perspective because you know at least once a week, you are going to get a big run in.” — Liz Stephen, U.S. Nordic Ski Team member and two-time defending Trail Run National champion (and the winner of the inaugural Park City Red Bull 400)

    On Sept. 20, Stephen raced in her fifth-consecutive XTERRA Trail Run National Championship, which took place at Snowbasin Resort near Ogden, Utah. The race is a half marathon (13.1 miles) that features two big hills and a final, mile-long incline to the finish.

    Right out of the start, competitors ascend a two-and-a-half mile slope that also includes the steepest section of the course. After storming back down, the racers climb roughly 1,000 feet in another two-and-a-half miles to the high point and then descend to the low point of the course. Finally, there are a few more hills before the finish.

    “I’ve gotten a little faster since they have changed the course and I think this is my fourth time on this course. It’s a great course,” Stephen said.

    For Stephen, the competition at the trail-running nationals varies. The last two years, she won handily, as no other woman came close to matching her pace. But three years ago, Lindsey Anderson, a steeplechase Olympian from Utah, battled with Stephen for the entire race before dropping her on the last half mile with a strong finishing kick. The year before that, Morgan Arritola, a former cross-country skier and current world-champion mountain runner, finished minutes ahead of Stephen. This year, Stephen’s closest competition was Alayna Szucha, an 11-year-old girl from Evergreen, Colo. Szucha finished 17 minutes behind Stephen with a time of 1:45:32, averaging 8:03 minute/miles. Stephen won in 1:28:39 with 6:46 as her average mile pace.

    “I actually didn’t run with a single person the entire 13 miles so it felt a bit lonely at times, but I have to say, the most inspiring and just crazy thing is that the second-place girl is 11 years old. It was her first half marathon,” Stephen said. “I got a chance to chat with her for a little bit after the race, just like a fired up little kid … It’s going to be fun to have a little penpalship with her and maybe send her some cross-country gear, see if we can give her the bug.”

    While Stephen did accomplish one goal at nationals — winning — she did not accomplish her other goal of beating her previous year’s time. Despite having perfect weather this year compared to last year’s windy and rainy race day, Stephen could not quite match her pace from 2014.

    “Being a little slower than the year before was a bit of a bummer, but at the same time it was like 40 seconds slower or something, which, in a 13-mile race, isn’t too much when you take a step back. I was happy with it and I just had fun,” Stephen explained.

    Liz Stephen celebrates her win in the Red Bull 400 hill climb up the Olympic ski jump at the Utah Olympic Park. It was the first time the Red Bull 400 has been held in America. (Tom Kelly/USSA)
    Liz Stephen celebrates her win in the Red Bull 400 hill climb up the Olympic ski jump at the Utah Olympic Park. It was the first time the Red Bull 400 has been held in the U.S. (Photo: Tom Kelly/USSA)

    However, the Trail Run Championship was not enough for Stephen. On top of nationals, she did the Beach to Beacon 10-kilometer race in Maine earlier this summer, where she finished as the seventh woman, and the USA’s inaugural Red Bull 400 in Park City last weekend.

    In the Red Bull 400, contestants charge up the large-hill (HS134) ski jump landing, onto a ramp that goes up to the jump takeoff, and then up the stairs to the top of the in-run. Organizers even placed cargo netting across the incline so competitors could more effectively crawl up the extremely steep sections of the jump. Five hundred racers came out, ready to test their limits.

    After winning the qualifier, Stephen managed to hold off the University of Utah’s Veronika Mayerhofer, an NCAA champion from Austria, in the final to win the event.

    “I tried to stay out of the nets as much as I could; I didn’t want to trip and you don’t have as much control over your limbs as usual,” Stephen said. “I tried to stay out and use it where I needed to. Most of it was a hike with your hands and legs.”

    Meanwhile, on the men’s side, U.S. nordic-combined Olympians Bryan Fletcher and Billy Demong placed in the top 10, with Fletcher in fifth and Demong in ninth, and cross-country ski Olympian Torin Koos finished seventh.

    For Stephen, all of these events both contribute to her fitness and her love for running. After all, summer — and early fall — are the perfect times to take advantage of her desire to run competitively.

    “Running has a really special place in my heart because I grew up doing it and it’s so pure,” Stephen noted. “I really love the sport of running so to be able to compete and get my competitive fix and racing in during the summer by running is really perfect for me.

    “All you need is a pair of shoes and a pair of shorts and you’re out the door. And I think that being able to use [running] so much for training keeps [cross-country skiing] really happy and fresh for me.”

  • Wednesday Workout: Steady State Intervals and Speed Shifts with SVSEF PG Coach Tom Smith

    Wednesday Workout: Steady State Intervals and Speed Shifts with SVSEF PG Coach Tom Smith

    SVSEF Gold Team member Miles Havlick rounds a cone during an interval. (Photo: Tom Smith)
    SVSEF Gold Team member Miles Havlick rounds a cone during an interval. (Photo: Tom Smith)

    For this week’s Wednesday Workout, FasterSkier spoke with Tom Smith, the head coach of the post-graduate elite development program for the Sun Valley Ski Education Foundation (SVSEF). On top of coaching full-year post graduates (PGs) in Sun Valley, Idaho, Smith works with college athletes who come there to train during the summer. Smith is originally from Bend, Ore., and skied for the University of Utah before heading to Sun Valley a few years ago.

    The workout Smith presented is a highly customizable steady state threshold workout with accelerations he likes to call “speed shifts.” Speed shifts are similar to pickups in that the speed and effort increase for a short period of time. However, for speed shifts, the change is minor compared to pickups, where speed and effect usually change drastically, going from low effort to race pace or even max effort.

    “I like to think of it as not an all-out sprint in the middle of L3 [Level 3] intensity, but like a shift in your tempo or power and that you’re testing your competitors and testing your own limits of your lactate threshold,” Smith explained.

    As a quick reminder, threshold effort or Level 3 is the pace at which lactic acid is being cleared from muscles at the same rate it is being produced. The general feeling at this effort is fast but in control and at a pace that can be maintained for an hour or two.

    Head PG Coach Tom Smith with a bunch of SVSEF athletes in the background. (photo: Tom Smith)
    SVSEF post-grad head coach Tom Smith takes a selfie with several SVSEF athletes in the background. (Photo: Tom Smith)

    This steady state workout entails going at a consistent threshold effort for 30 to 45 minutes while doing 20-second speed shifts every three to five minutes to push the effort into the upper limits of L3.

    Smith leads this workout on rollerskis, though it can be done in any discipline. It’s also very customizable. Depending on the time of year, the focus can be on ensuring that the threshold effort is not exceeded or intentionally going beyond L3 during the speed shifts to work on recovering from an anaerobic effort while continuing to ski at threshold. The total interval time and frequency of the speed shifts can also be changed to make the entire workout easier or harder, depending on what the participant is looking for.

    A large component of the workout also comes from the day before. Smith plans a technique-focused, low-effort workout in the same discipline that the continuous threshold workout is going to be in. So if Smith’s athletes will be skating during the continuous threshold workout, they go for an easy skate distance workout the day before while Smith takes a bunch of video. Then they all review the video and each pick out one specific aspect of their technique to work on and come up with a concrete way they can improve it. That night or even the following morning, Smith’s athletes again look at the video to review their technique and really understand what they need to be doing to improve during the threshold workout. This allows the athletes to work on their technique during the interval while simultaneously focusing on a quality effort.

    “By accomplishing [technique work] in the session beforehand, the athlete already has that goal in mind of what they want to work on and they know how they are going to actually go about improving it,” Smith said. “You don’t really have to harp on it too much within the intensity session itself as a coach.”

    SVSEF Gold Team member Rogan Brown leads Bates College skier Corky Harrer on a classic ski. (photo: Tom Smith)
    SVSEF Gold Team member Rogan Brown leads Bates College skier Corky Harrer on a classic ski. (Photo: Tom Smith)

    This also gives Smith the opportunity to focus on his athlete’s efforts during the L3 interval. The SVSEF post grads do this workout on a fixed loop, setting up speed shifts on various terrain so they feel what it is like to push the effort during different techniques and at different speeds. It also helps them feel how easy or hard it is to recover from different efforts on the various terrain.

    Smith then goes to a location about a minute after a speed shift to test the athletes’ lactate levels. What he hopes to see is their lactate levels around 4 millimoles, which means they are going at a threshold effort and have effectively pushed to the limits of L3 and recovered.

    If possible, Smith also wants his athletes to ski in a pack. This gives them an opportunity to practice some mass-start tactics and see how effective an added effort is or is not on various terrain.

    “We can put one speed shift on a V2 focused slight up grade, we can put one on a V1 section, we can put one on maybe a tuck-skate downhill section, so it gives you a few different things to think about [and shows], especially in a mass start simulated environment, that there are different opportunities and different places around a course to put in a little bit of an attack,” Smith explained.

    Ultimately, he hopes his athletes come away from this workout with technique improvements and a better understanding of and feeling for their L3 zone.

    “I think it’s a really good session for the older guys, especially as they transition from older juniors into seniors to really understand where their limits are within their lactate threshold zone and how hard they can really push it before they actually blow themselves up,” he said.

    The Workout

    The day before:

    – On the day before the steady state interval workout, work on technique and find one specific area to focus on for the next day. Having video is really helpful for picking out a major technique area that can be improved!

    The day of:

    – Warm up for 20 to 30 minutes to prepare the body for a threshold effort.

    – Begin the continuous threshold interval. Keep in mind the effort continues for 30 to 45 minutes, so it is best to start at the lower end of L3.

    – Every three to five minutes, do a 20 second speed shift. Try and focus specifically on adding a little extra power or slightly increasing tempo. This helps to ensure the effort does not go beyond the L3 limit. Also try and change up the terrain where the speed shifts happen to get plenty of variety in the workout.

    – Remember after each speed shift, the effort should remain in L3 and it should drop to the lower end of L3 before the next speed shift brings the effort back up.

    – After finishing the steady state interval, warm down for 15 to 30 minutes to wrap up the workout.

  • Ten Ways to Stop on Rollerskis

    Ten Ways to Stop on Rollerskis


    Alice Flanders of the CXC Team and Michigan Tech illustrates a rollerski stop gone bad. (Photo: aliceflanders.wordpress.com)
    Alice Flanders of the CXC Team and Michigan Tech illustrates a rollerski stop gone bad: the Superman, a.k.a. a face plant or eating the pavement. (Photo: aliceflanders.wordpress.com)

    Got a bad case of the Mondays? Maybe this post from Alice Flanders, a Houghton-based master’s student at Michigan Technological University and satellite athlete with the CXC Team, will cheer you up: 10 Ways to Stop on Rollerskis. Read her original blog post here.

    ***

    Rollerskiing on the bike trails around the Minneapolis area, you get a lot of comments and weird looks. Everything from “Birkie Birkie Birkie!” to “Holy Crap arm strength,” if there’s an exclamation about seeing someone doing something odd, it’s probably been said to a rollerskier on the Greenway. One of the most common questions I’ve encountered when people find out that I rollerski is,

    “How do you stop on those things?”

    This is a great question, one with a lot of really bad answers. Just as with anything that requires a quick decrease in speed, there are good ways and not so good ways to come to a standstill.

    The following is a list of ways to stop on rollerskis, some of them good and some of them awfully painful.

    1. Superman
    Also known as “face-plant” or “eating  the pavement,” this technique is best known for the momentary “OH CRAP!” weightless feeling quickly followed by getting the wind knocked out of you. Causes often include cracks in the pavement, railroad tracks and appropriately sized pebbles.

    2. The Butt Scoot
    This technique is common on snow but is much more effective at stopping you on pavement. When you get going too fast and don’t know how to stop, just sit down and eventually you’ll glide to a halt. Unfortunately pavement is not nearly as forgiving as freshly fallen snow and often contains small pebbles that are painful to remove. The Butt Scoot is not a recommended method of stopping on rollerskis.

    The "butt scoot" (All photos: Alice Flanders)
    The “butt scoot” (All photos: Alice Flanders)

    3. Sliding into Home
    “And Lucca nearly knocks it out of the park! The right fielder throws it to third for the out, but Hedblom is just too fast. Hedblom is sprinting for home plate. The third baseman throws the ball to the catcher. It’s going to be a close one folks! Hedblom sticks her foot out and slides into home, SAFE!”

    There’s a reason we don’t play baseball on rollerskis. Similar to the butt scoot, characteristic results of this technique include road rash on the hip and outer leg, scuffed ski boots and ripped shorts.

    Sliding to a stop, by sliding into home.
    Sliding to a stop, by sliding into home.

    4. The Black Stuff
    Beware of The Black Stuff, especially on hot days. This is the goo they squirt into cracks in the road. The hotter it gets, the more it likes to grab the wheels of unsuspecting rollerskiers. The faster you’re going the more it likes to reach up and give you a surprise crash landing.

    5. Rolling Stop
    The rolling stop is one of the better stopping techniques. It requires having a good feel for the speed of the rollerskis, enough room ahead of you (or an uphill), and a back-up plan  in case your speed calculations are wrong. When done correctly you will slowly and gracefully come to a stop at exactly the right time and everyone will be impressed.

    6. Stop Drop and Roll

    This is a planned fall method for the dramatic flair in us all. It is a good back-up plan when rollerskiing next to a grassy curb. To employ this method, aim for the softest patch of grass and like a paratrooper hit the ground with a solid roll. As always it is important to make sure your helmet is properly fitted and adjusted.

    Stop, drop and roll (Like many of these techniques: NOT RECOMMENDED!)
    Stop, drop and roll (Like many of these techniques: NOT RECOMMENDED!)

    7. Grassy Knoll
    Possibly one of the best and least technical methods, the Grassy Knoll allows the skier to control their speed and come to a stop without hitting the ground. For the Grassy Knoll, the rollerskier shall first stagger their feet and shift most of their weight to the back leg. The skier shall then aim for the grass alongside the trail and gently roll onto the grass while staying upright. Sometimes ski poles can be used to assist in balancing. Be wary of long grass, hidden rocks and sticks. If done incorrectly this can easily be adapted into a version of the Stop Drop and Roll.

    Rolling to a stop on a grassy knoll. One of the best and least technical methods.
    Rolling to a stop on a grassy knoll. One of the best and least technical methods.

    8. Urban Tree Hugger
    When coming into an intersection a little fast, the Urban Tree Hugger is your best option. Aim for a light post or crosswalk post, catch it with one arm and redirect your forward inertia into the stationary light post. Be careful not to hurt your arm and make sure the light post/ crosswalk post is strong enough for the collision prior to using this method.

    "Urban Tree Hugger" method: for when you need to stop immediately in an urban setting.
    “Urban Tree Hugger” method: for when you need to stop immediately in an urban setting.

    9. “Snowplow”
    Similar to how you snowplow in the winter, this is the most common way to slow yourself down on rollerskis. In order for this method to be successful, it is important to make sure your wheels do not touch (don’t cross your tips!).  To do this, push outward on each ski. This will force them to stay separated. You will stop due to the friction between the pavement and the rubber wheel as the wheel slides sideways across the road. This technique does take some practice to perfect.

    The classic snowplow, minus the snow. Makes sense.
    The classic snowplow, minus the snow. Makes sense.

    10. Water Landing
    Water hurts a lot less than pavement. Summer days get hot. Sometimes it pays off to aim for the lake.

    Ahhh, a water landing! Feels good and doesn't hurt!
    Ahhh, a water landing! Feels good and doesn’t hurt!

    Let’s enjoy what pieces of summer we have left. Train hard, go fast, and don’t fall down.

    It won’t be long until the snow comes!

  • An Unlikely King: Ski Classics Champ Eliassen on the Secret to His Successful Rookie Season

    An Unlikely King: Ski Classics Champ Eliassen on the Secret to His Successful Rookie Season

    Petter Eliassen after double poling his way to a victory at the Norwegian Birkebeiner on March 22. The 29-year-old Norwegian went on to win the 2014/2015 Ski Classics title in his first season on the circuit. (Photo: Kent Murdoch)
    Petter Eliassen after double poling his way to a victory at the Norwegian Birkebeiner on March 22. The 29-year-old Norwegian went on to win the 2014/2015 Ski Classics title in his first season on the circuit. (Photo: Kent Murdoch)

    How did Petter Eliassen do it? A month ago, the 29-year-old Norwegian from Trondheim double poled his way to a victory in the Norwegian Birkebeiner and went on to win the final Ski Classics race of the season — Sweden’s Årefjällsloppet — to claim the overall 2014/2015 Ski Classics title. It was his fourth-straight win on the circuit, making him the first racer to do so in Ski Classics history.

    FasterSkier recently spoke with Eliassen, a Norwegian national team member two seasons ago, on the phone, and he happily shared his training strategies. The following interview has been translated from Norwegian to English.

    A rookie to the long-distance circuit, he was content with the opening of his season, placing among the top 10 in the first five races of the Ski Classics series.

    But Eliassen did not expect to close the season with a four-race winning streak — starting with the König Ludwig Lauf in Germany on Feb. 2, then a Vasaloppet win in his very first attempt at the legendary 90-kilometer classic race in Sweden on March 9. He won the Norwegian Birkebeiner on March 21, and finished the season off with a final victory in the Årefjällsloppet on March 28.

    And he certainly didn’t expect to win the overall circuit crown in his first try. Eliassen beat established elite racers, such as the Aukland brothers of Norway, and former Vasaloppet champions, like Norway’s John Kristian Dahl and three-time Vasa Champion Jörgen Brink of Sweden, as well as a long list of merited marathon specialists, including Sweden’s Jerry Ahrlin, Oskar Svärd and Daniel Tynell, and Czech super-veterans Lukáš Bauer and Stanislav Řezáč.

    Seraina Boner (l) of Switzerland and Team Coop and Petter Eliassen of Norway and Team LeasePlan Go won the Årefjällsloppet on March 28, the last of nine events in the 2014/2015 Swix Ski Classics marathon series. (Photo: Ski Classics)
    Petter Eliassen (r) of Norway and Team LeasePlan Go and Switzerland’s Seraina Boner (l) of Team Coop won the Årefjällsloppet on March 28, the last of nine events in the 2014/2015 Swix Ski Classics marathon series. (Photo: Ski Classics)

    What’s your key to marathon success?

    “I definitely benefit from years of racing experience,” Eliassen said, adding that the support and depth on Team LeasePlan Go made a difference. “We have a support crew and a race team that is very experienced and very well run. That’s huge both prior to the races and also in the offseason.

    “Training-wise, I have done much the same leading up to this season as I did when I was on the national team. We do a lot of volume and some strength, but I have focused a bit more on double poling than I used to and much less on skating,” he said, adding that he does miss skating.

    “I enjoy skating, and I still do some skate workouts throughout the season, but it’s definitely not the main part of the volume.”

    While the Ski Classics organizers have not ruled out including freestyle events to the race schedule in the future, Eliassen doesn’t see that happen in the near future.

    “So many of the established long-distance elite racers are highly specialized and spend so much of their training effort on perfecting their double-pole technique and strength that I think they would object,” he said.

    Practice your weaknesses, race your strengths

    While double poling isn’t his specialty, Eliassen is constantly trying to improve that aspect of his classic technique. He explained his team spends many of its group workouts focusing on tight finishes and does a lot of intense intervals in all kinds of terrain to prep for those.

    “My favorite terrain is uphill. But many of the Ski Classics events have flat or even slight downhill finishes, so we spend a lot of time on that,” he said.

    His race strategy is to determine how the race will play out well ahead of the finish line to avoid a double-pole showdown.

    “I always go into the race with the intention to stay with the lead group as long as I can, but I try to pull away while there is still some distance to go and preferably in terrain that I’m good at,” he explained.

    Skiers are made in the summer

    During the season, Eliassen generally puts in one or two double-pole workouts per week, which last from one to three hours depending on how he feels and how much time there is between the races. When there are several weeks between events, he does longer workouts, and when the races come like rapid-fire, his main focus is recovering from one event to the next.

    But the bulk of his double-pole training is completed even before the snow falls. During the dryland season, Eliassen and his teammates log several long rollerski workouts each week, with two to four hours of double poling.

    “I am definitely not the one who logs the most volume on our team, but in the summer, I do at least two of those each week,” he said.

    While rollerskiing isn’t his choice dryland workout, he loves running and also puts in a fair amount of time on his bike.

    “I have to admit that my favorite summer workouts are long runs in the mountains. That’s where I really feel at home,” he said.

    Strength and recovery

    Eliassen stressed that plenty of variety was the key to staying injury free, along with a healthy dose of general strength, flexibility and recovery.

    “It’s really important to do a lot of core strength in order to protect your back, shoulders and arms,” he said. “Also make sure to stretch. When you do a lot of ski-specific and double-pole specific training, you tend to get very tight, especially in the front of your body.

    “And definitely make sure you allow yourself plenty of recovery time between the hard and long workouts, especially the rollerski double-pole sessions,” he added, pointing out that tendinitis issues often are a result of overuse and under-recovery.

    In terms of building double-pole specific strength, he believes in simply double poling a lot.

    “I don’t do any of the double-pole machines … I know a lot of skiers use them, but I believe there are several training methods that will lead to success, and so far, I haven’t used those,” he said.

    If it ain’t broke, don’t fix it

    Based on his experiences and results from his rookie season on the marathon circuit, Eliassen planned to continue with his training plan from last season.

    “I will train mostly the same way as I did prior to this season, but of course, I will try to improve my test results even a little bit more,” he said.

    Generally, Team LeasePlan Go does a one-week training camp each month during the dryland season, and in between, its athletes train independently.

    “We live all over the country, so it’s nice to meet on a regular basis, but I also enjoy the flexibility of setting my own training schedule,” Eliassen said.

    “I think the marathons really is my arena,” he added with a smile.

  • Wednesday Workout: Fast, Uphill V2

    Wednesday Workout: Fast, Uphill V2

    Author François Léger Dionne concentrates on short, fast V2 strides at L3 intensity.
    Author François Léger Dionne concentrates on short, fast V2 strides at L3 intensity at the Far Hills Ski Center in Val-David, Quebec.

    This week, our focus shifts to a common theme amongst racers and trainers: uphill V2. Just like double poling is the go-to technique for most skiers in World Cup classic races  — watch those motionless legs during classic sprints and even throughout the 90 kilometres of Sweden’s legendary Vasaloppet! — V2 technique has really become their freestyle mainstay. And while we generally switch to V2 on flats and slight uphills, there are many benefits of using it on steeper climbs.

    For V2 to be effective on uphills, it is crucial to shorten the stride and increase the tempo. Forget long, smooth gliding on each ski. Don’t worry about full-arm extension when poling. Take the load off the triceps and focus instead on stabilizing the shoulders with the lats muscles. This will enable faster arm movements and a quicker reset between each push-off. The arms and upper body should dictate the pace of the V2 strides. Legs and hips should in turn follow and be the true power source of the technique.

    Let the power come primarily from the legs and hips; the arms should dictate the pace. Author François Léger Dionne concentrates on short, fast V2 strides at L3 intensity at the Far Hills Ski Center in Val-David, Quebec.
    Let the power come primarily from the legs and hips; the arms should dictate the pace. Author François Léger Dionne concentrates on short, fast V2 strides at L3 intensity at the Far Hills Ski Center in Val-David, Quebec.

    When doing V2 at low intensity, I noticed many skiers (often youngsters) tend to rely mostly on their upper body. Poor push-off from each leg usually isn’t a consequence of muscle weakness. It can simply be the result of a lack of muscle memory training.    One effective way to engage those leg and hip muscles (mainly: quads, glutes, tensor fascia latae, psoas, iliacus) is skiing without poles. Twenty to 30 minutes, broken down in sets depending on your level, will do the trick.

    When skating without poles, concentrate on keeping your balance and push off with the entire leg (from hip flexion to big toe propulsion). As much as possible, don’t use your upper body for momentum. Avoid over-rotation of the hips and keep your spine long and vertical.

    After a proper warmup, followed by a no-pole ski session, you’re ready for short uphill V2 bursts. The idea is to initiate proper leg and hip movements through no-pole skating at a comfortable pace, and using this muscle activation and awareness for V2 climbs.

    The basic workout:

    20 minutes warmup: low intensity V2 (with poles)

    20-30 minutes of no-pole skating (Level 1-2 intensity), broke down in sets of five minutes or more depending on your level

    15-20 X 30 seconds repeats of uphill V2 (L3 or threshold intensity) with 1 minute recovery between each rep.

    30 minutes cool-down

    Improving your ability to power through uphills using only V2 will not only make you a overall stronger freestyle skier, it will help your body tone with the fast pace of sprints. You may also increase your V2 speed at the foot of real steep climbs (before switching to offset) and at the top of them when forward momentum is at it’s lowest.

    Notes:

    • To make the no-pole session more challenging, you can extend your arms on each side (holding the middle part of your poles). This will help prevent hip over-rotation.
    • For the uphill V2 repeats, find a hill you would tend to climb in offset, yet is attackable using V2 only.