Tag: single leg stability

  • Building a Better Skier Part 3: Single Limb Stability

    Building a Better Skier Part 3: Single Limb Stability

    This is Part 3 of a series delving into how biomechanics and movement patterns affect skiing technique. If you haven’t already, start with the introduction, Part 1 which introduces the concept of a neutral spine posture, and Part 2 which describes spine stability and mobility.

    The ability to balance and be stable on one leg is where the rubber meets the road (or ski hits the snow). True, we generate propulsion with strength and endurance, but if that power is not transferred into glide, it becomes wasted effort. This is quite literally what separates the efficient from the inefficient. Or, the fast from the not so fast.

    This study set out to quantify the difference in glide between elite and sub-elite skiers (national vs regional skiers). As expected, they found that the higher caliber skiers did, in fact, glide better. In trying to quantify the why, fitness aside, they found that the national level skiers had a different pattern of foot pressure in the boot. Where the regional skiers only pressured the medial side (big toe side), the national skiers loaded their feet across the whole foot. 

    What’s really happening here is that the national level skiers were better at shifting their weight over the glide foot/ski. This “commitment” to the glide ski is one of the hardest things to master, especially for adults learning to Nordic skiing later in life. 

    When standing on two feet, your center of gravity falls in the middle between your feet. If you want to balance on one foot, your weight has to shift. You can’t just pick up one foot. To achieve this weight shift, you can lean your trunk, which will allow you to balance, but it is not a stable or powerful position. If you shift your pelvis to the side of the stance leg, you can accomplish the requisite weight shift AND place your body in a position where muscles are engaged and ready to roll .
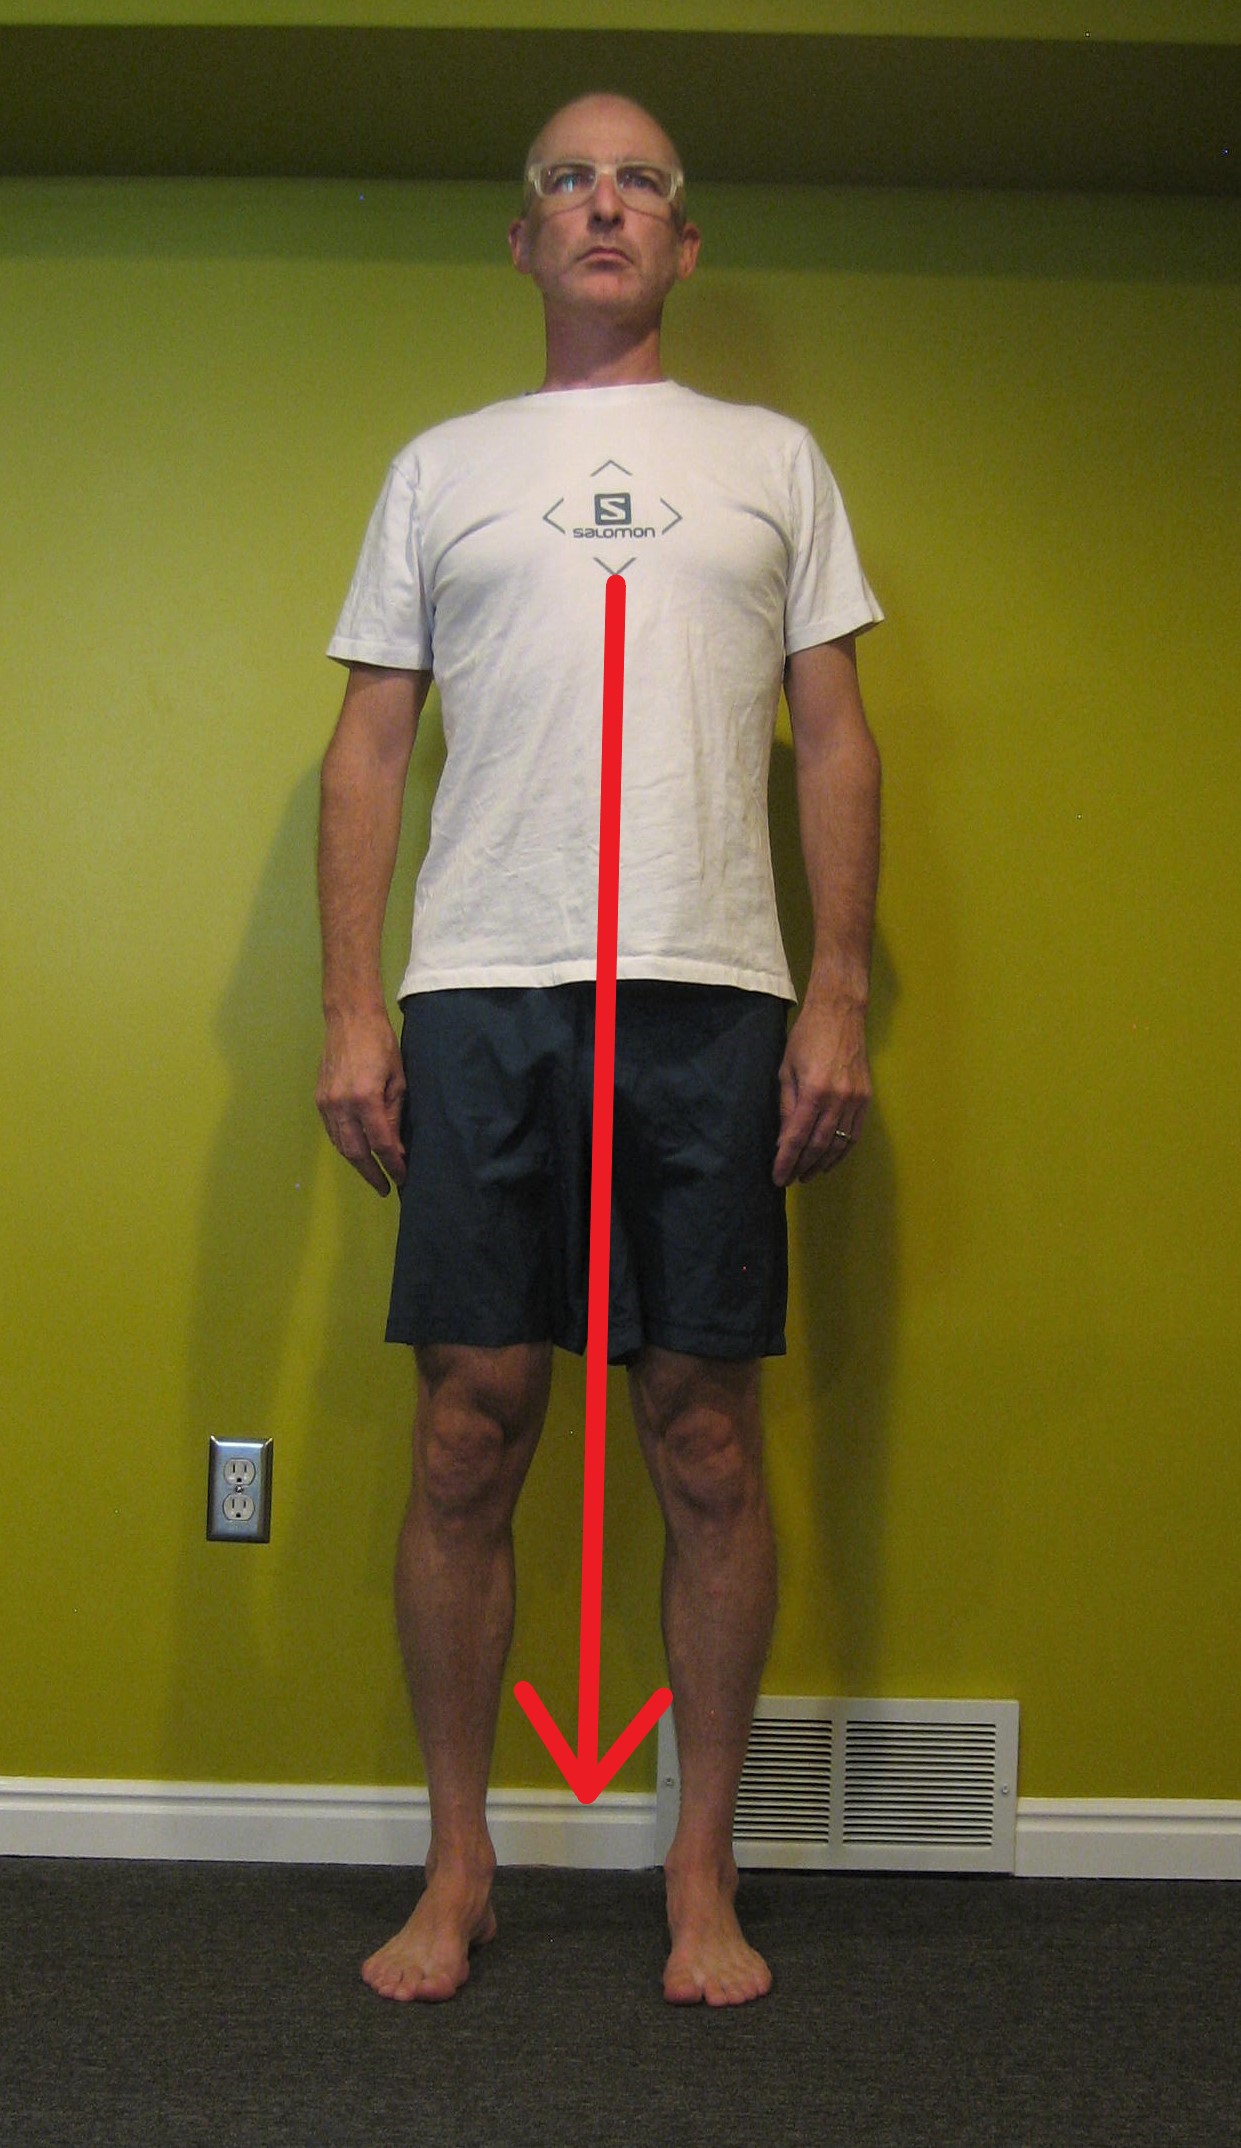
    The skiers in this video are fine examples of appropriate, hip-centric weight shifts. Notice how the upper body stays very quiet and still. There is no side to side movement. The pelvis, however, can clearly be seen moving side to side to move the skier’s center of gravity fully over top of the glide ski.

    This is all easier said than done. Go stand in front of a mirror — a bathroom vanity mirror is fine because you only need to see your shoulders. Balance on one foot. Do your shoulders stay level? Now move the opposite leg to the side and back a few times. Are your shoulders still level? If they are not, then it’s unlikely that you are shifting your weight appropriately. If you are struggling with balance on a smooth, flat floor, you can appreciate the challenge of finding stability while gliding down an undulating track on a toothpick of a ski.

    Another major component of single limb stability is the coordination of joint flexion at the hip, knee, and ankle. Anyone who’s had a ski lesson has heard the phrase nose, knees, and toes —  or that the shin and trunk should be parallel. These cues are all about getting the ankle, knee, and hip to flex together. The goal is to put the body in a position that is both inherently stable due to muscle activation and preloaded for propulsion. This is what I’ll be referring to as the basic shape.
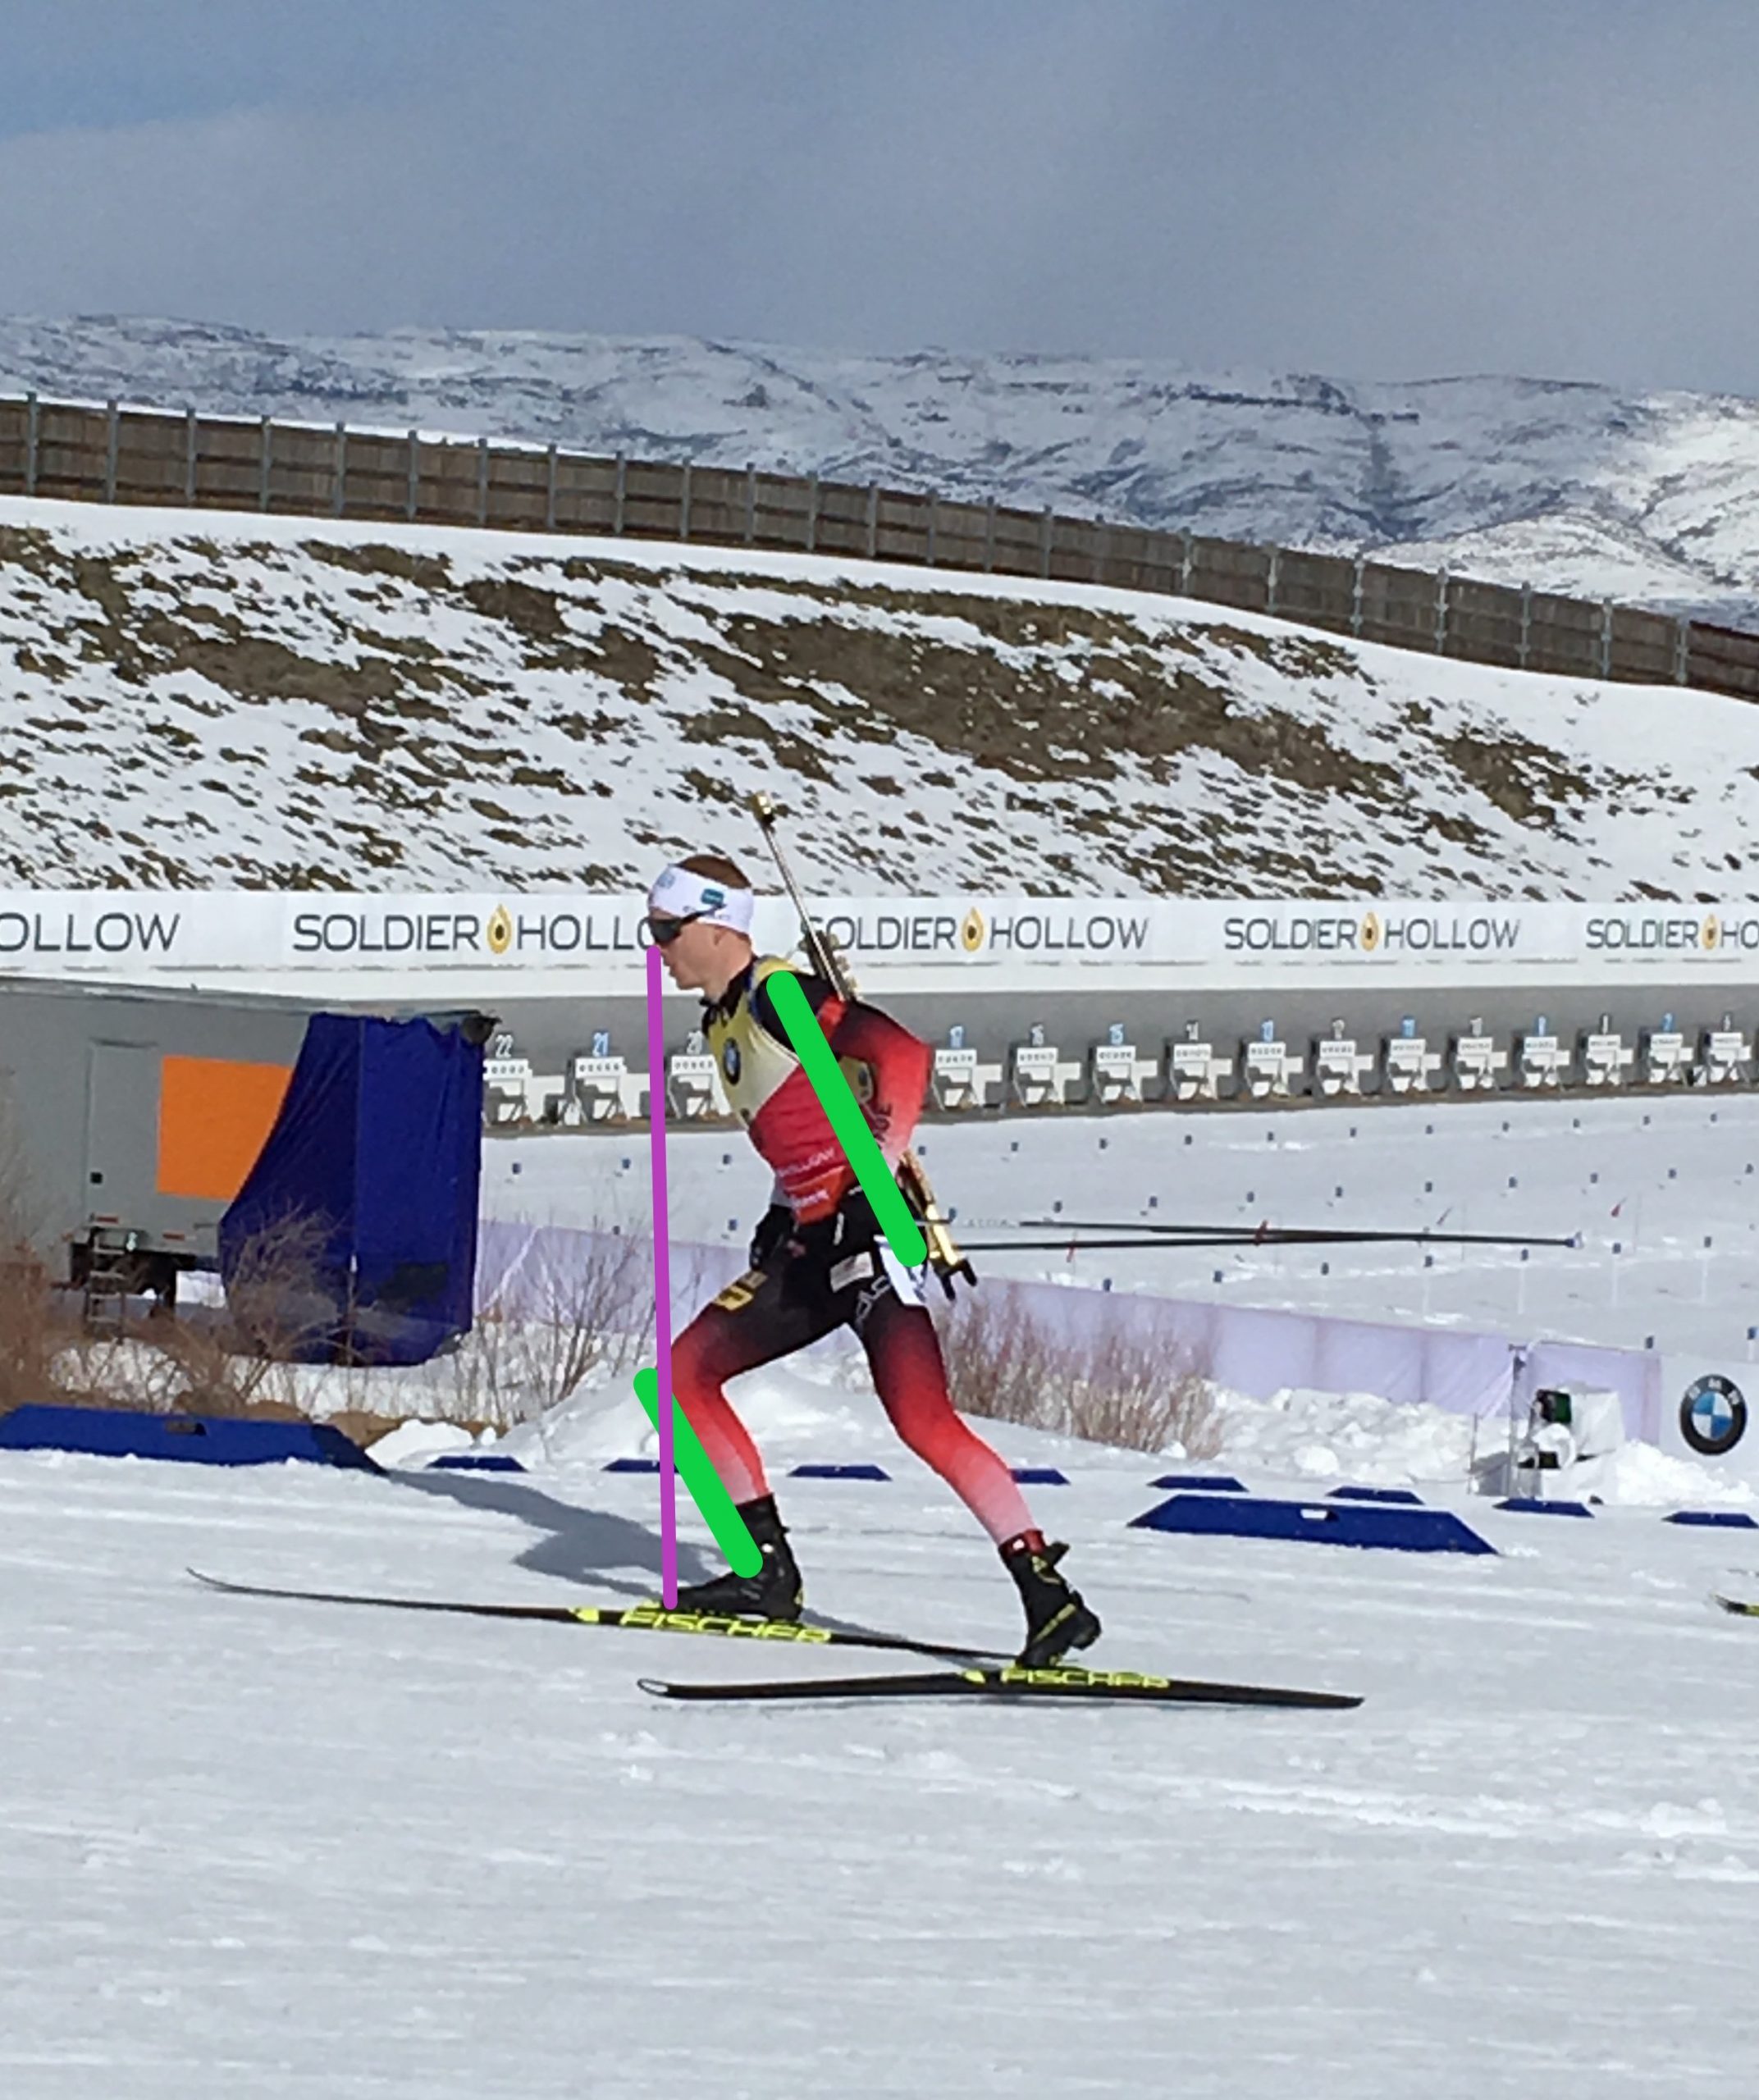
    Norwegian biathlon star Johannes Thingnes Bø models “nose, knees, toes.” Notice that the shin and trunk (green lines) are parallel. (Photo: Ned Dowling)

    The next experiment requires a partner. Balance on one leg staying very upright with your knee and hip straight. Have your partner push you (gently!) from each side. Did you maintain your balance? Now aim for the nose, knees, toes position and have your partner push on you again. Which position was more stable? (If you had difficulty finding this position, there will be more cues with the exercises below.)

    If the distribution of foot pressure and coordinated joint flexion are two major components of single leg stability — which has been shown to be a major component of skiing efficiency — then it seems highly rational that we should strive to perfect these traits on dry land before we expect ourselves to do it on skis (including and arguably even more so on rollerskis). We must be able to form the basic shape.

    Adequate strength of the gluteal muscles is a prerequisite. If you don’t already incorporate glute exercises in your strength program, you can get some great ideas from previous FasterSkier articles here and here.

    Foot and ankle mechanics are also a primary contributor. In the basic shape, we are asking the ankle to flex forward at the same time that the foot has to accept our full weight. Insufficient or excessive flexion, or poorly controlled mobility through the foot and/or ankle can force the tibia (shin bone) to rotate inward, taking the knee with it. Lack of glute strength and control can have the same effect from the top down. With this extraneous  motion coming from either direction, the result is an increased valgus (medially-directed) force on the knee, which equates to increased loads in both the tibiofemoral and patellofemoral joints. Clinically, this is the most common cause of knee pain with Nordic skiing.

    If the prescription for controlling top-down motion is glute strength and coordination, the bottom-up is addressed through strength of the muscles in the foot and ankle. Conveniently, these can often be addressed by simply working on single limb stability — as long as you pay attention. Quality control is mandatory!

    A note on orthotics: In many circles, custom orthotics have fallen out of vogue especially since studies like this one have found them to be no better than exercise at helping knee pain. But the demands on the ankle joint are quite different in Nordic skiing than with walking or running, which are more commonly studied. Skiing generally requires a much greater amount of dorsiflexion. As mentioned above, we want this dorsiflexion to happen without internally rotating the tibia. The addition of external support to the foot has the potential to control this aberrant motion. I am a strong proponent of at least some upgrade of insoles in ski boots (and cycling shoes for the same reason). Most stock insoles are terrible, even the ones that came in my very expensive carbon boots. Out-of-the-box options from Superfeet, Sole, Powerstep, and Curex are all quite good and far less expensive than custom. For some, these might not provide enough support and custom orthotics with a strategic build up of additional material would be better. 

    How do you know? A quick test I do in the clinic is to have my patient balance and do a couple of single leg squats while barefoot. Then I have them do the same thing with a more supportive insole. Then I place a piece of ¼” (4mm) thick folded cardboard under the insole at the ball of the foot and have them repeat the balance and squats. I’m looking for whether they become “easier,” “less painful,” or appear better controlled to my eye. If the extra material under the insole made for improvements, then we talk about custom orthotics. If it made no difference, then I just advise an upgraded insole. Ultimately, we are looking to improve both the alignment of the knee as the ankle dorsiflexes AND improve balance.

    All of that said, here are my top three exercises/drills for ski-specific balance–the basic shape. Ideally, these are done barefoot, without the additional support of an insole and shoe (opposite of the previous conversion), so the muscles have to work harder and get stronger. The basic cues are the same for all three:

    • Tripod Foot: A tripod gets its stability from three legs and we want three primary pressure points on the foot–the ball of the foot, the pinky side ball of the foot, and the heel. Weight should be slightly biased forward off of the heel. The toes should be on the floor but relaxed and not gripping for dear life.
    • Nose, Knees, Toes: My preferred way of thinking about this is if snot is dripping from your nose, you want it to land on your shoe not down the front of your shirt. Bend at the ankle, knee, and hip to accomplish this. 
    • Weight Shift: comes from the pelvis/hip not leaning the trunk. Park yourself into the hip. If your glutes aren’t burning, you’re doing it wrong (or the exercise is too easy).
    • Posture: neutral spine is the goal. Forward trunk lean occurs through the hips, not the spine.
    • Forward Gaze: Avoid staring at your feet. You’ll need to keep your head up to look down the track while skiing, so best to get used to it in training. It will also remove some visual dependency and help with maintaining a neutral spine.
    • Quality vs Quantity: the emphasis is on how you do the exercise, not just going through the motions. 
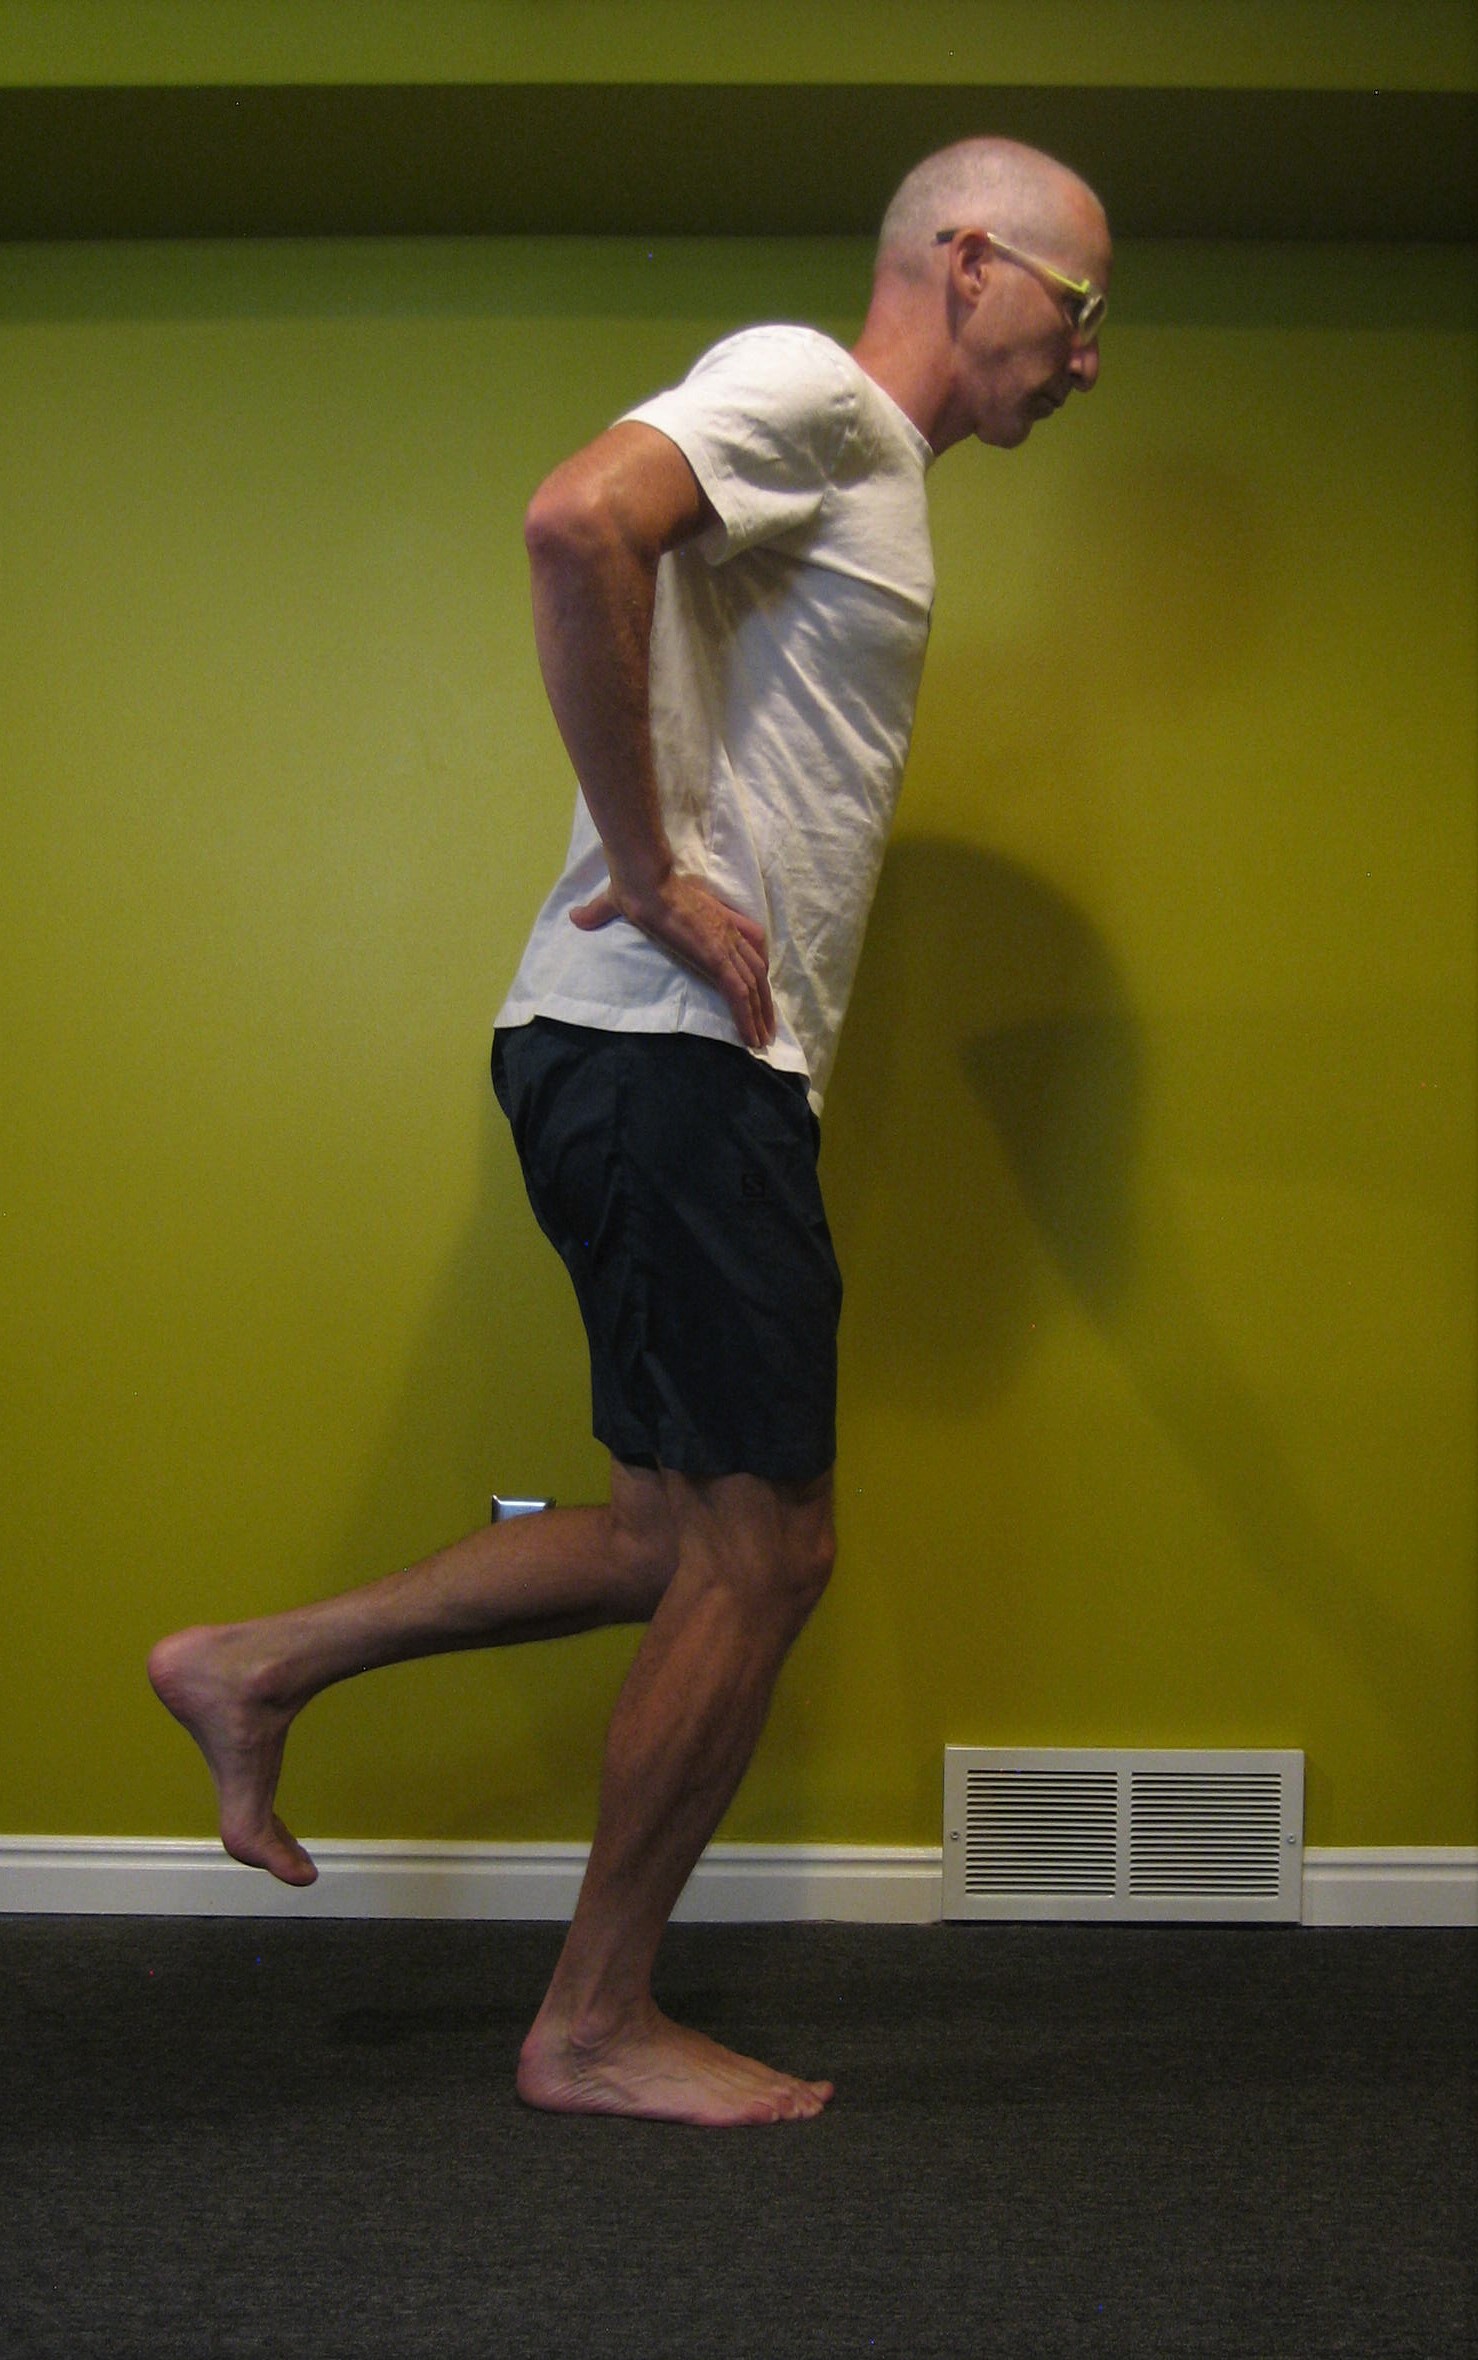
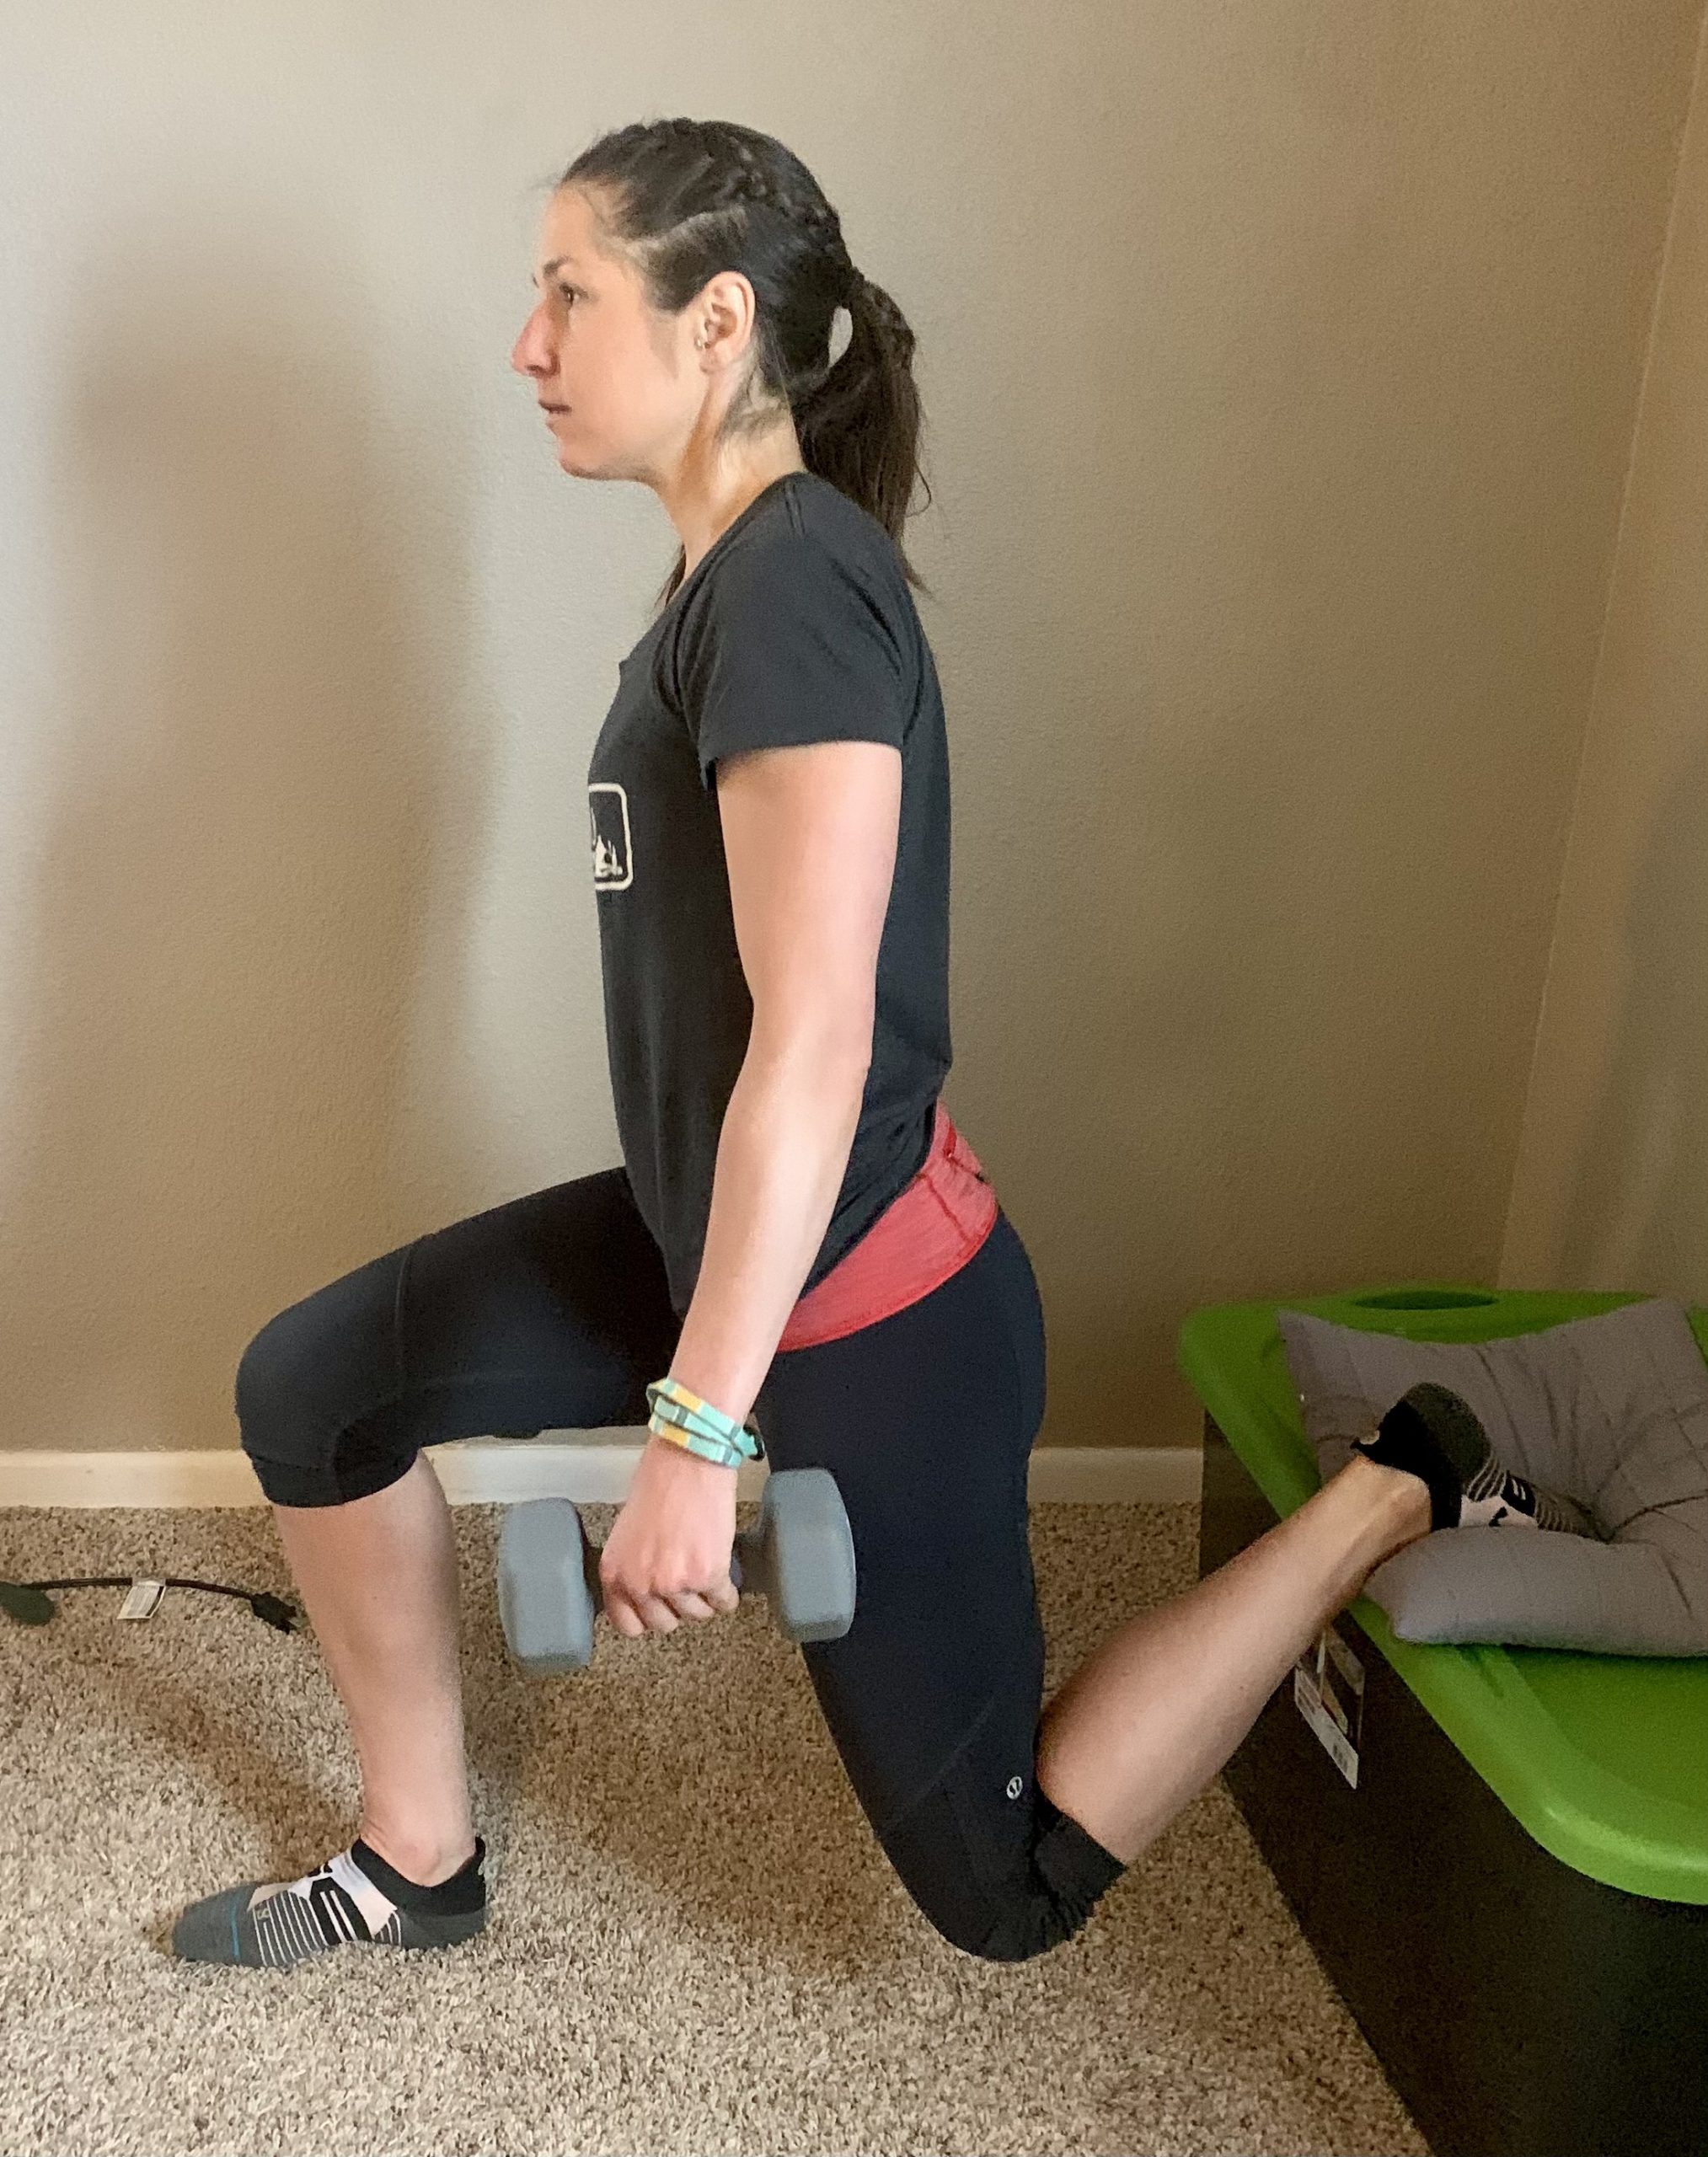
    The author models “the basic shape”.

    Start by forming the basic shape. If this is challenging to maintain, then do not progress until it becomes natural and thoughtless.

    Exercise #1: Step Ups

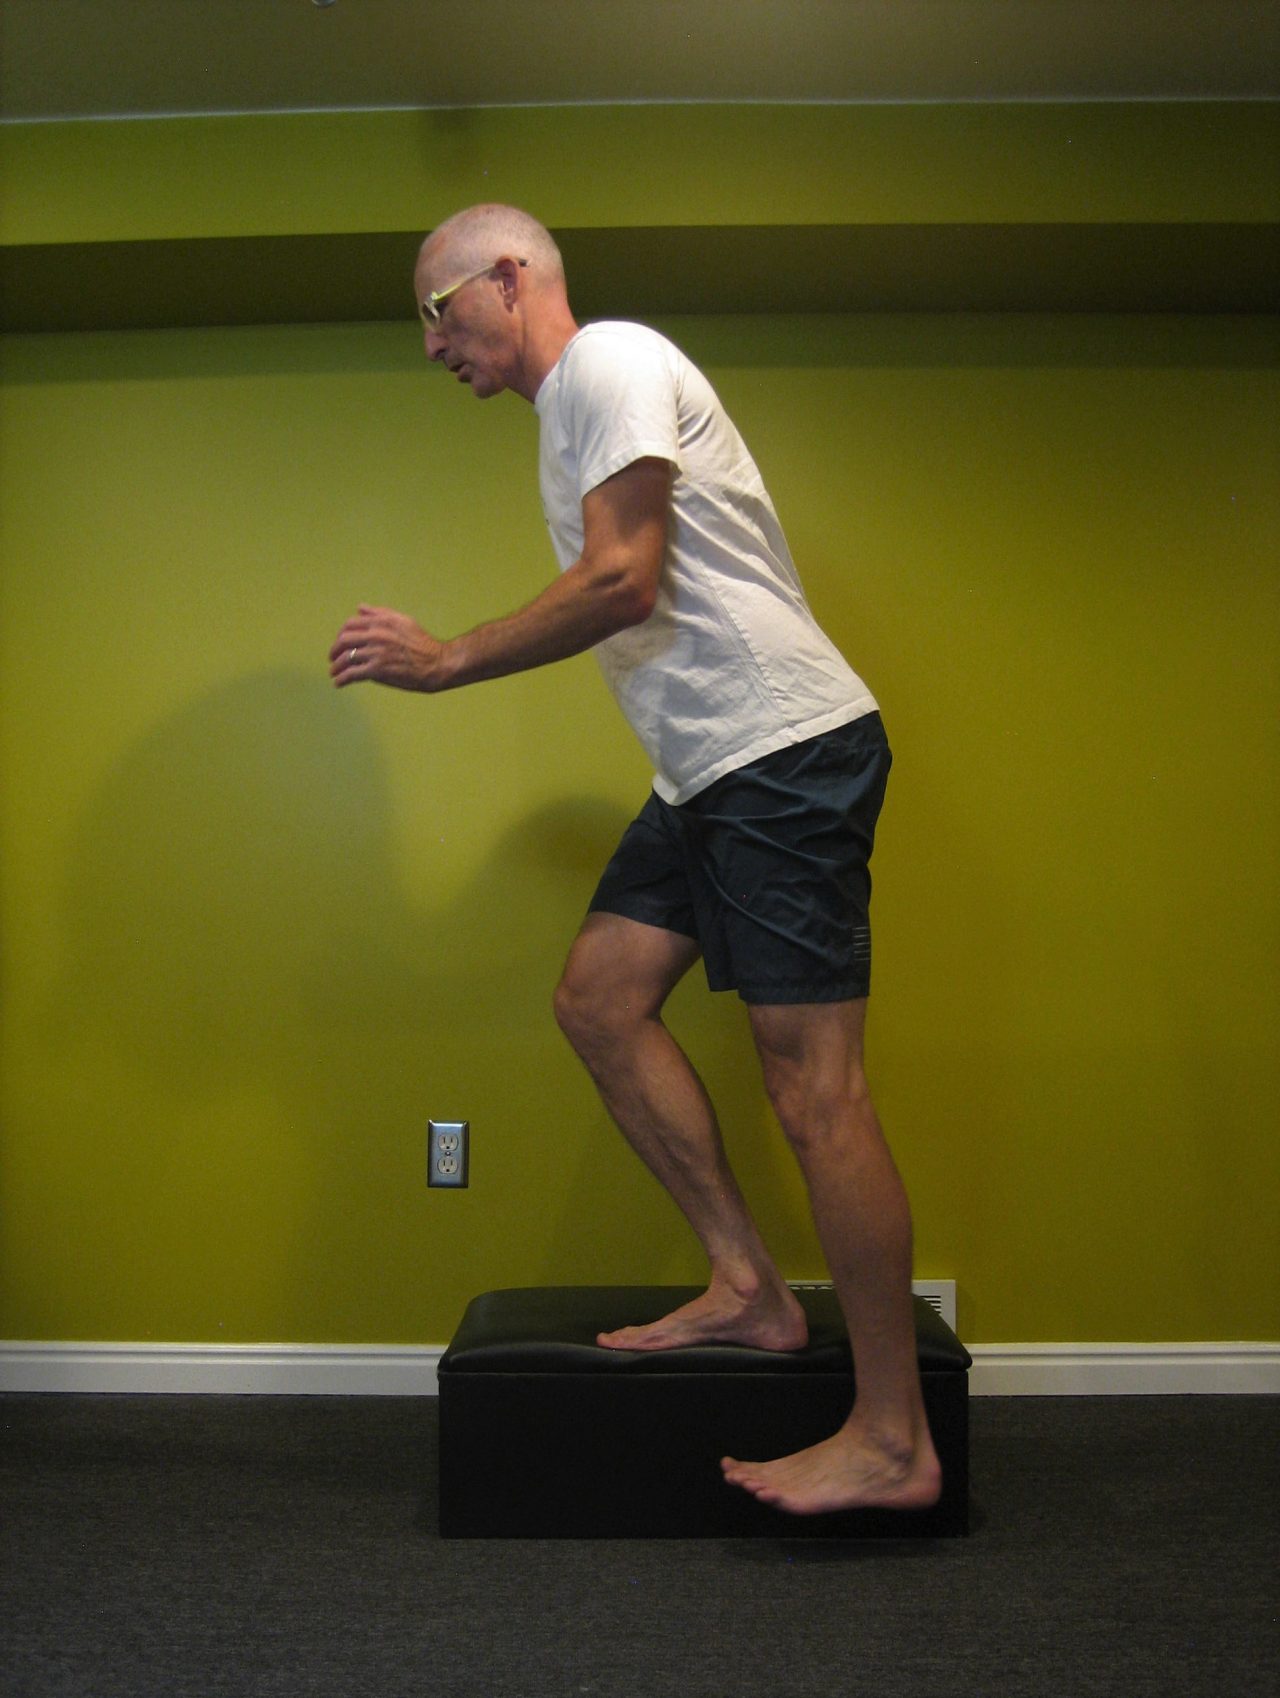
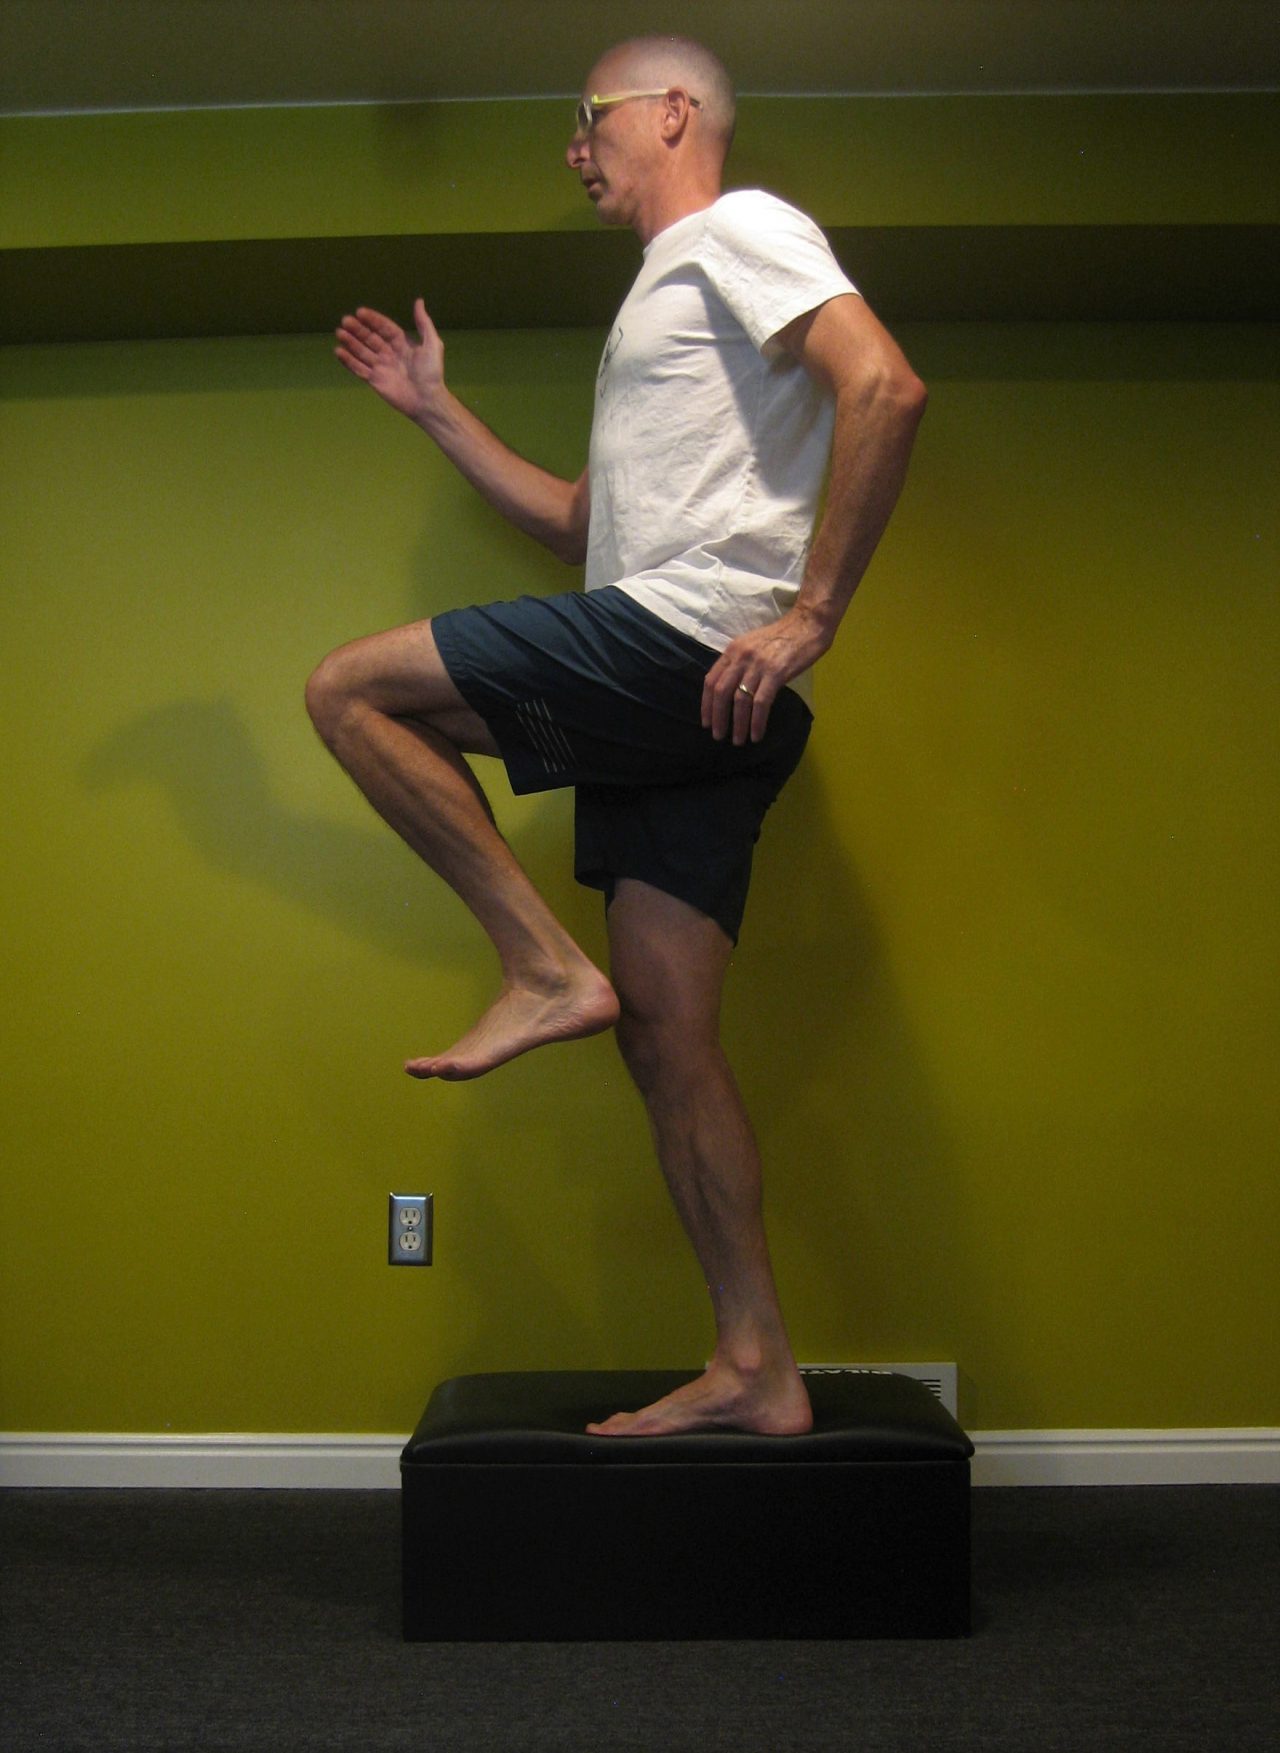
    Stand sideways on a step (preferably the bottom, not top, step). Lower your outside foot towards the floor. As you lower, you should be going into the basic shape. Return to the tall starting position. Don’t worry about trying to fully touch the floor–that’s not the goal. The goal is to move up and down, in and out of the basic shape. For added challenge, hold a dumbbell in the outside hand. 2-3 sets of 10-15 reps should be adequate to bring on some fatigue and challenge your balance.
    Exercise #2: Single Leg Series with Band

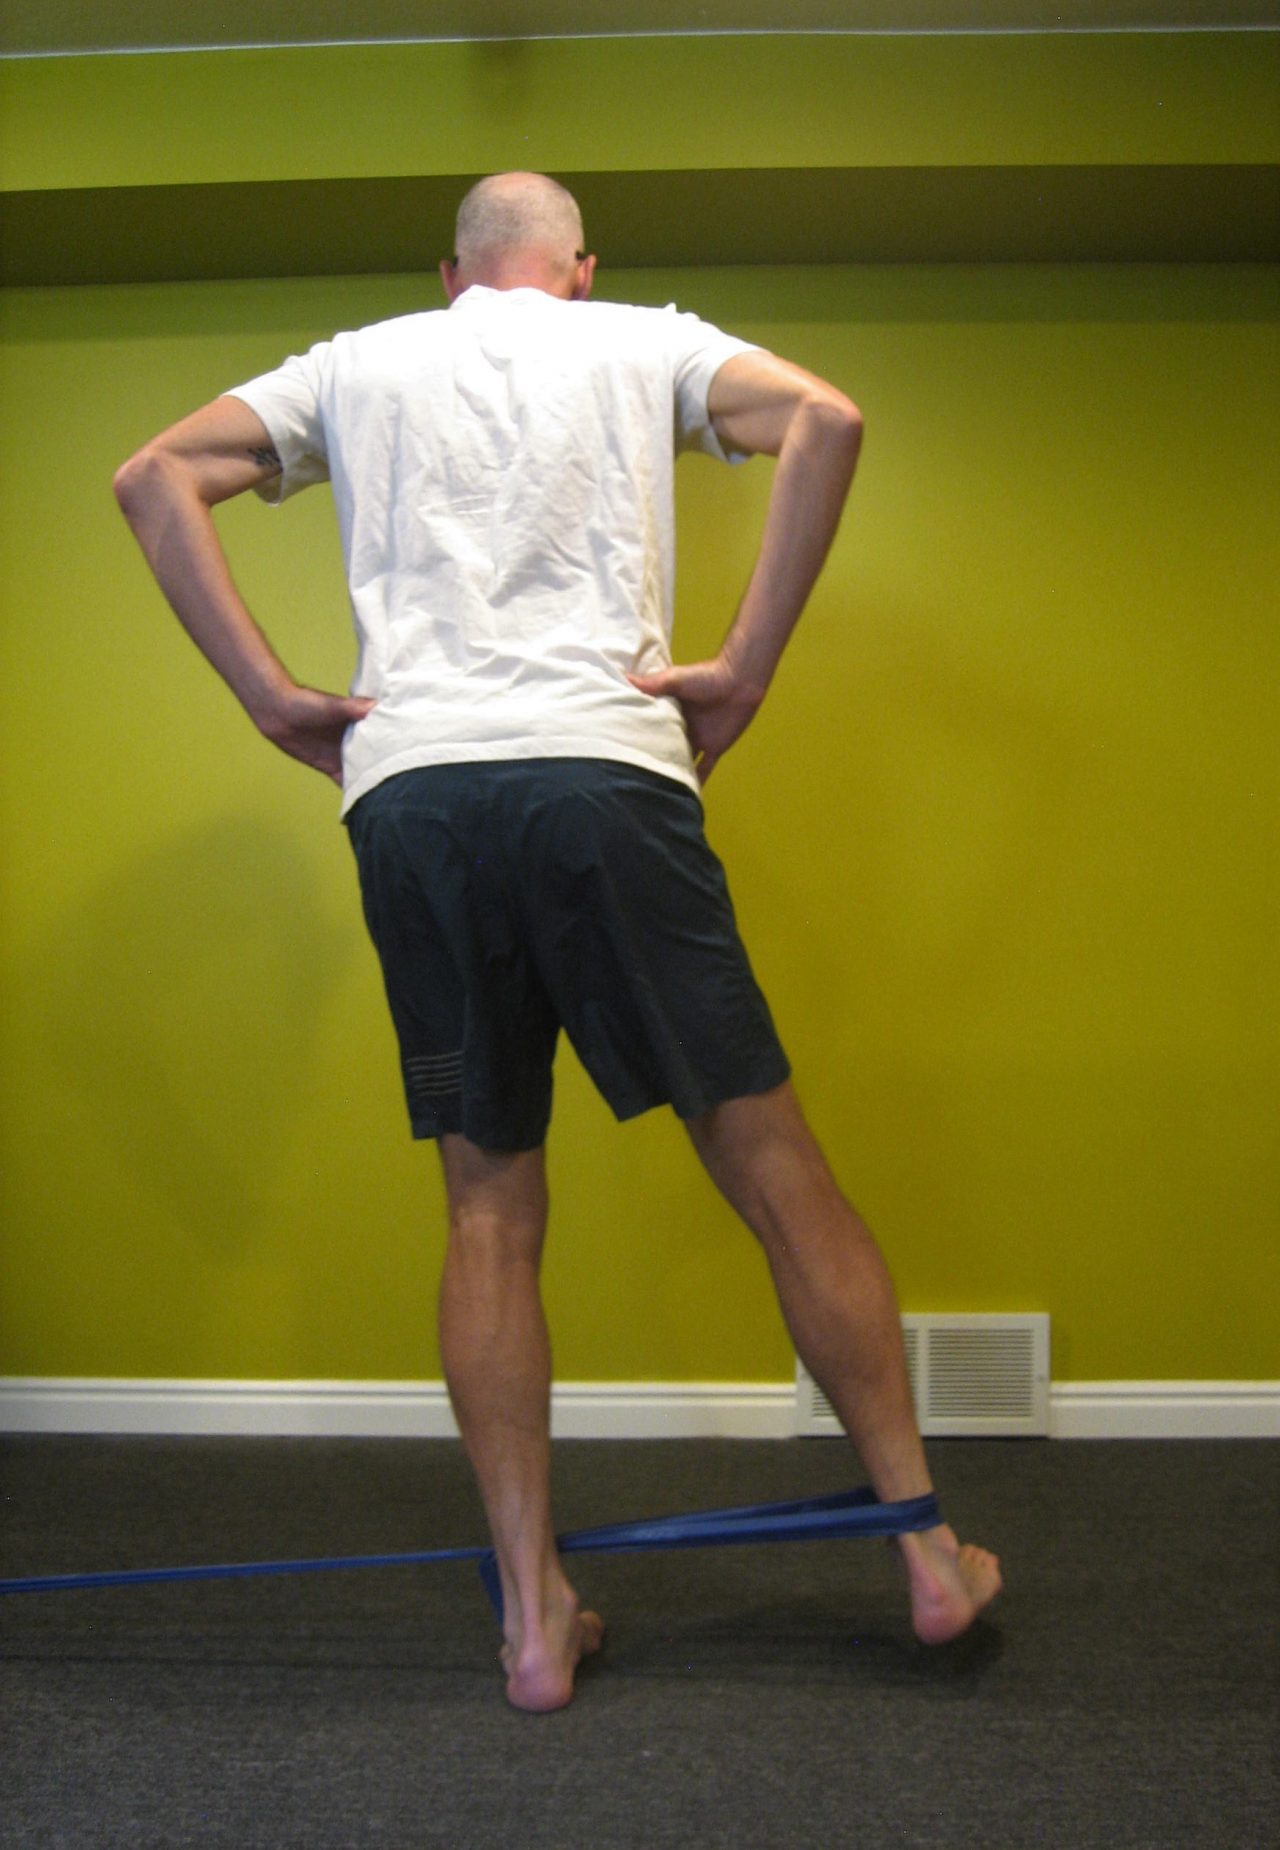
    Loop a long exercise band around one ankle and face the anchor point of the band. Than, assume the basic shape standing on the unbanded leg. While maintaining the basic shape, pull straight back against the band to bring the foot in line with the standing leg, then follow through to kick the foot a few inches behind. Turn your body 90 degrees in either direction and repeat the process; extending the banded leg outward to work the gluteus medius muscles of the outer hip, or pulling the banded leg toward the standing leg to stimulate the inner adductor muscles. Ultimately, you will face four different directions but the force against the band is always in direct opposition to the anchor point of the band.
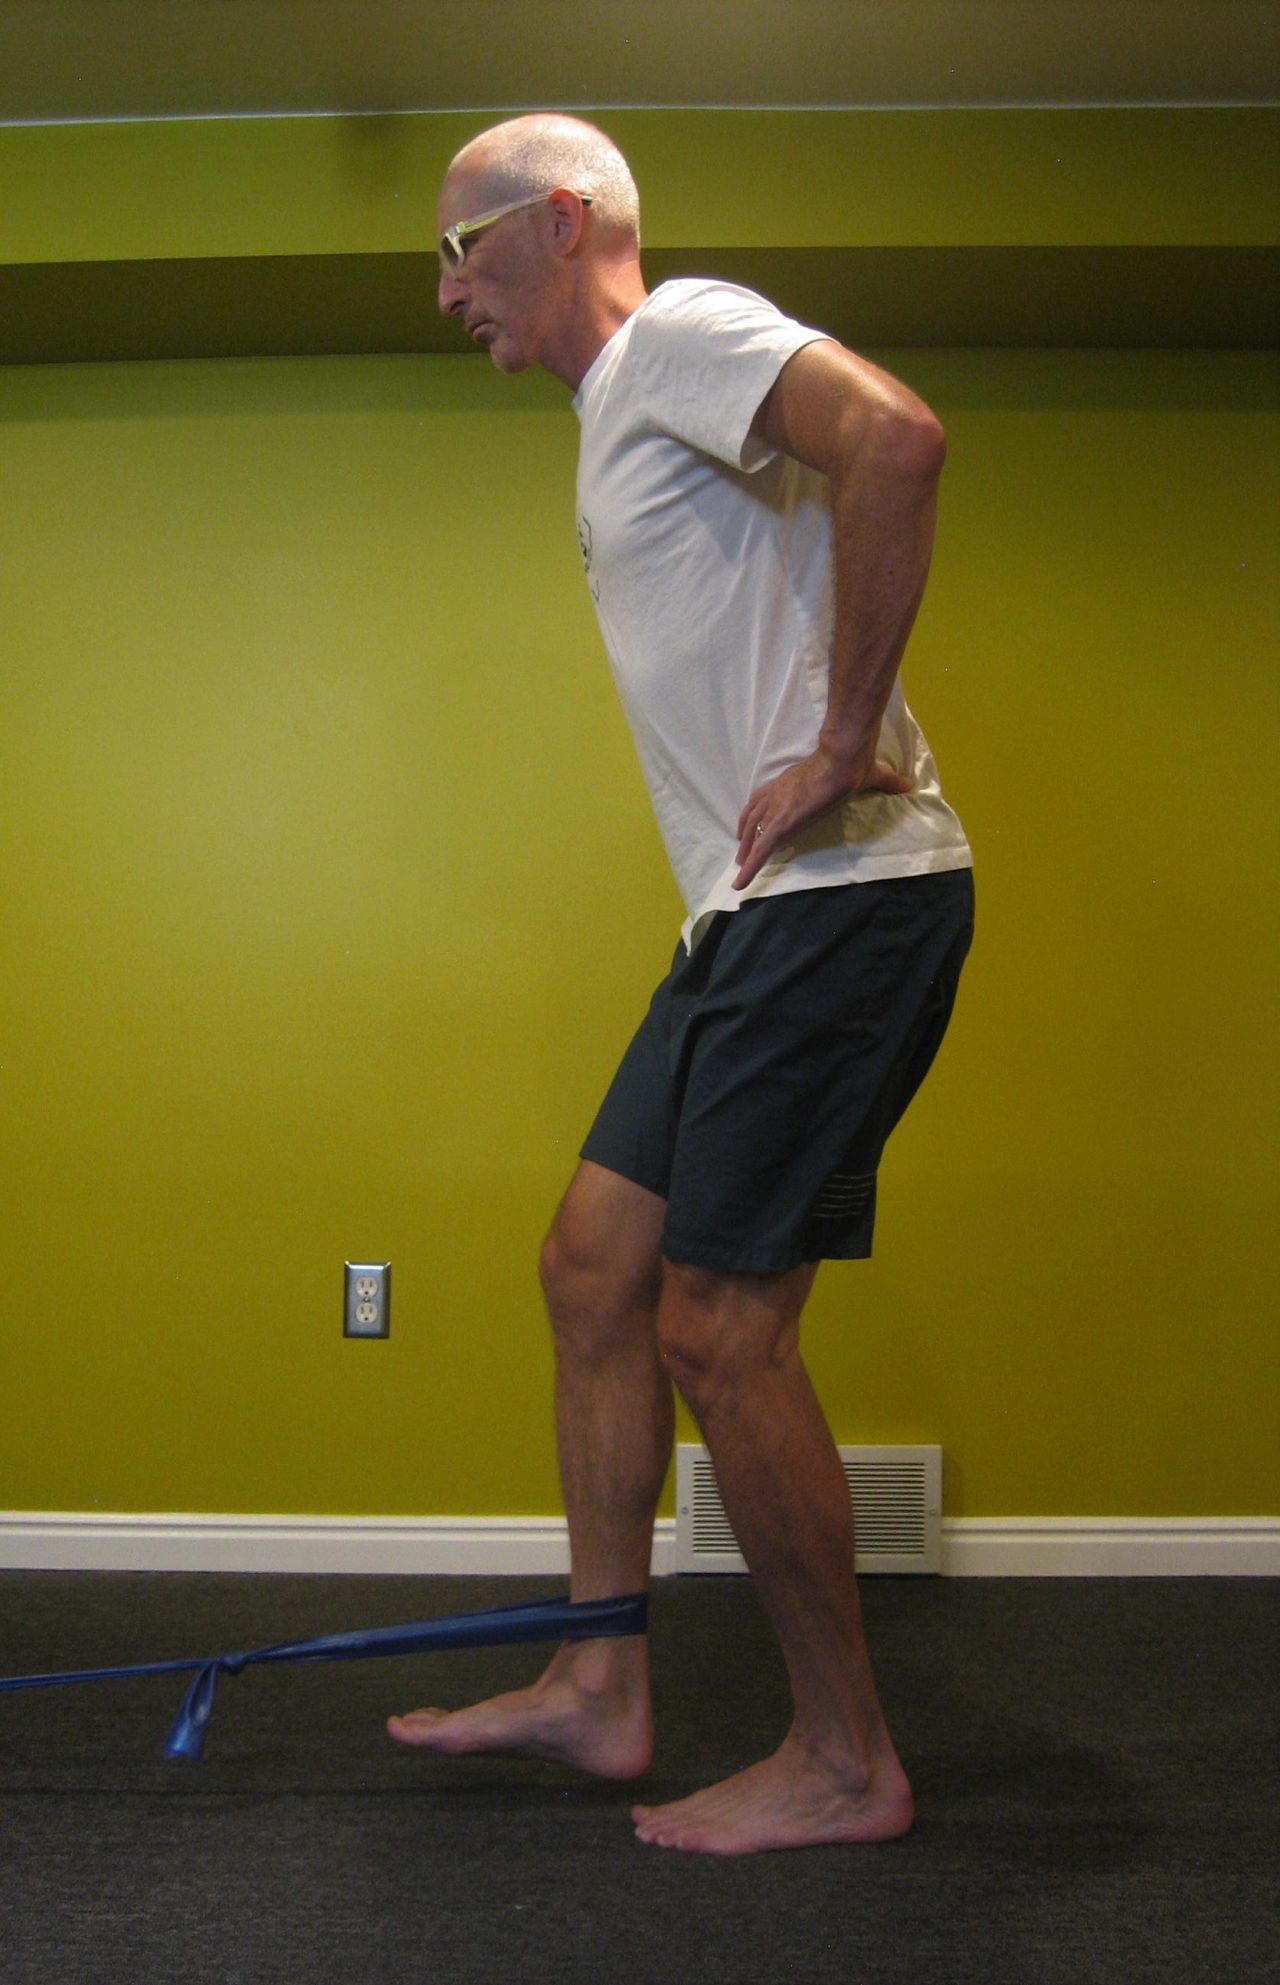
    If you can only source a “mini-band” loop, put it around both ankles and skip the pulling-in motion. A little resistance goes a long way with this exercise. Aim to perform 10-15 repetitions in each direction and do two laps on each leg.

    Exercise #3: Lateral Hops

    Form the basic shape on your right leg. Step onto the left leg, shifting your weight from the pelvis, and again form the basic shape. Progressively increase the distance between steps, turning it into more of a sideways hop than step. Keep the unloaded leg extended to the side as if skiing — do not let it flag behind the stance leg unless you are a speedskater.

    Keep it honest: make sure you are sticking the landing and holding your balance for a second or two on each leg before pushing off to the next side. This is meant to be a balance exercise, not plyometric strength work. The next progression is to hold a resistance band anchored from the side. I prefer to base this exercise on time (1-2 minutes) vs repetitions so there’s no question of whether that botched one was good enough to count.

    Notably absent from this article is the neurological component of balance. Many of my PT colleagues would absolutely berate me over this; however, I wanted to stick to the basic kinesiology and this article is long enough already. The brain receives massive amounts of information from vestibular, neural receptors in joints and soft tissue, and vision. In fractions of a second, it processes this information and directs muscles to act. If any link in that system is compromised, so too is your balance. If you think about the difference between skiing on a sunny, bluebird versus flat light or a storm, you can quickly appreciate how vision affects balance. There are certainly ways to challenge and train these systems, but that is beyond the scope of this article. However, an excellent way to progress any balance exercise is to do it with your eyes closed. 

  • Making a Healthy Transition to Running as the Seasons Change with Jessica Yeaton

    Making a Healthy Transition to Running as the Seasons Change with Jessica Yeaton

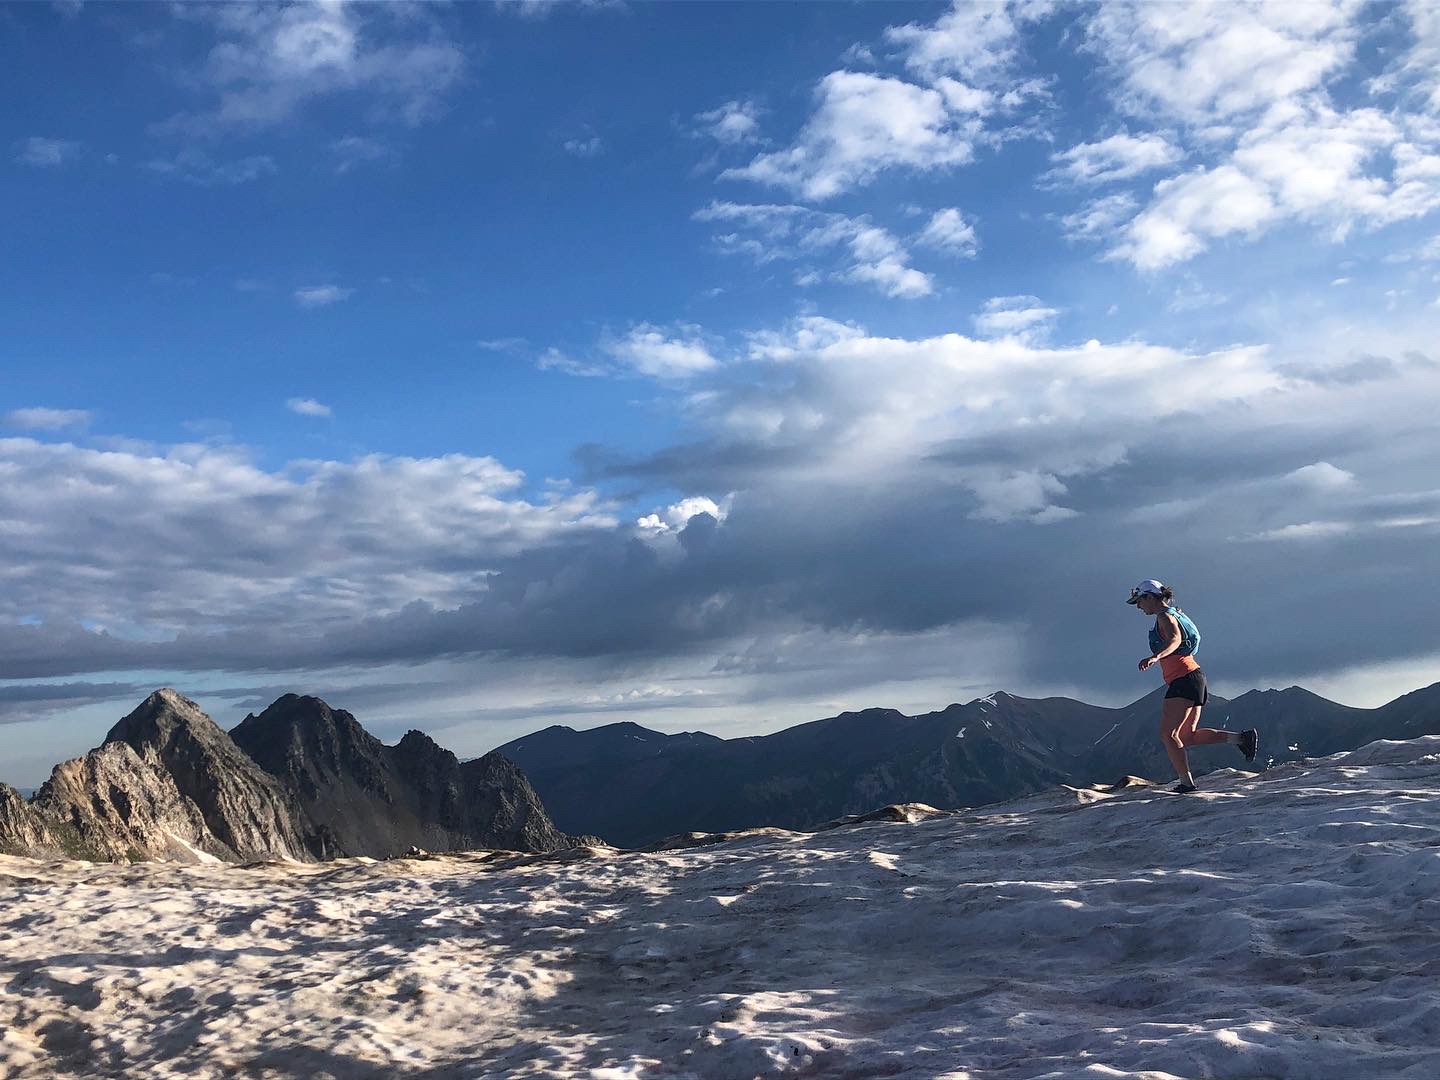
    The author crosses a snow field on a long run near her home in Colorado last summer.

    Last year at this time, I was primarily gym-ridden. After roughly five months on snow, my fitness was high but my tolerance for the impact and specific demands of running were low. Throwing better judgement to the wind, I gave in to the allure of warm days, rapidly drying trails, and beloved road loops around town, and paid the price.  

    Despite running between zero and ten miles total between December and the end of February, I took off for my first run of the season: 4.5 miles. That first week totalled 20 miles in four runs. Much lower than summer totals, but far greater than the sum of the months prior.

    Two weeks later, I did a 90 minute trail run with roughly 1,200 feet of climbing and descending. What started as the sensation that a tendon on the lateral side of my right knee was snagging with each leg swing quickly turned into a sharp stabbing pain. I hobbled my way home and by that afternoon, I couldn’t walk downstairs without sidestepping or even make it down the gentle slope of my front yard. Sound familiar?

    This experience is not uncommon. When snow conditions deteriorate in the spring but weather is perhaps not yet conducive to cycling or rollerskiing, our options for aerobic exercise that provides the same satisfaction as the kilometers we logged all winter are limited. The best available early season option is often running, so we lace up our cobwebbed sneakers, and fight the temptation to jump back in too quickly. 

    While some may tolerate a rapid transition, there are a myriad of running related injuries that could easily crop up. Last year at this time, FasterSkier featured recommendations from Dr. Ross McKinnon, DPT, to address the topic of a healthy transition to running. His advice included a slow increase in running volume, working on running mechanics, beginning with soft surfaces, and making sure your shoes are up to the task. 

    To add on, we reached out to DPT candidate, Olympian, and former APU Teammate Jess Yeaton for additional information to support a healthy return to running. 

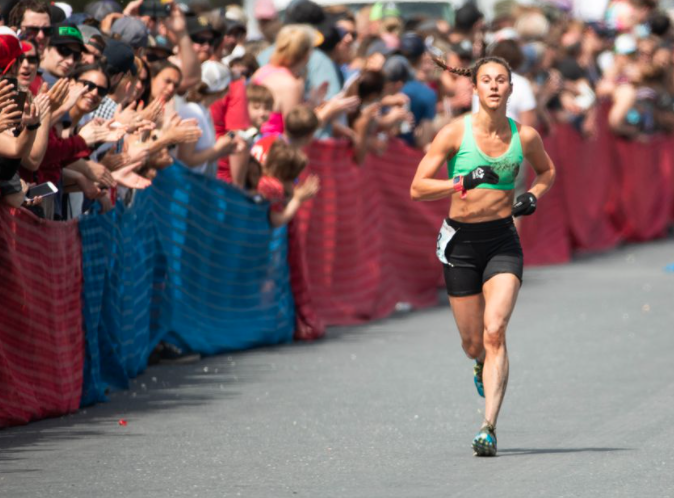
    Jess Yeaton heads for home to win the 2018 Mt Marathon race in Seward, AK. (Photo: Anchorage Daily News/Lauren Holmes)

    Seconding Dr. McKinnon’s first recommendation, Yeaton began with the importance of committing to a gradual return.

    I think the absolute biggest thing is taking a slow progression back and not increasing your weekly mileage too much, as well as adding in exercises that target strengthening glute med.”

    The gluteus medius muscle, or glute med, is a fan shaped muscle on the outside of the hip which connects the iliac crest to the top of the femur. The glute med plays a vital role in single leg stability, in particular, in maintaining level positioning of the hips and proper alignment of the leg during each stride. After all, running is essentially a repetitive high-impact single leg motion, so stability at the hips and through the core are key.

    By strengthening the glute med, runners can reduce “hip drop” and prevent the knee from caving inward with each stride. These phenomena reduce the body’s natural mechanisms for absorbing the impacts of running. They put abnormal strain on various ligaments, tendons, and joints down the chain, leading to IT Band Syndrome, knee and low back pain, and more. 

    The gluteus medius, or glute med, provides stability at the hip, a source of injury risk for runners. (Photo: Human Anatomy and Physiology Lab, LumenLearning.com)

    “Examples of [exercises to strengthen the glute med] would be things like donkey kicks, fire hydrants, bridging up with both legs and then holding with one leg,” Yeaton explained. “I actually had to do a community project working with a running group here in Albuquerque for school and made a video with some of these exercises, which is available on YouTube.”

    In the video, Yeaton demonstrates forward and lateral walks with an exercise band looped above the knees. Maintaining tension in the band activates and strengthens the glute med, promoting better stability in single leg movements, such as running — or skiing!

    Yeaton also contributed to an article on single-leg stability geared toward better balance on skis this fall, which can be found here

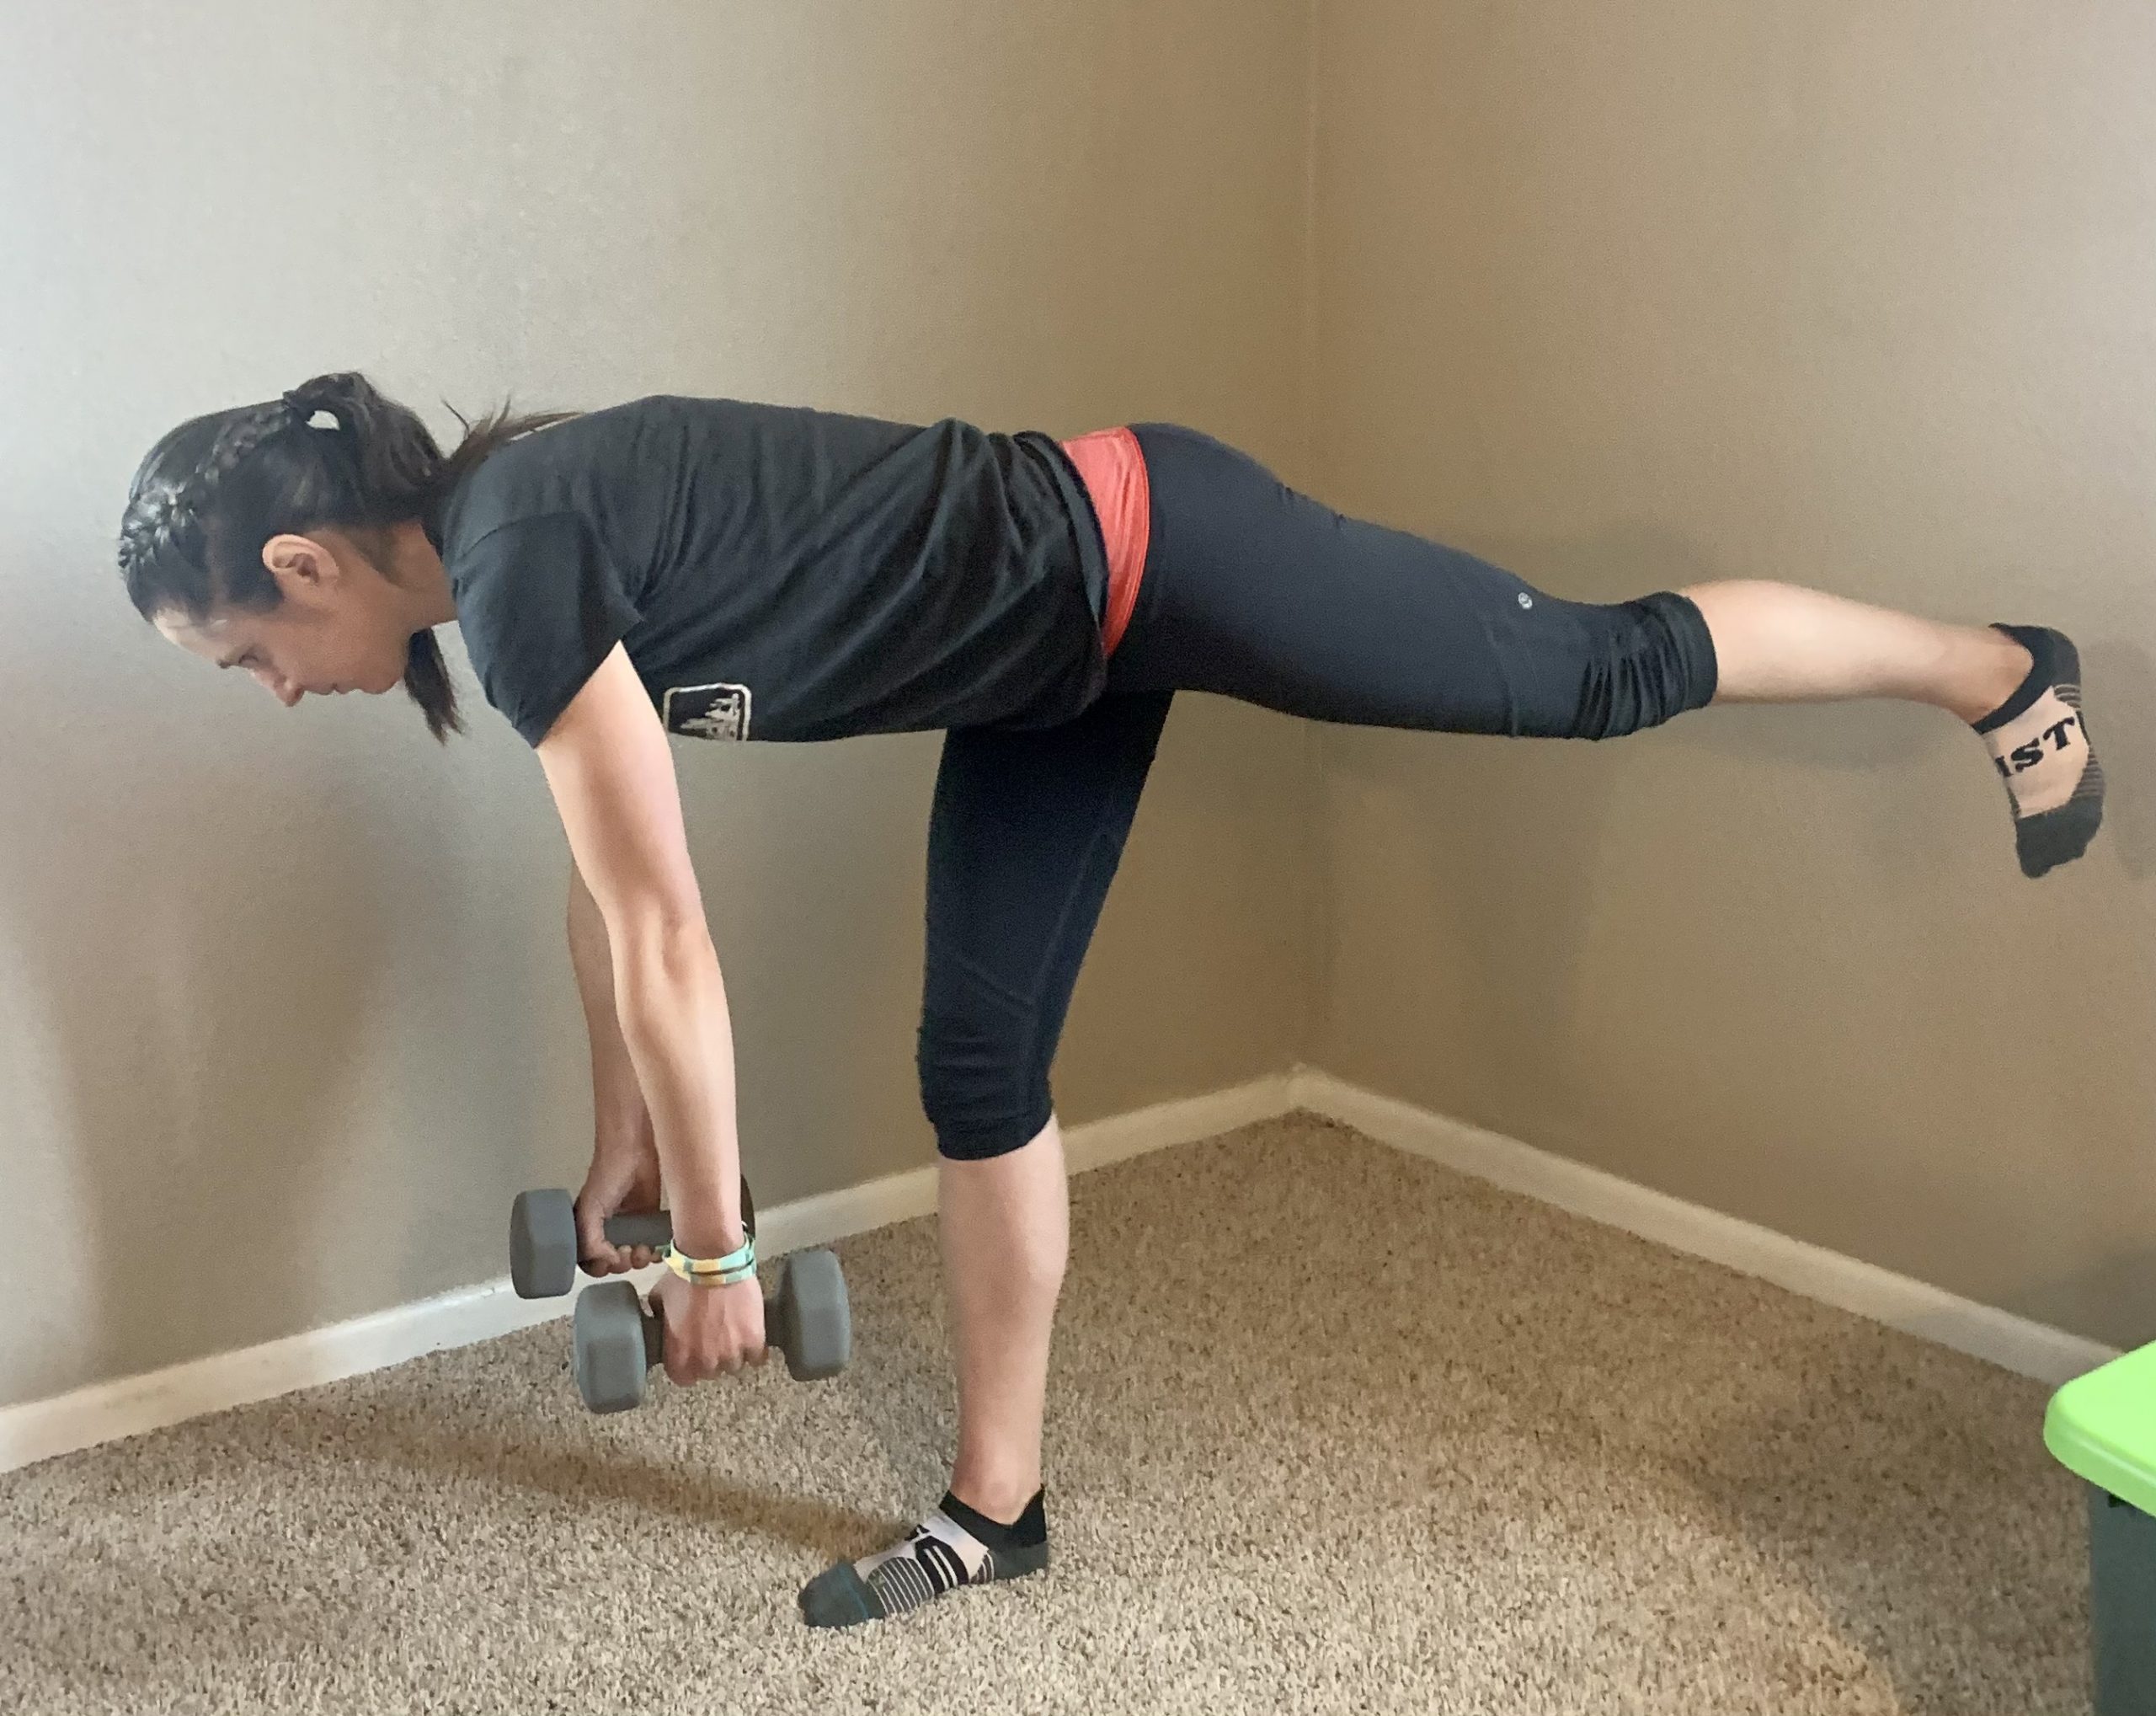
    In the gym, you could try single leg deadlifts with a kettlebell or free weight to build stability. To execute this move correctly, it is important to keep the hips level to the floor and avoid the tendency to rotate away from the standing leg. While keeping a flat back, focus on hinging  from the hip and staying within the range of motion that your hamstring flexibility allows rather than reaching the weight toward the floor, which often leads to rounding at the low back. In addition to challenging your single leg balance, you should feel this in the glute and hamstring of the standing leg. 

    Aim for a flat back with hips squared forward, and keep the toes of the lifted leg pointed toward the ground.

    Another option for enhanced glute med strength is to try a split squat with the rear leg elevated, also known as a Bulgarian split squat. With one foot resting on a box, stair, or bench, complete a single leg squat, creating a 90-degree bend in the knee of the standing leg. The knee of the elevated leg should drop straight down toward the ground, while the other knee stays stacked over the ankle and in line with the foot. 

    Be sure to keep your chest up and core tight to reduce wobbling and work the correct muscles.

    By pushing your heel into the ground as you come out of the squat, you can keep the action in your glute muscle, rather than letting the quadriceps muscles on the front of the upper leg take over. Again, the positioning of the hips is important; here they should stay squared forward throughout the movement. 

    Yeaton also noted that she commonly sees skiers develop calf and achilles related injuries from jumping back into running too quickly and recommended variations of calf raises and heel drops to combat these issues. 

    “Another one you could add is doing calf raises with a ball between your ankles, which puts you in a supinated position (meaning the foot is rotated slightly inward), which helps target tibialis posterior. I’ve noticed this muscle is a BIG problem for a lot of skiers.”

    Keeping pressure on the ball as you rise onto your toes and slowly lower cues and strengthens the tibialis posterior.

    The tibialis posterior lies underneath the gastrocnemius, more commonly known as the calf muscle. Running the full length of the lower leg, the tibialis posterior begins behind the knee and connects to the arch of the foot. It helps to flex the foot and reduce pronation, where the arch collapses and the ankle tracks inward. This is commonly seen in runners.

    To perform the exercise, hold a soft ball, such as a tennis ball, between the heels of your feet. Slowly rise onto your toes while maintaining the positioning of the ball, hold briefly at the top, then return slowly to standing. 

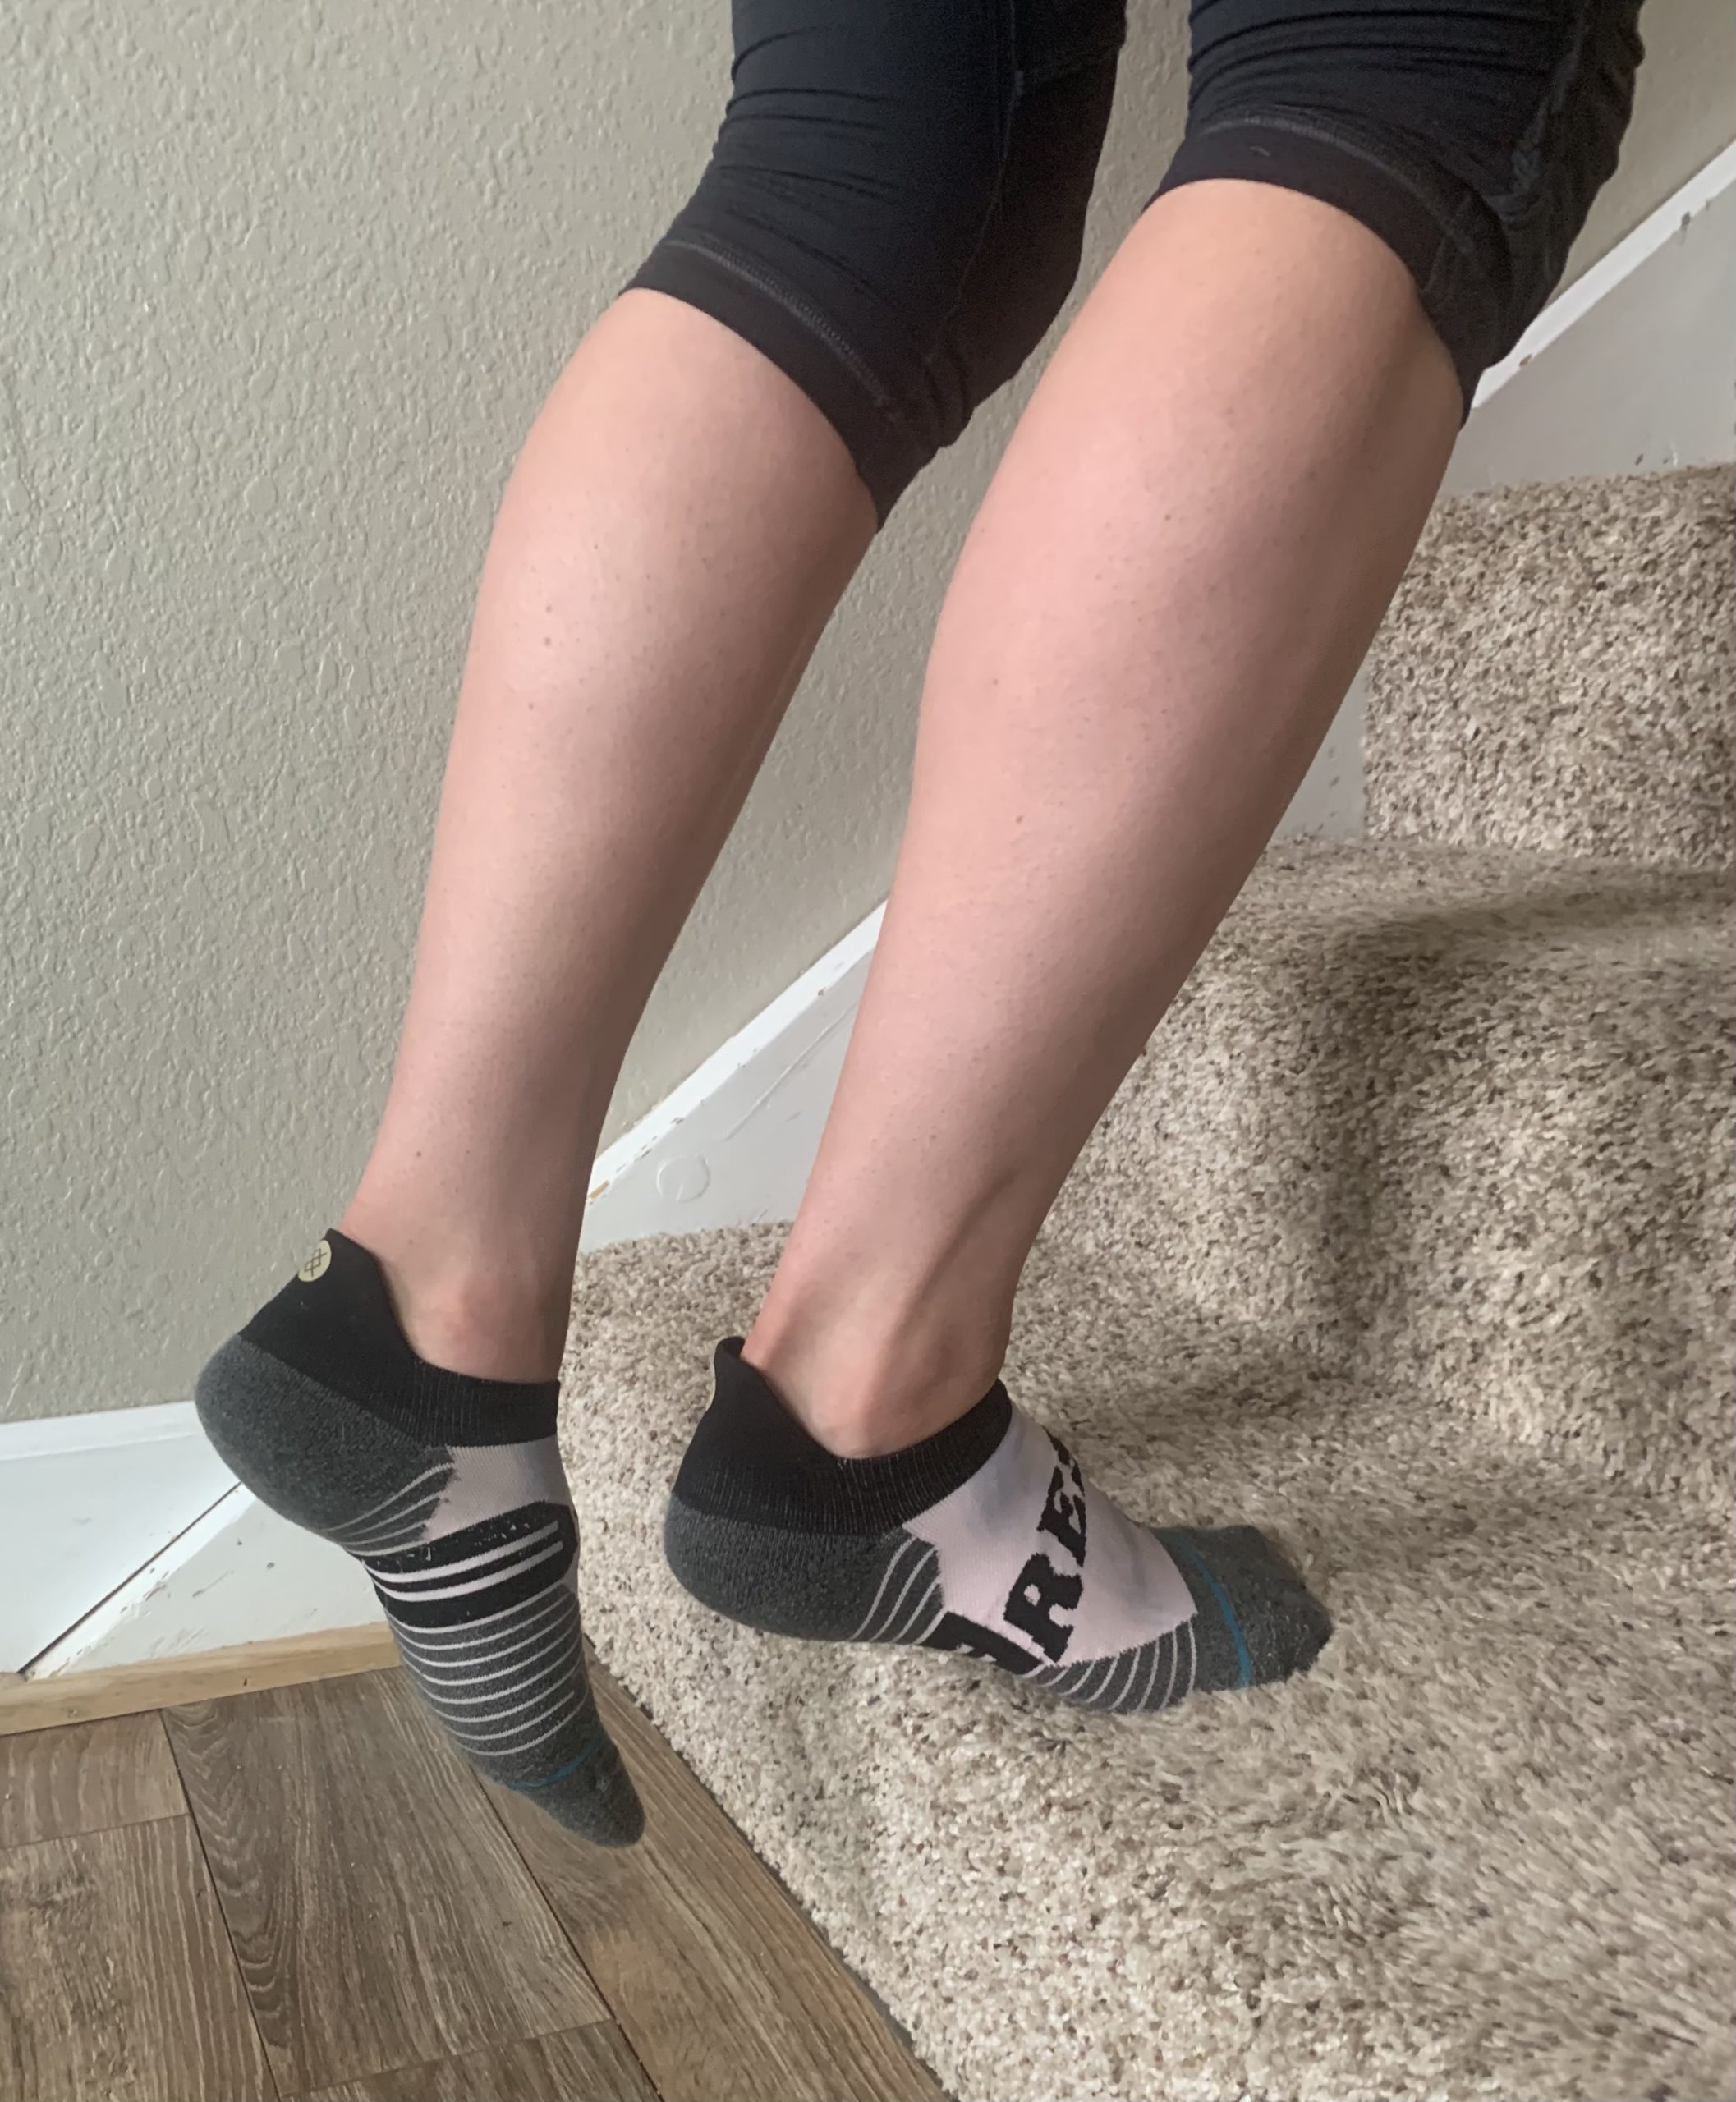
    For achilles strength, you can do heel drop exercises on the stairs. Push up into a calf raise on both feet, then lower down slowly on one foot. The eccentric, or the slow, controlled lowering part is what’s important.”

    Use both feet to rise onto your toes, then slowly lower with just one foot to target the achilles.

    Returning to the concept of a gradual increase in running volume, Yeaton recommends actually calculating how quickly you are ramping up. Yeaton recommends the 10% rule — meaning volume should increase by no more than 10% per week. She referenced a 2014 study titled “Excessive progression in weekly running distance and risk of running-related injuries: an association which varies according to type of injury”, which followed roughly 900 runners for one year, tracking mileage increase and injuries. The research showed that athletes who increase by 30% or more were at a higher risk for injury, whereas those who increased by 10% or less were the least likely to incur a running-related injury. 

    “I think this is crazy when skiers put a number to it, because that really isn’t much of an increase… from what I’ve seen, what most athletes consider taking it slow and easing back in is really a pretty significant progression.”

    Obviously, there are caveats — if you start with one three mile run, you’ll probably be okay running more than 3.3 miles total the next week. If you ran 12 miles over four runs last week, you probably shouldn’t run 13 in one go the following week. However, paying attention to frequency, distance, and intensity of your runs as you progress can play a vital role in keeping your body happy.

    Anecdotally, running 5-7 miles once per week through this winter has made a big difference in my ability to progress this spring. 

    So there you have it. Work on hip stability and core strength (bonus: this will help your skiing too!), incorporate calf raises and heel drops, and keep an objective eye on your progression. Have fun and stay healthy!

  • Developing Single-Leg Stability for Improved Glide

    Developing Single-Leg Stability for Improved Glide


    If you’ve found your way here, you are likely familiar with the three tenets of cross country skiing: push off, weight transfer, and glide. Whether it’s diagonal stride in the track or V2 on the corduroy, your ability to experience a complete weight transfer, ride a flat ski, and carry momentum is heavily dependent on the stability of your standing leg. 

    Why is developing that balance and stability a challenge? For those who choose modalities other than roller skiing to enjoy the outdoors in the offseason, consider what types of motion those activities entail. Cycling, running, hiking, and walking are all very linear movements with fairly rapid tempo, meaning there is little emphasis on the lateral push off or extended single leg balance that are the cornerstones of cross country ski technique. 

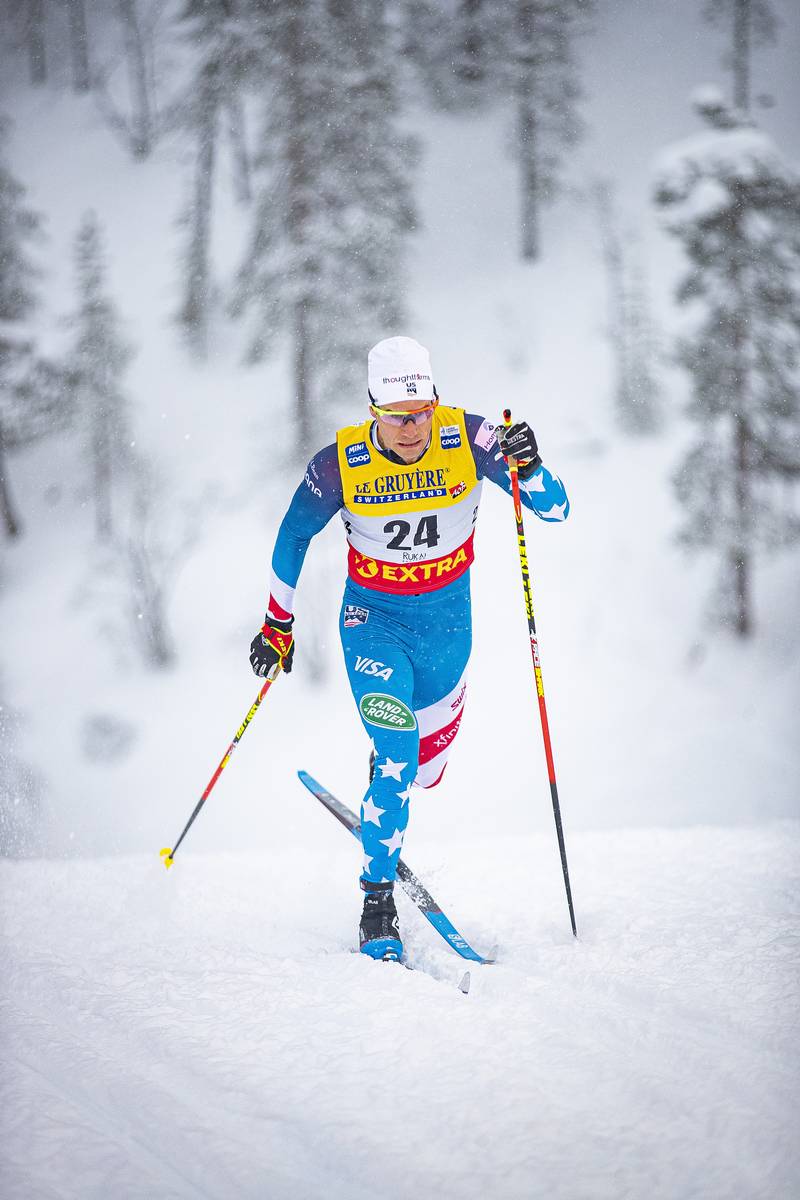
    Simi Hamilton skiing to a World Cup career best 34th in a distance classic event. He popped the result in Ruka, Finland’s 2019 15 k classic. (Photo: NordicFocus)

    Be it your first season on skinny skis or your 50th, strengthening the lateral musculature of the hip and the tiny stabilizer muscles throughout the leg will help you develop confidence in your weight transfer and glide to help you hone your technique and enjoy sliding on snow this season. 

    There are lots of ways to improve single-leg stability; yoga, Pilates, even simply standing on one leg while brushing your teeth or doing the dishes is helpful. But if you want a few simple and targeted exercises, we have a few beneficial suggestions. Here we use mini resistance bands, which can be found for less than $20, to combine dynamic and isometric (holding in place against resistance) moves that target the musculature of the hip, improving strength and stability down the chain.

    The progression is endorsed by Doctor of Physical Therapy candidate, Australian National Team and APU Elite Team skier, 2018 Olympian, and 2020 Birkie Champion Jessica Yeaton. 

    Clamshells 

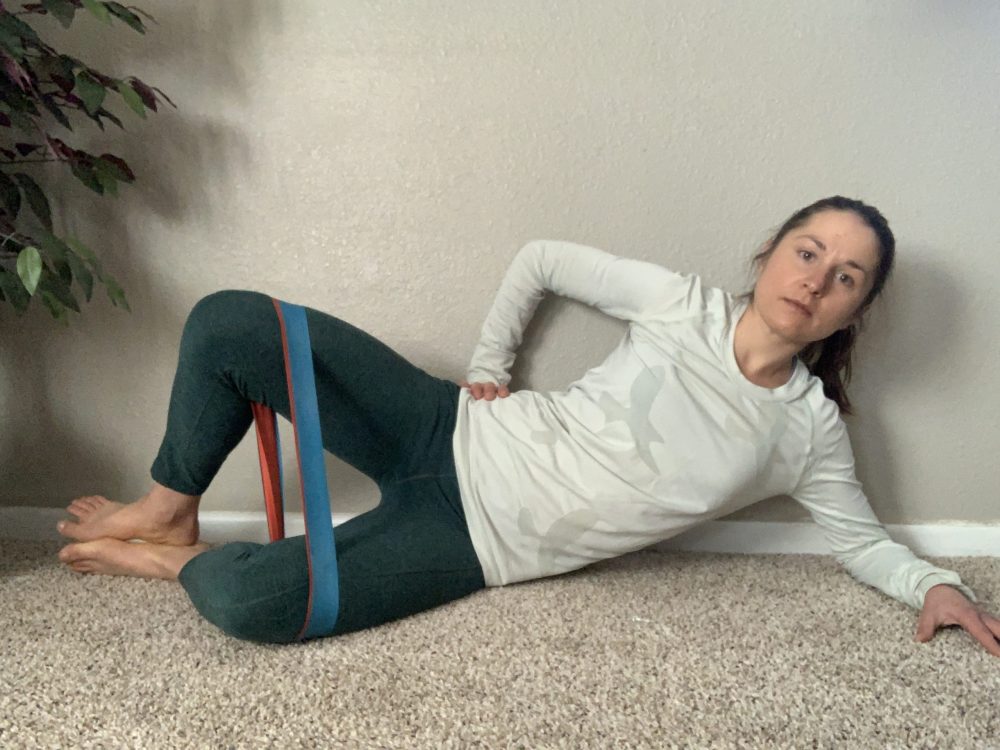
    Lie on your side with the band just above your knees. Hips and ankles should be in line with the knees bent roughly 90 degrees in front of the body. Then, rotating from the hip like a hing, open the top leg, holding at the top for two seconds, then slowly rotating back to the starting position. You should feel this in the outer part of your hip, specifically in the gluteus medius muscle which is responsible for abduction and external rotation of the leg from the hip. In layman’s terms, this means it helps keep your knee from caving inward in compensation for poor hip stability when you’re gliding on your ski and helps power your skate push off.  

    Try 2-3 sets of 10 to start, adding a longer hold or additional repetitions as you build strength.

    Some essential reminders from Yeaton: “Keep your top hip rolled forward, avoid flaring your ribs, keep your ankles together, and think about rotating at the hip rather than just lifting your knee. Again, the key is to keep your hip rolled forward and don’t let it roll back, or else you are working the wrong muscles.”

    Fire Hydrants

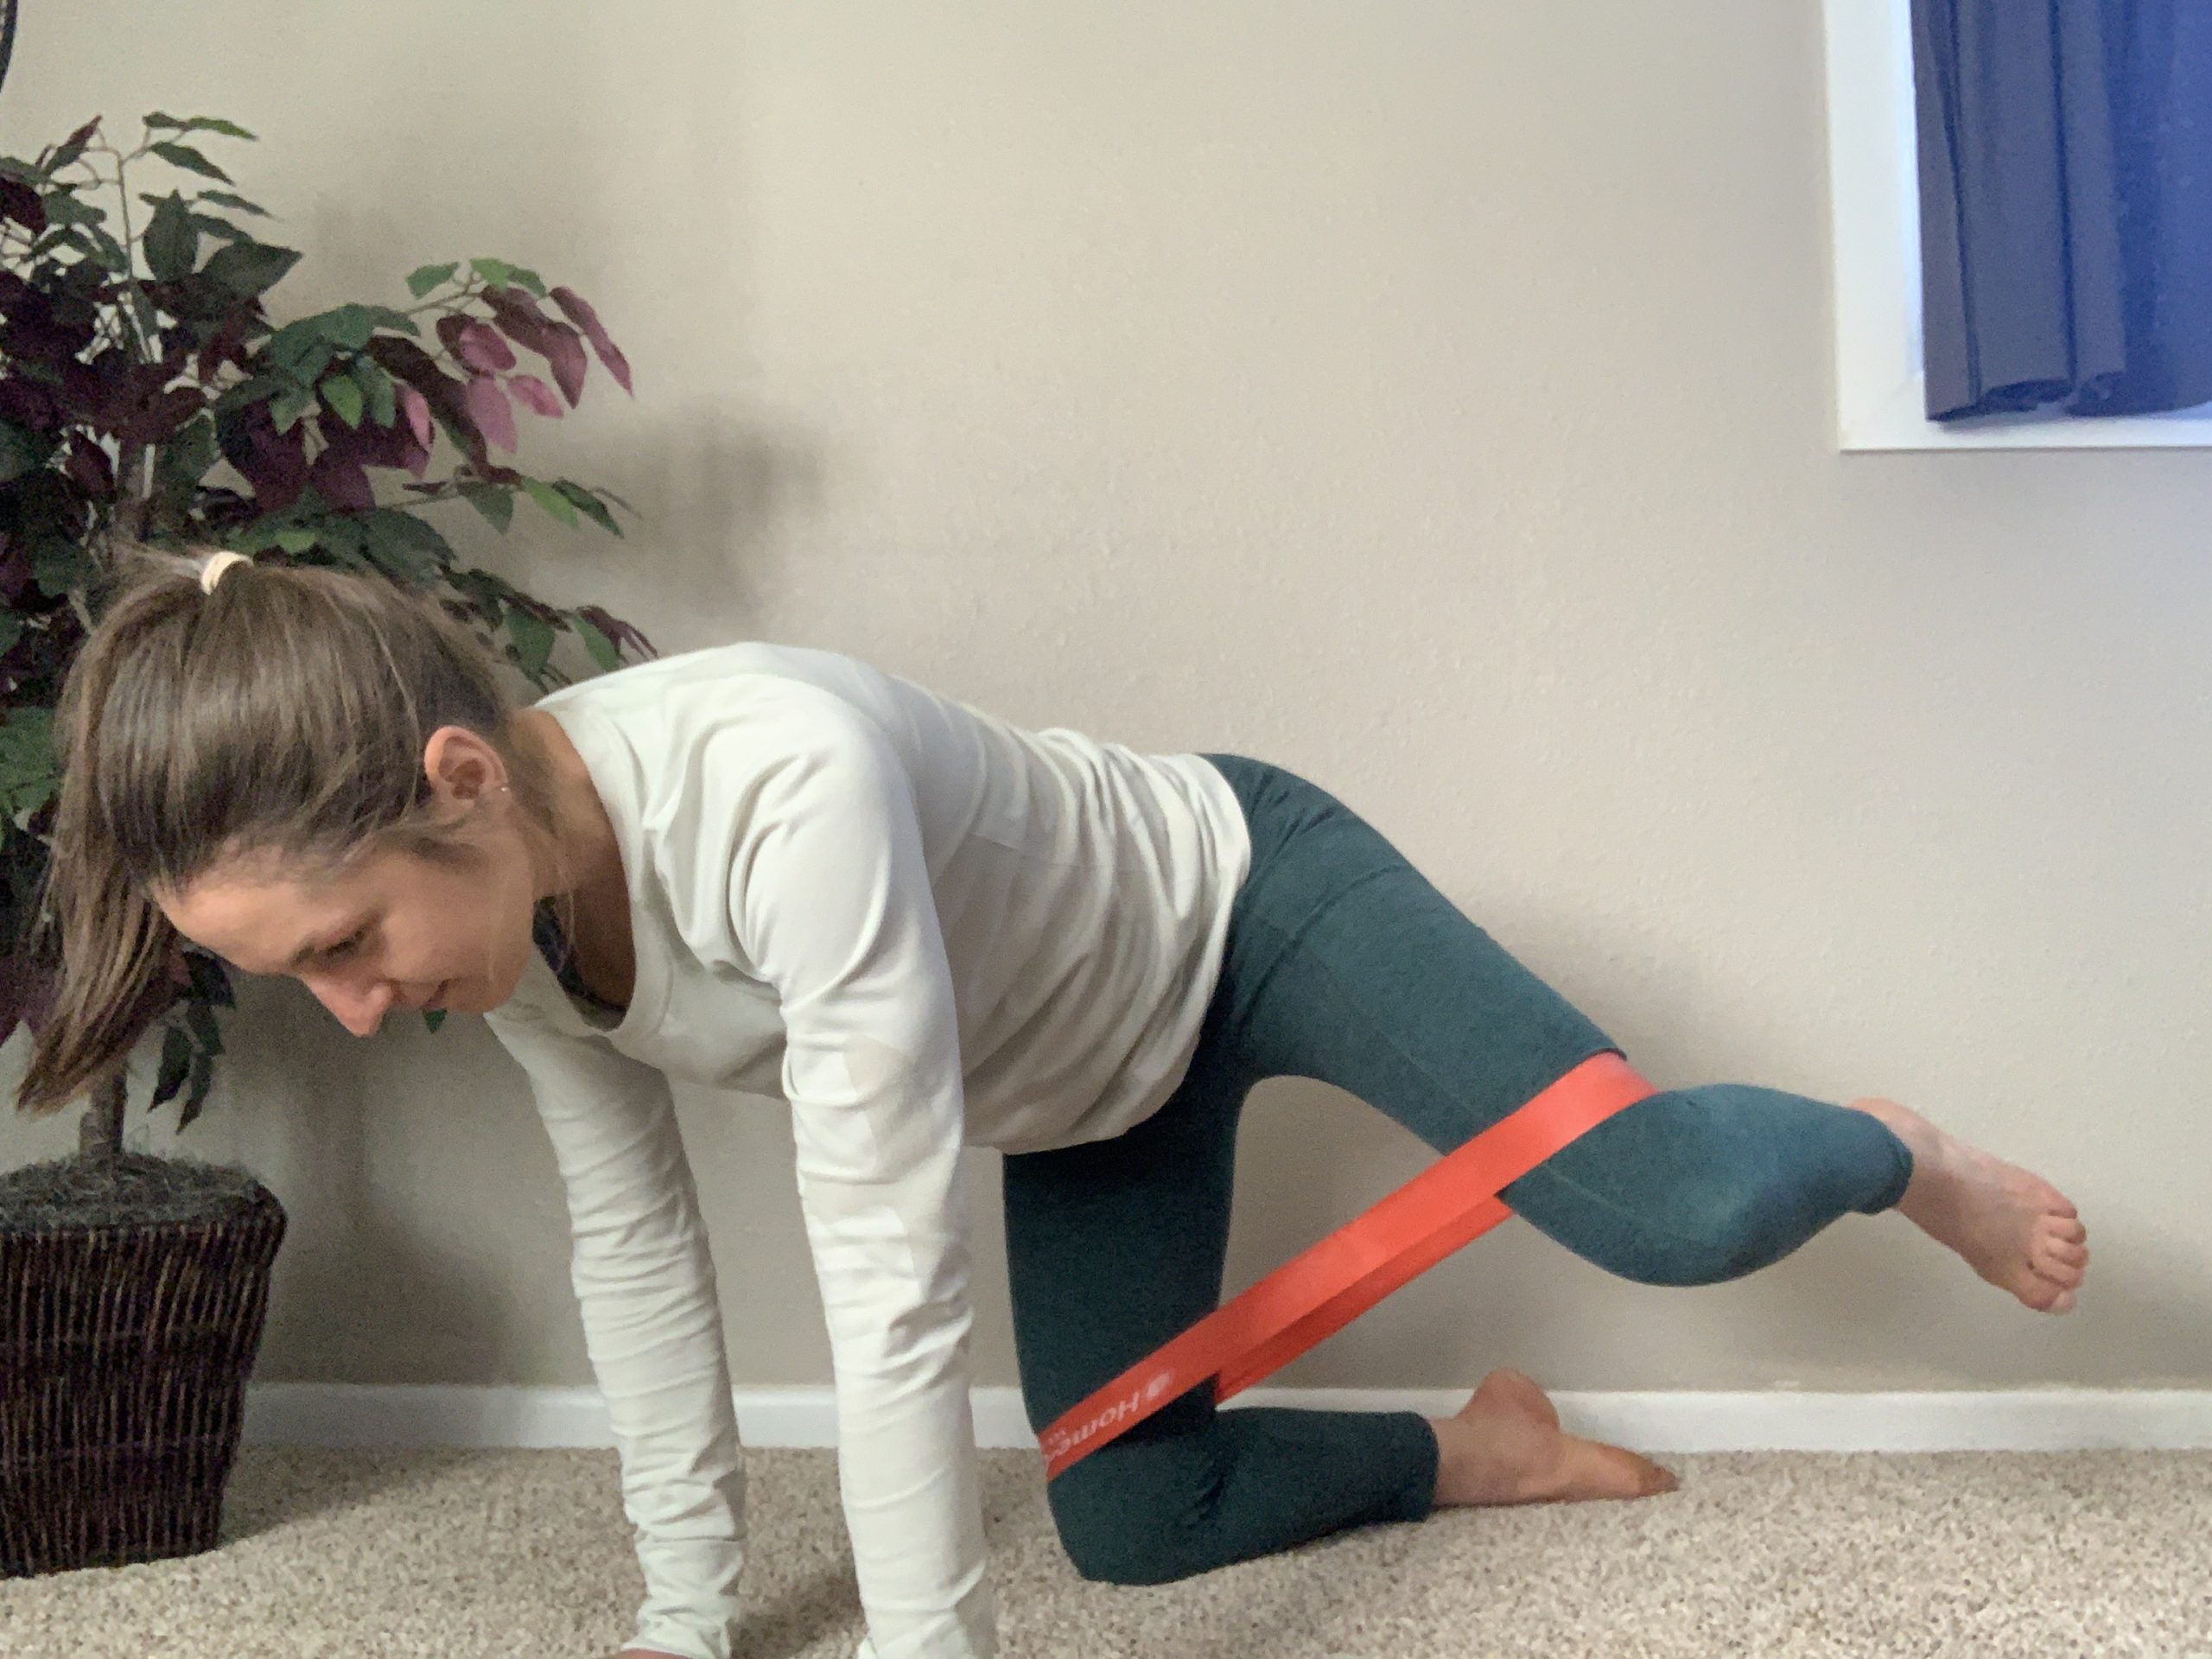
    Starting on hands and knees with the core engaged and the band above the knees, rotate from the hip to lift one knee off the ground. Hold at the top for two seconds, then slowly release. Keep a flat back and make sure you are not compensating by shifting your hips to the side or rotating from the spine. Keeping a ball or a light book on your low back can be a helpful cue — if it slides off, you are probably rotating your hips rather than just rotating the leg outward.  

    Try 2-3 sets of 10 to start, adding a longer hold or additional repetitions as you build strength.

    Glute Bridge With External Rotation

    For both of the exercises below, the band should again be placed just above the knees. 

    Level 1:

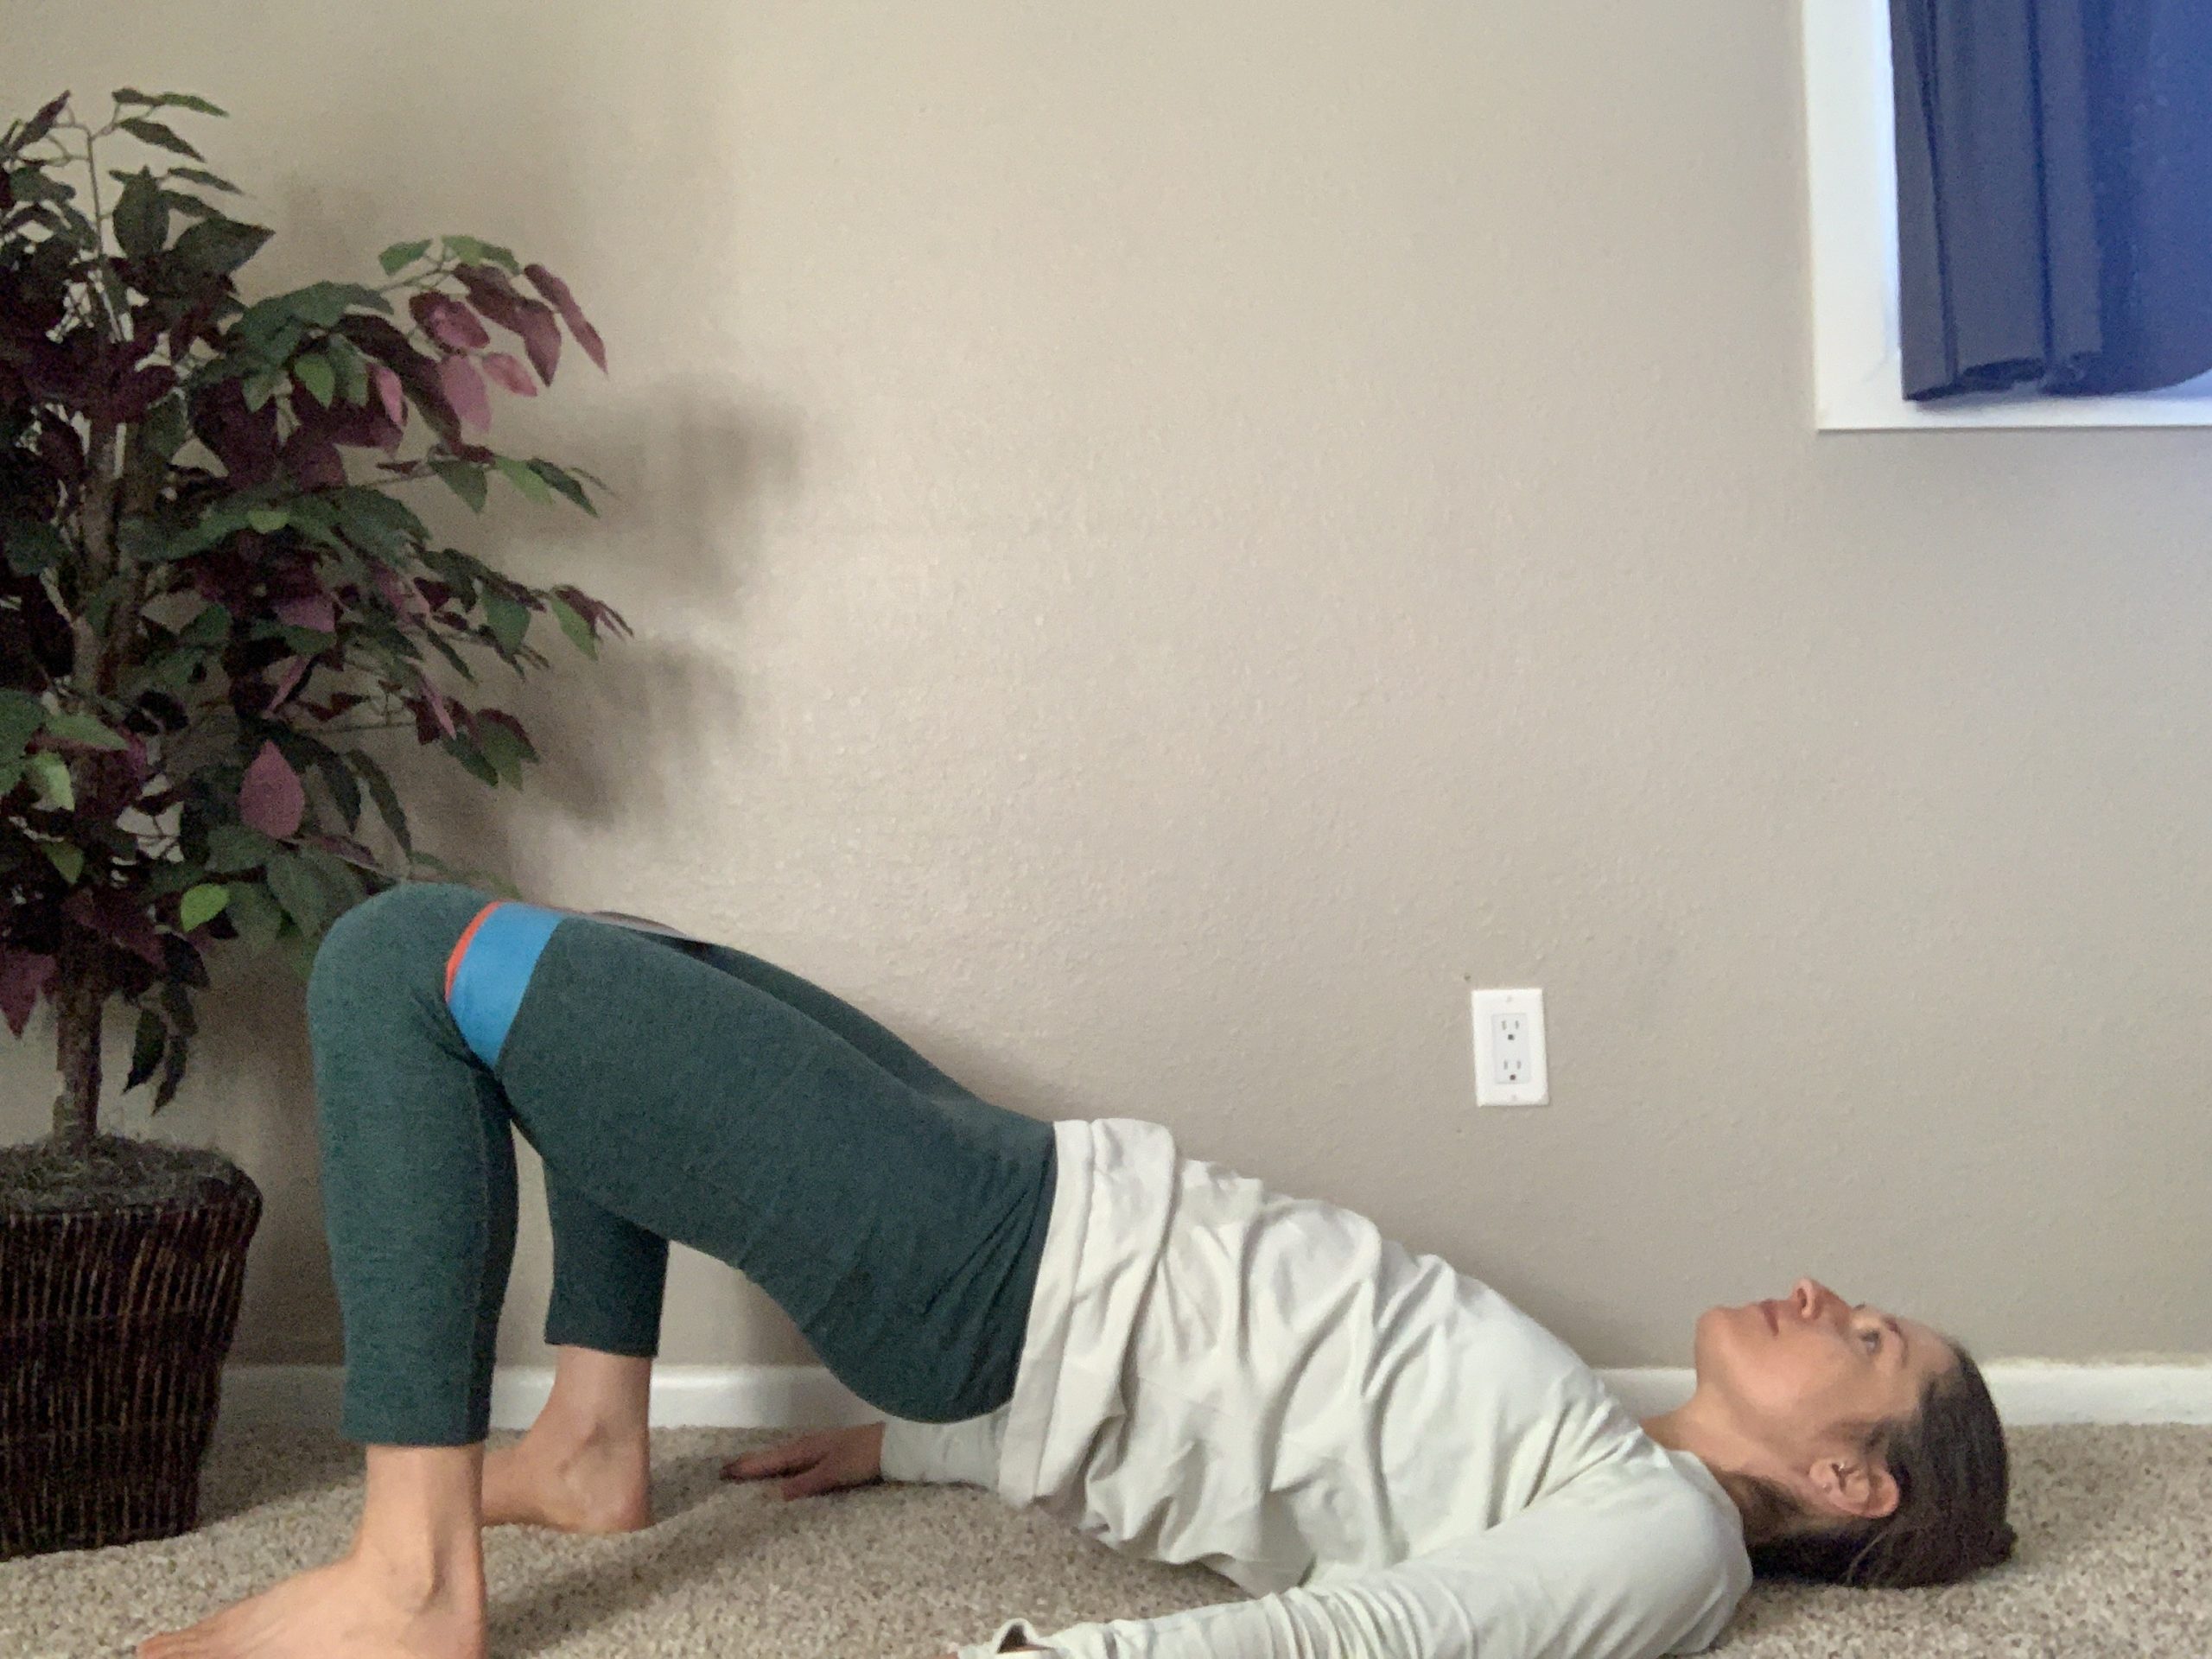
    Lying on your back with knees bent, feet hips width apart, and heels close to your butt, push your hips up into a bend. This should put your knees at a roughly 90 degree angle. Keeping the hips high, rotate the knees outward from the hips, further stretching the band.

    Try 2-3 sets of 30 second holds, increasing the time or repetitions as you progress.

    Level 2:

    Beginning again from the bridge position, extend one leg while focusing on keeping the hips level and not shifting side to side. You should maintain some tension in the band to keep the outer hip muscles firing, but do not need to try to add additional tension to the band.

    Again, try 2-3 sets of 30 second holds, increasing the time or reps to add challenge. 

    Yeaton reminds, “Really focusing on keeping your hips level. Don’t let the hip of the leg you are lifting off the ground drop — that’s the most important part.” 

    Skate Pushes

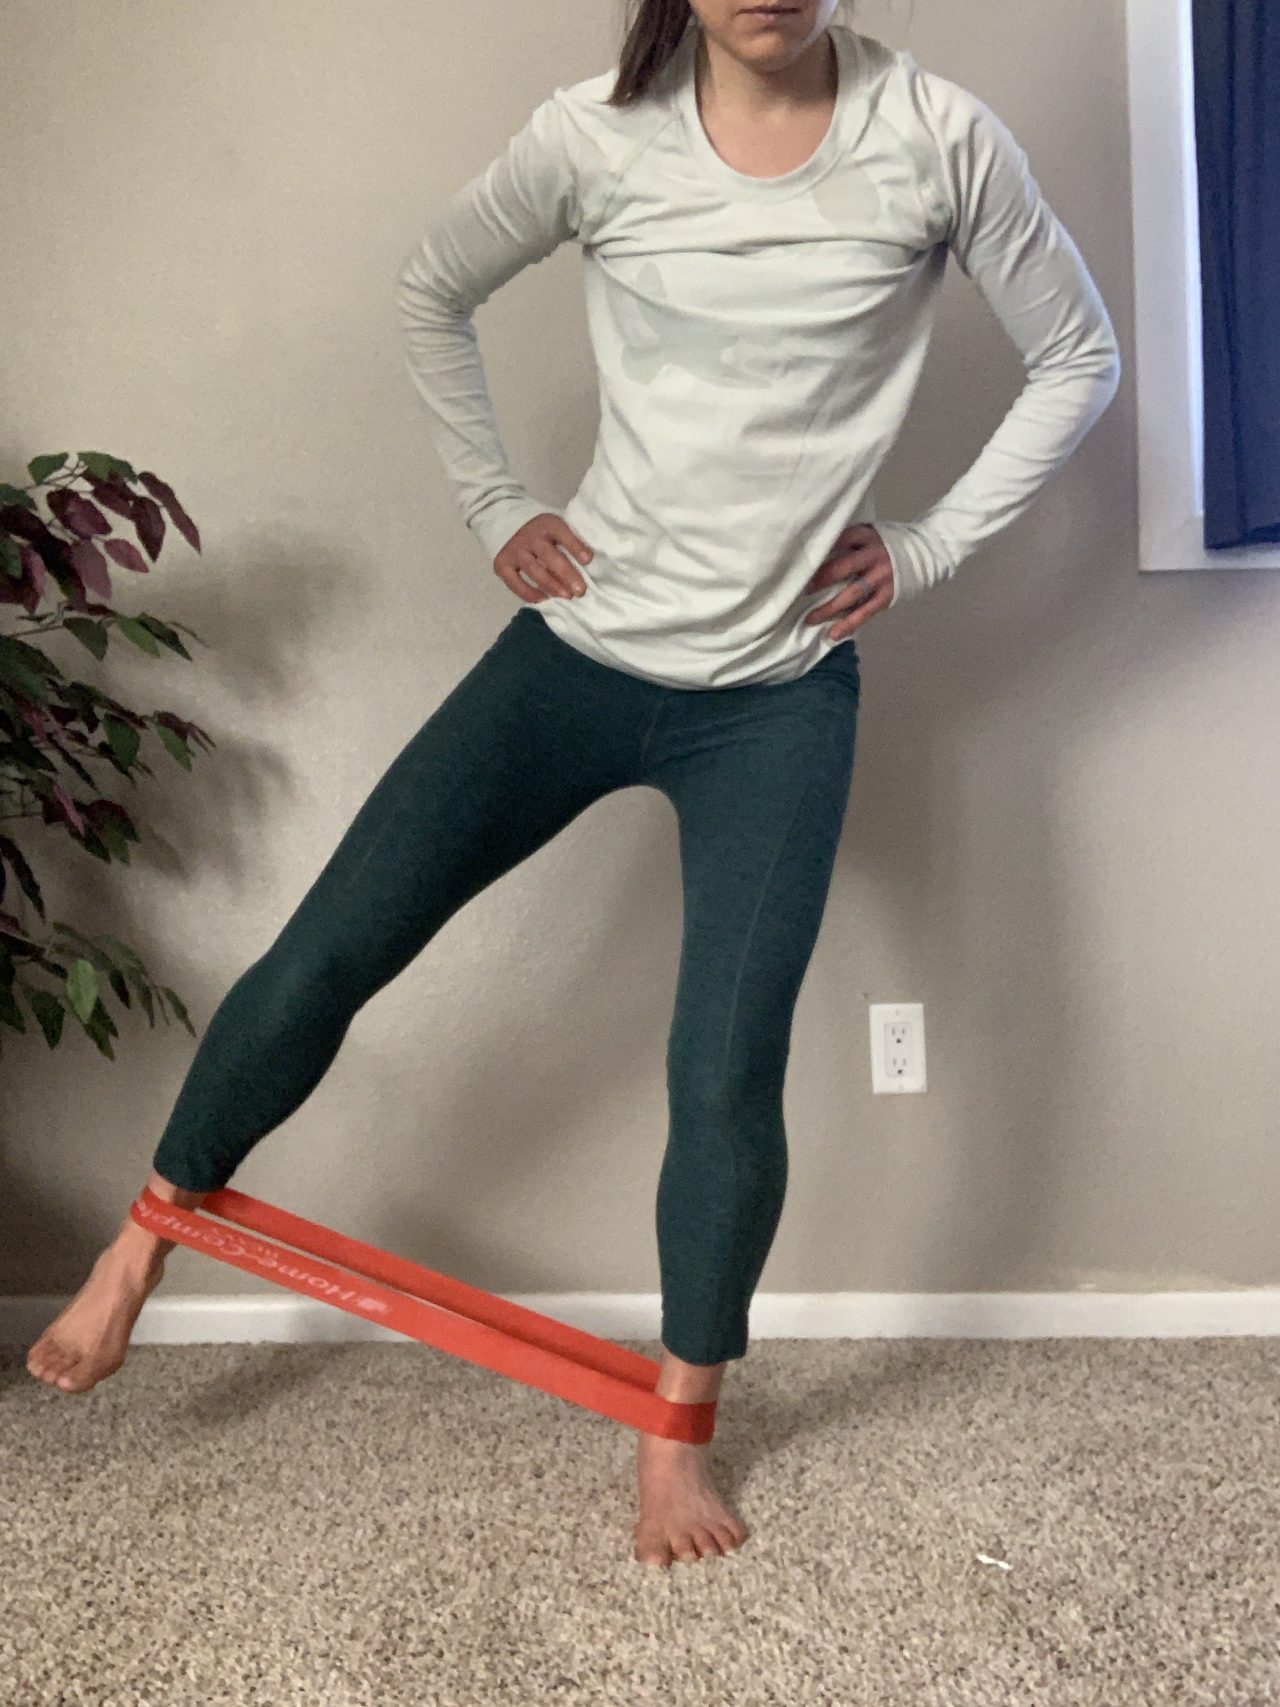
    With the band just above the ankles, stand on one leg with a skate ski body position. There should be a bend at the ankle, the angle of the shin and back should be parallel, and hips should be stacked over the heel. Slowly extend the free leg outward as if you were pushing off perpendicular to the trail. Hold at the top for two seconds and release slowly to the start position.

    It’s important to keep the motions slow and controlled. Just like in skate skiing, you do not want to compensate by tipping your torso to the side or letting the standing hip pop outward. A mirror can be helpful to help you maintain good form. If you’re finding it hard to maintain balance and form, try decreasing the resistance level of the band, or simply try it without the band until it becomes easier.

    Try 2-3 sets of 10 to start, adding a longer hold or additional repetitions as you build strength.

    Single-Leg Squat With Band

    If you found yourself wobbling and struggling to maintain good form with the skate pushes, it might be best to focus on the first three exercises for the time being. For those looking for a more advanced challenge, here is what Yeaton called her “favorite” exercise for single-leg stability. 

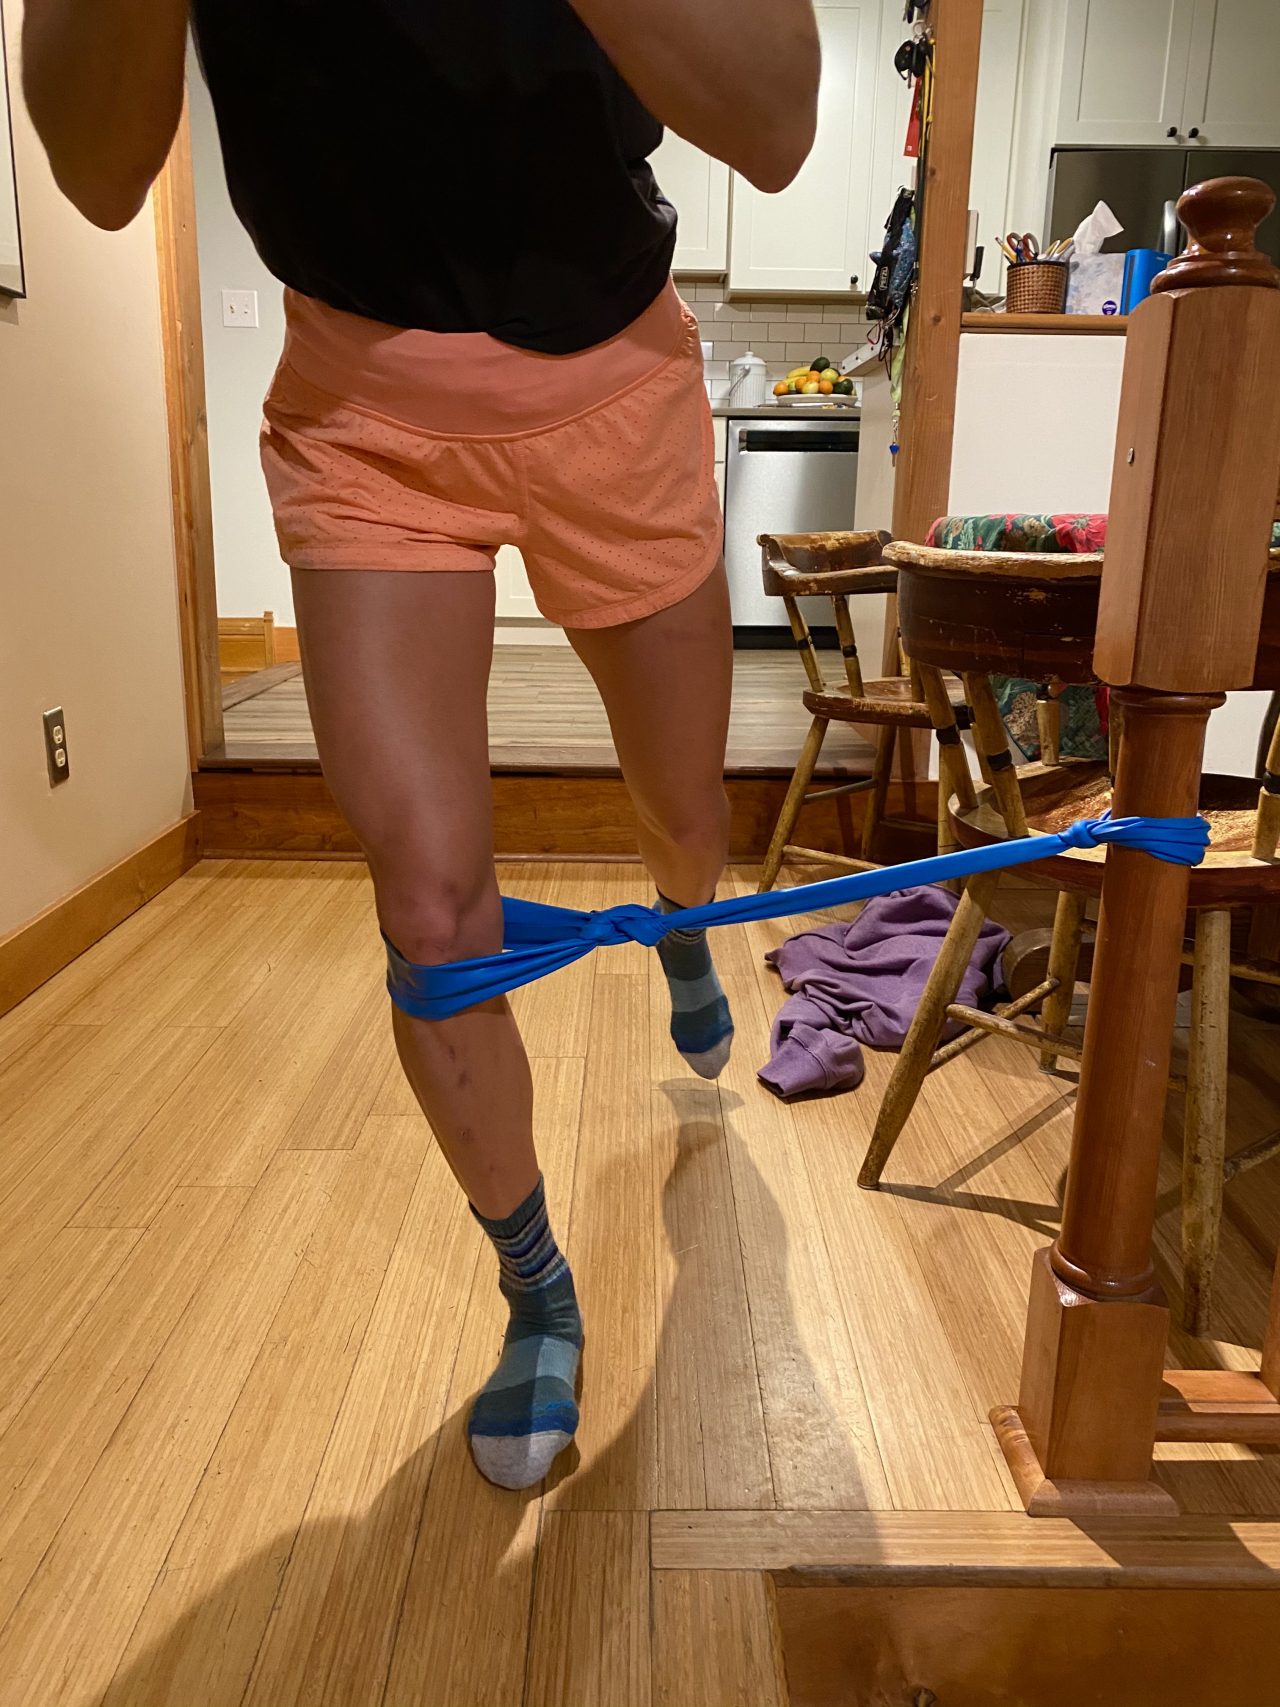
    This exercise uses a full sized resistance band wrapped just below the knee of the standing leg. Fix the other end to something stable, like a table or the vertical rung of a railing. The band should be providing resistance that tries to rotate your knee inward, and you’ll be focusing on keeping the knee in line with the toe to resist the band. 

    With the free leg extended behind, focus on maintaining pressure through the outside of the foot and keeping the hips squared forward as you drop into a single-leg half squat. You should have flexion at your ankle, knee, and hip, so the hip is stacked over the knee, just like when you’re out for a ski.  

    “Don’t let your hips rotate towards the resistance, or again, you aren’t working the right muscles!” Yeaton warns. 

    Yeaton adds, “Another option is to tie the band around the opposite leg (leg in the air), which can actually make it even harder to stabilize and keep your hips in line and not rotating.

    Note: These exercises can all be made more challenging by incorporating a Bosu half ball or inflated disk to decrease the ground stability. 

    Wishing you improved balance and glide, and snowy trails to practice on! Give these exercises a try and you’ll be gliding like Sophie Caldwell in no time!

    Picture perfect. Sophie Caldwell on her way to qualifying in first in the 2019 Davos, Switzerland skate sprint. (Photo: NordicFocus)