This article builds upon the four-part “Building a Better Skier” series, which explores how biomechanics and movement patterns affect skiing technique, and more importantly how you can apply these concepts to improve your skiing. Please feel free to email the author with any questions: ned.dowling@hsc.utah.edu.
Recently, I overheard one of my Physical Therapy colleagues tell a patient, “We’ve got to get you jumping. If you want to get back to running, you’ll need to do some jumping first. Running is nothing but jumping from one leg to the other.” Running is a bit more complex than that, but she made a good point.
I’d think it obvious to most that jumping is a faster, more explosive movement than simply taking a step. The same goes for running versus walking. Time spent with one foot on the ground in running is about 0.215 seconds while walking is closer to 0.6 seconds. In the context of cross country skiing, the propulsive phase during skate V2 is around 0.310 seconds and 0.230 seconds with diagonal stride. While these numbers are variable based on velocity, it should be easy to appreciate that the actions involved in running and Nordic skiing happen at a much faster rate than with walking.
But what does ‘happen at a faster rate’ mean? To answer this, I’m going to take a dive into some physics and biomechanics. First, we need a name for what exactly is happening faster. For the sake of this article, we’re going to go with force. This is perhaps more appropriate than power and maybe less accurate than impulse, but it certainly does the trick of conveying the message that an action has been initiated with the intent of creating motion, be it skiing, running, walking, jumping, etc. (If you want a deeper dive, I highly recommend Force: the Biomechanics of Training by Dan Cleather.)
To overcome gravity and the friction (or suction) of snow, force is required. Our velocity or speed is largely dependent on the magnitude of the force we generate. However, force is not simply an instantaneous measurement. We can talk about peak force or average force, but these miss the big picture. With skiing, whether we are talking about legs propelling skis or arms pushing on poles, force can be plotted on a graph where the Y-axis is the magnitude of force, the X-axis is the amount of time that force is applied, and the area under the resulting curve is the total quantity force applied to the ski or pole during one cycle.
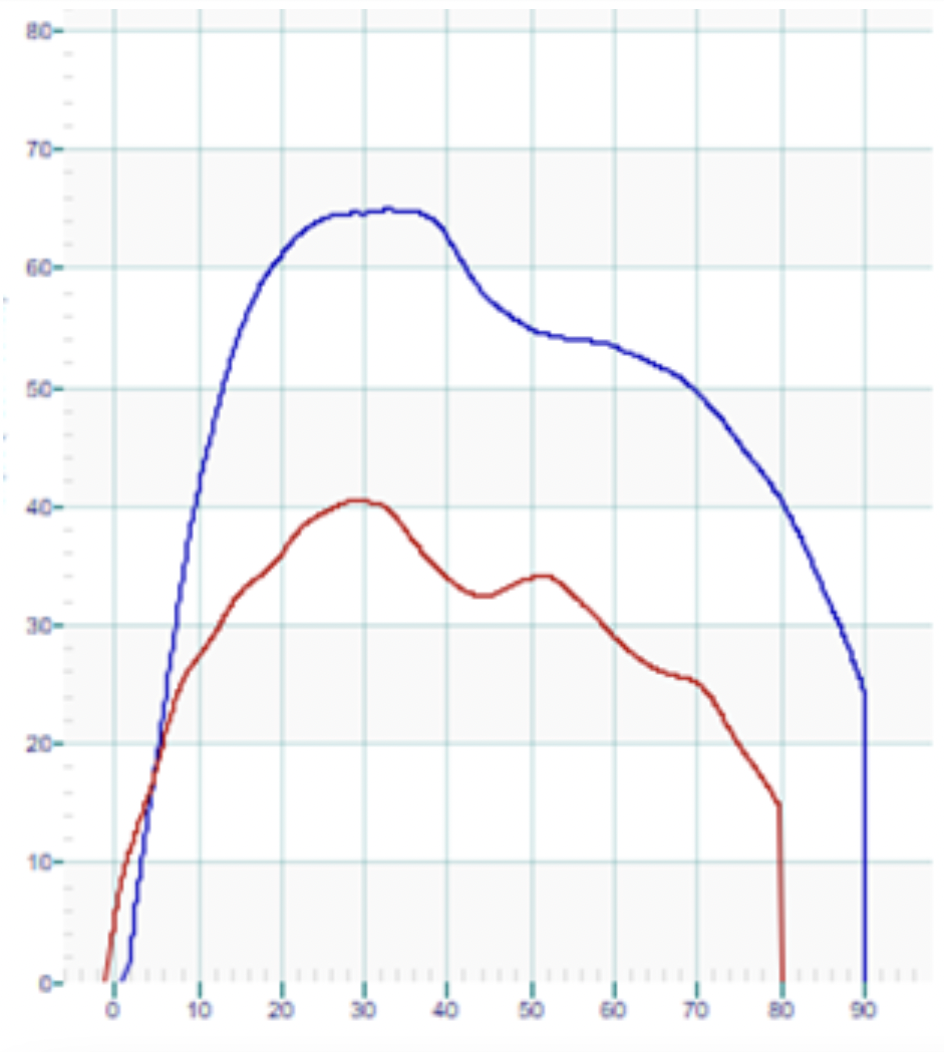
In this graph, the peak force (y-axis) is much greater for the blue line. The greater magnitude of force is also held for a longer period of time (x-axis). Thus, the area underneath the blue line is considerably greater than the area under the red line. All else being equal, the skier producing the blue line will be faster.
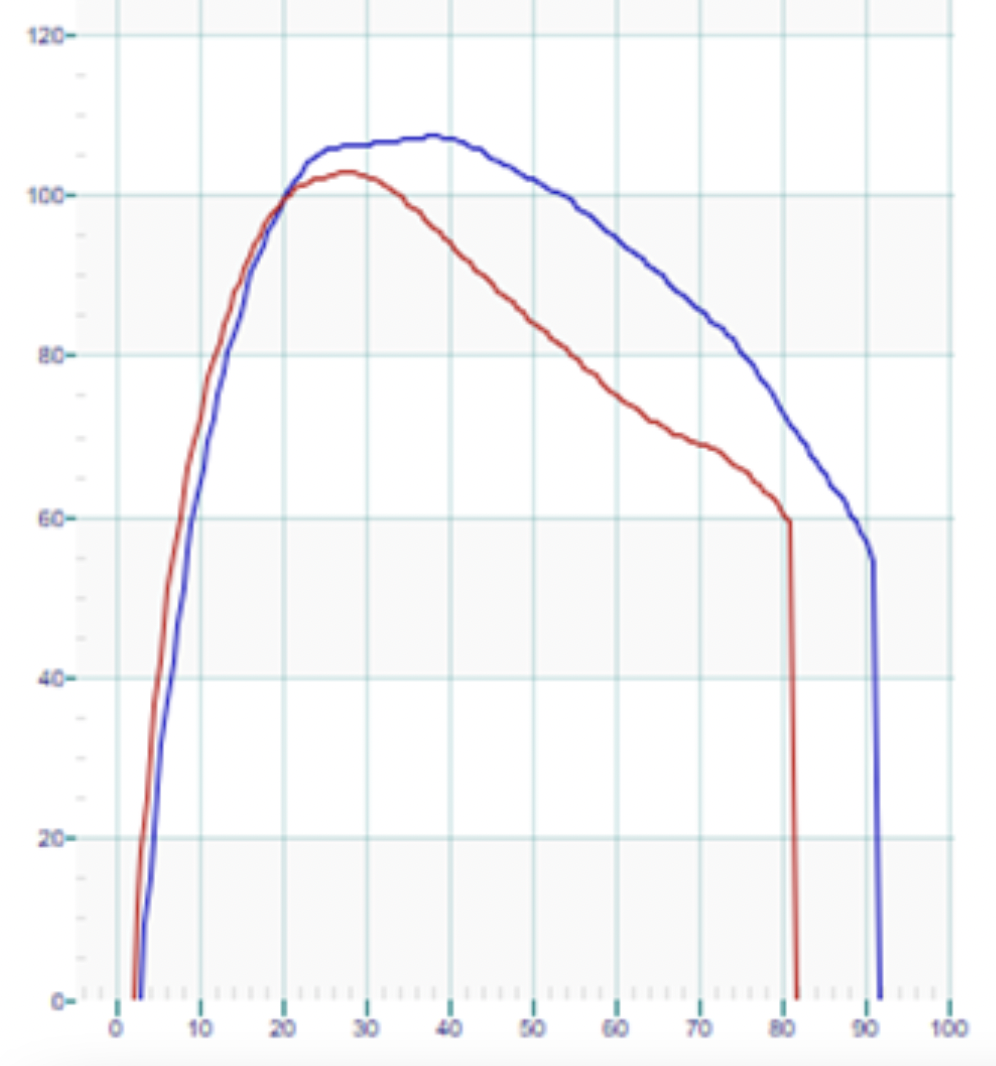
Here we see similar peak forces (y-axis), but the red line doesn’t maintain its force and drops off more rapidly (x-axis). The area under the blue line is larger as a result.
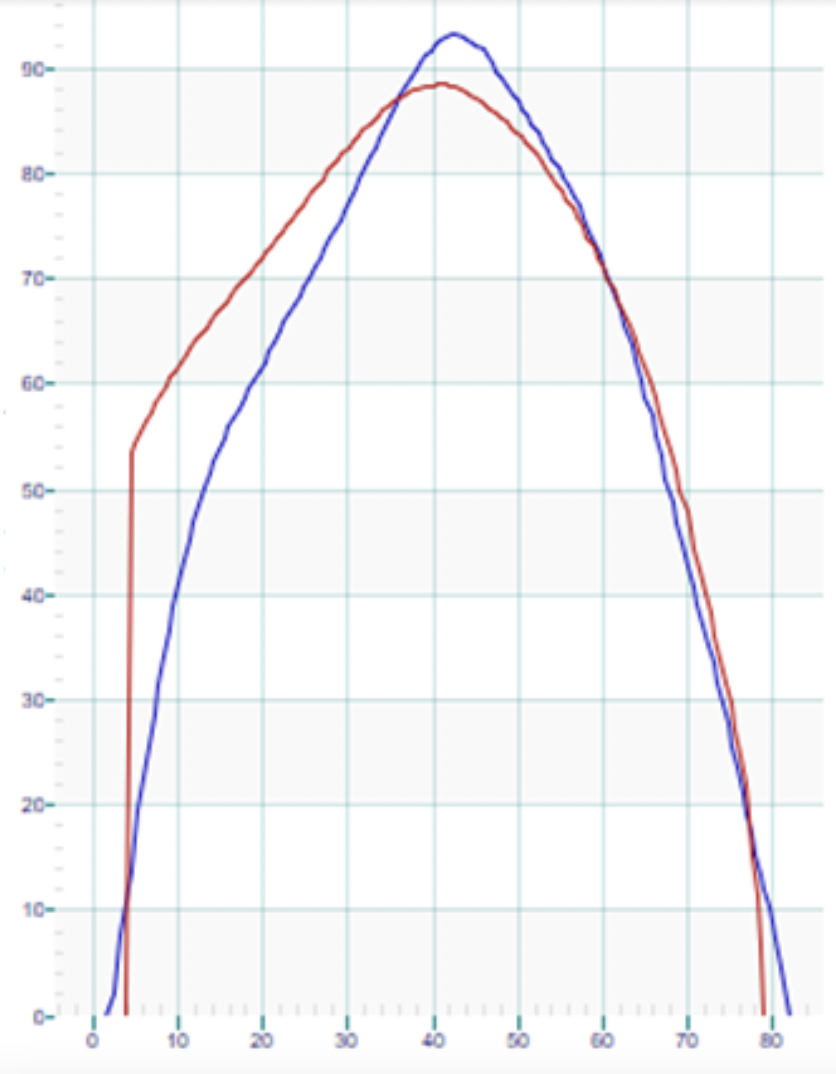
In this graph, the red and blue lines have very similar peak forces (y-axis) and duration (x-axis). However, there is a major difference in how they get there. The red line reaches its peak force faster. As a result, the area under the red line is larger than the blue. This is because, even though peak force and duration are the same, the red athlete’s peak force happened faster.
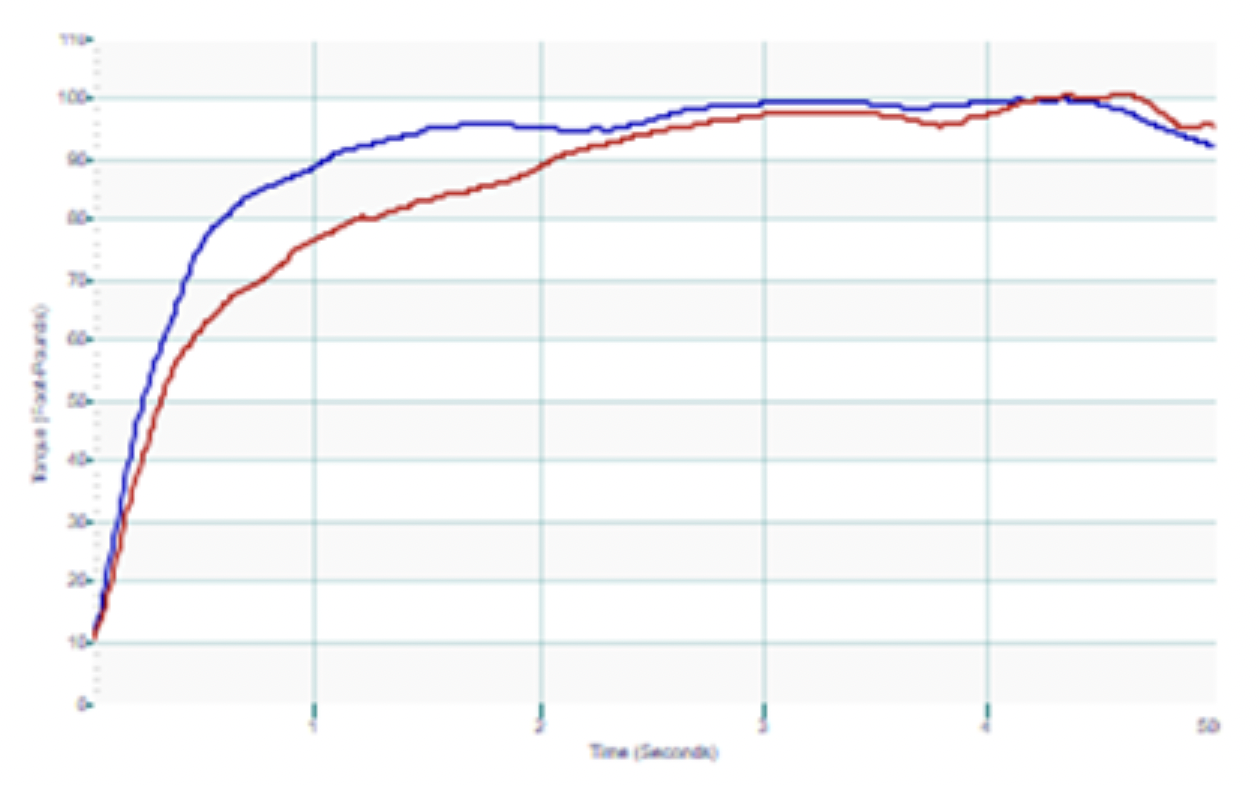
Here’s another example of similar peak force, but the blue line has a much steeper curve and is reaching peak force more quickly.
The slope of the line, “rise over run” if you remember way back to middle school, represents how quickly force is generated. This is called the rate of force development (RFD), and since it is the name of the article and we’ve spent so much time just getting to this point, it must be important.
I already pointed out that force development in powerful skiing happens quickly. In their article, General strength and kinetics: fundamental to sprinting faster in cross country skiing (also cited above), the authors set out to draw correlations between biomechanics, kinematics, and strength in elite skiers. Among their primary findings were: 1. “Analysis of kinetics and kinematics revealed that it was not exclusively the magnitude of applied forces during skiing, but the timing and proper instant of force application were major factors discriminating between faster and slower skiers.” And 2. “General strength and power per se seem not to be major determinants of performance in elite skiers, whereas coordination of these capacities within the different and complex skiing movements seems to be the discriminating factor.”
A primary takeaway is that RFD is related to maximum velocity. This sounds intuitive enough: a sprinter on the track is generating more force per stride over 100 meters than a distance runner racing the 5k. But they go on to conclude that as the skiers increased their speed, they decreased their stride time/duration of force (X-axis). How can speed be increasing if the duration of force is decreasing? Won’t the area of the graph get smaller?
Some of the speed increase is the result of higher peak forces, but it was also attributed to increased RFD. If we manipulate the graph such that peak force is achieved more quickly — meaning a steep spike at the onset of the force — we can afford to decrease the force more rapidly while still generating a larger area under the curve.
With regards to physical attributes, the authors discovered that maximum strength was not correlated with maximum skiing speed; however, jump height (aka RFD) was closely correlated. In the study, maximum strength was considered isometrically, meaning that the muscles were resiting a static load (think planks) versus a push or pull against a load.
It also should be noted that a quicker, but shorter, stride must be accompanied by a faster stride cycle or cadence in order to be effective. This will be well understood by anyone who rides a bike with a power meter: if you are trying to maintain 300w on a climb and shift into an easier gear, your cadence has to increase or the power will drop off. The change in gearing creates less max force through the pedals but is compensated by increasing the speed at which the crank is turned.
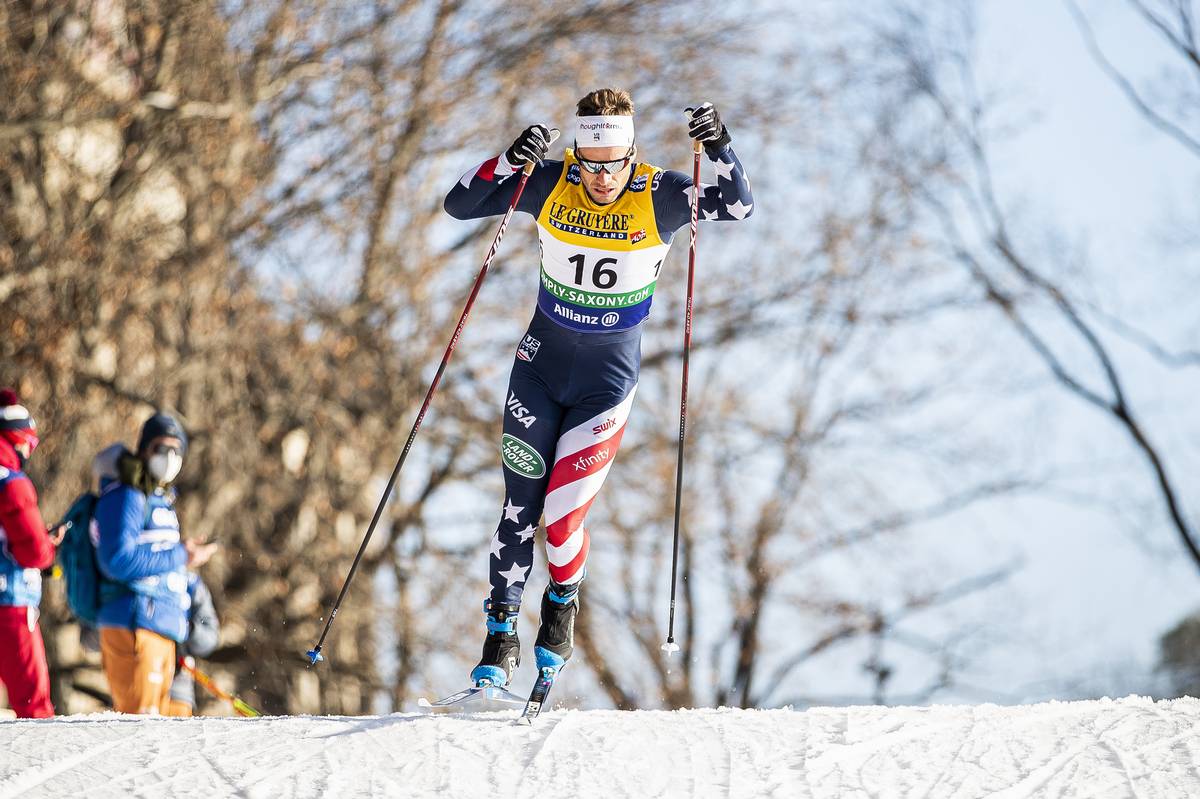
RFD sounds awesome. How do I get some?
Simply put, you train it. In order to increase the speed at which muscles contract and generate force, we must increase the speed of muscle contractions in training. On the low-load end of the spectrum, this can mean simply speeding up standard strength exercises like squats, leg press, and lat pulls.
At the higher end of the spectrum are jumping and plyometric training. Plyometric training significantly improves vertical jump height, which was already noted to be correlated with increased skiing speed.
Plyometric exercises incorporate a pre-load or “stretch” phase prior to a rapid contraction. For example, if we consider a vertical jump, starting the jump from a squat position is a simple contraction of the muscles responsible for hip, knee, and ankle extension. But if the jumping motion begins in standing before dropping into a squat and quickly rebounding for the vertical jump, the same muscles that generate the jumping force are lengthened before contracting. This harnesses the energy produced by the elastic recoil of muscles and tendons.
Think about putting a fairly tight rubber band around your wrist. The rubber band is actively contracting against your wrist and the pressure, or force, is evident. Now pull back on the rubber band and let it snap against your wrist. This amount of force is significantly and noticeably (sorry!) greater. Our muscles and tendons do not harness that much elastic energy, but you get the idea.
A pause for words of advice/caution: If the previous paragraph made your knees tremble or your back start to tighten, keep in mind that all exercises exist on a spectrum. With any exercise program, the load or difficulty must start with what is doable. There is a fine line between doing enough to stimulate adaptations in the body and doing too much, increasing the potential for injury. If you are managing a chronic musculoskeletal issue or returning from injury, it is highly recommended that you consult with a Physical Therapist or Athletic Trainer for a more personalized RFD program. Plyometric exercises can be done in a pool with a significant decrease in resistance. The overall load in the water is decreased, but the RFD benefit is retained.
Plyometric Exercises to Increase RFD:
Hopping: Whether on two feet or one, hopping drills will help strengthen the feet and ankles while developing RFD in the calf muscles. These have the lowest loads and can be valuable exercises themselves or as part of your warm up. Jumping rope falls in this category and has been shown to improve running speed.
This video demonstrates a handful of “pogo” style hopping drills. Notice how the knee and hip stay fixed with force being generated by the ankle.
Jumping: Vertical jumps, broad jumps, box jumps, drop jumps, bilateral, unilateral, backwards, sideways–the variety is only limited by your imagination. However, to get the most out of the plyometric stretch cycle, it is arguably best to make these countermovement jumps where the body drops down before exploding upwards (or sideways, forward, etc.).
In this video, Dave Quammen of Park City Sports Medicine demonstrates a series of two-legged jumping drills. Challenge can be increased with added repetitions or with reversing direction with the forward jumps. Try these on one leg for a significant increase in load/difficulty.
Bounding: With or without poles, bounding follows the basic premise of adding “pop” to a normal stride for increased RFD and exaggerated height, distance, or speed. While boulding can be done on flat ground, there are added benefits to going uphill: because height and flight time are reduced so are the impact forces when landing. It also takes more effort to go uphill, so the workout is more efficient (more bang for the buck), and it just feels more natural.
Demonstration of more running-oriented hill bounding, from Lydiard Training.
Ski bounding with poles is a traditional dryland exercise that not only improves RFD but works the core and arms at the same time — valuable training even if you only skate ski. It can be done on a long gradual hill for endurance work, but short, steep hills will emphasize RFD.
The U.S. Ski Team completes a set of longer duration L4 ski bounding intervals way back in 2012. Camera quality has since improved, but the background song is still a classic. Note how the technique is very different from running even though the speed might be similar.
Again, with the basic concept of creating quick, explosive movements, there are far more ways to develop RFD than this summary can hope to cover. The remaining topic, then, is dosage.
Plyometric exercises are demanding and stressful to the musculoskeletal system. Delayed onset muscle soreness is to be expected, and at least one recovery day is mandatory. Aside from muscle soreness, any pain that is beyond mild or takes more than a couple of hours to subside should be considered a contraindication and deserving of a consultation with a sports medicine provider.
For most readers, doing the exercises once or twice a week is an adequate stimulus for both improvement of RFD and appropriate recovery. As for duration or repetitions: when in doubt, start small. In the jumping video above, Dave demonstrates two repetitions of each jump. If we consider the full video to be one set, then starting with 2-3 sets is likely reasonable. Then, increase repetitions to progress the program. Keep in mind that quality is key — if you feel your technique or stability start to wean, it’s best to stop there. Total exhaustion is not the goal.
Precede plyometrics with a light cardio warm up. If coupling plyometrics with core or strength training in the same session, it is generally recommended to do the plyos first before you are too fatigued.