From the FasterSkier archive — posts syndicated from athletes’ and coaches’ own blogs between 2004 and 2012, kept online as published. Current coverage is at fasterskier.com.
Stuart Kremzner has published a new book with a bold title — High Performance Nordic Training: A Guide to Taking Your Athletic Ability to the Next Level. Kremzner is an exercise physiologist and nordic coach and also the author of the Bill Koch League leader manual, last updated in 2008.
Training, even restricted to a single sport, is a complex topic with unending opportunities to dive into bewildering detail and unexplored research topics. Anyone who has spent time in sport will know there is a long history of bad ideas, pseudo-science, and anecdotal ‘proof’ cluttering up the emerging evidence for best practices. There are many competing books of varying age, quality, and length.
“I hope this general framework will give the reader the basic tools to guide their training development decisions.” — From the Introduction
In essence, this short book is an introduction to developing and improving a cross-country ski training plan.
One way Kremzner reduced the size and complexity of the book was to filter out all the references and scientific evidence behind the ideas. While this choice greatly improves readability, it leaves the reader with a decision about whether to trust the author. That said, readers without a reasonable background in biochemistry and physics need to trust the author, as research journals are written for academics. As a long time nordic nerd and someone who reads sports physiology journals in his free time, Kremzner passes my test.
The author’s references to training theory are at a high level. If you are interested in how to achieve goals with interval workouts, for example, the fundamentals are fleshed out. If you want the thermodynamic detail of why the ATP cycle is directional, you need to look elsewhere. If you don’t understand how the previous two sentences are connected, this book is a good place to start.
This book has two weaknesses: One of those weaknesses is also the book’s biggest strength.
The book is short, focusing on a high level view of endurance training’s building blocks and how to organize them. Yes, the book will leave you wanting more, but it provides a solid road map to recognizing what is next on your learning journey. In a world where it is so easy to get lost in details and forget the goal, this book is a handy reminder of how to find your way out of the swamp and onto the freeway towards the destination.
The second weakness is one that most of us who have been in the sport multiple decades share. After long experience, it is easy to think that ‘good enough for now’ will always be ‘acceptable’. Very few of us escape blind spots based on ‘we always did it that way and there was never a problem’. While Kremzner is correct in suggesting that roller skiing is a very good way to do lactate testing, this is no longer acceptable as a justification to publish a picture of an athlete roller skiing without a helmet.
The author set a bold goal with the title. Whether you should take him at his word and buy this book depends on where you are on your personal training and coaching journey.
If you are self-coached and new to training theory, this is a clear and simple introduction – this is a recommended read.
If you are self-coached and have known the basics for a decade or more, this is a quick way to check yourself for blind spots. Recommended.
If you are coaching, this will help you design plans for your athletes. The book includes simplified explanations of the ‘whys’ that may help you communicate the theory in your mind, and in turn, allow your athletes to better understand how their training applies to race day speed. That’s a win-win. Recommended.
If you are coaching athletes on the World Cup red group, and this is a small niche, you already know more than this book covers. Not recommended.
“This is in no way a substitute for a well-qualified coach.” — From the Introduction
At the end of the ski day, we can spend hours in the bar arguing tiny details and incremental gains. None of that matters if we don’t get the big things right. This book is a quick read about the big things.
(Note to readers: Kremzner has been a contributor to FasterSkier.)
The following strength and performance tips come from one of our resident experts, Stuart Kremzner, MS, CSCS, FMSII, OS, RN, an exercise physiologist who has coached and raced in nordic skiing for over 20 years. Kremzner has trained/consulted with college athletic programs, elite teams, and athletes with the goal of improving athletic performance and injury prevention. When not working, he is running and skiing on the trails in New Hampshire or writing wax tips for the TOKO Tech Team. Kremzner can be found at e3sportsperformance.com.
***
In my recent article, “Back to Basics: How to ‘Reset’ for Nordic Performance”, I discussed how to prime our nervous system and core muscles in an optimized firing pattern. This article will delve into how to strengthen the core muscles now that they are more active and firing in an improved pattern. The goal of these exercises is to strengthen the core muscles in a reflexive dynamic pattern. The primary muscles targeted are the deep pelvic floor, transverse abdominal and gluteus medius muscles. Many other muscles are still very active as well.
Additionally, we learned how the reflexive core discussed in Original Strength is driven by three pillars: Vestibular stimulation, midline crossing or contralateral movement and diaphragmatic breathing. If what you are doing doesn’t satisfy these criteria then it is not reflex driven as far as the core is concerned, (Shropshire, 2018). The exercises below encompass these criteria.
When we read fitness books, articles or see YouTube videos about core training, it can be overwhelming and spark the questions– what do I need to do? What is most relevant for improving my Nordic skiing performance?
This is where having an assessment by a trainer certified in Original Strength or Functional Movement Systems will pay off in dividends, as the exercises will be targeted for you, versus a general starting point that is presented below. That said these are exercises that address the majority of deficits in a wide range of athletes from 10-year-old soccer players to skiers on the national team.
Consider the exercises below as a starting point, this is one of many potential good core exercise sets. Every athlete’s needs are different. If your reflexive core is already well developed then progress the exercises. Essentially, to keep developing and stimulating an adaptation you need to challenge yourself. Start with the basic exercises below. If you can do three sets of 10-12 repetitions with excellent technique then progress the exercise to a point where on your 8th-10th repetition your perfect body position, technique or muscles fail. This is the point of ideal adaptation for you.
Many of the exercises below are based on the Original Strength system of training. To learn more and really develop the knowledge to challenge yourself, I would recommend getting one of Original Strength’s books or check out more of their website videos.
Core Exercise Routine
Start with rolling out and doing some myofascial release. Then move into resetting and activating your nervous system with the Original Strength activation/warm-up discussed in last week’s article, this will prime your nervous system and accelerate your adaptation to the core exercises.
Myofascial release. (Photo: Stuart Kremzner collection)
Important Points:
-These exercises can be done as an individual workout or added into an existing strength routine.
-For rapid adaptation, you should do these every day, or at a minimum 3 times a week.
-Maintain a good body position, continue to diaphragm breathe with good depth and rhythm.
-Execute the exercise with perfect technique. Remember 1-2 seconds with perfect technique is far more effective than compensated movement patterns (twisting, breaking position, holding your breath). This compensated movement will keep reinforcing a dysfunctional motor program and feeding into the same problem.
-As with the reset exercises described last week, continue to diaphragm breathe. Belly breathe deeply in and out through your nose. Your exhale should be 2x as long as your inhale. The tongue should be pressing on the roof of your mouth just behind your teeth. On the inhale push your belly button up as much as possible. The belly should always rise before shoulders.
-To advance these exercises, you can add load, (gravity or weight), pushing or pulling a load, create a less stable platform, or distraction (resistance pulling you in another direction, with a band or opposite limb movement).
For example to progress dead bugs, add a weight to the hand or ankle, or flip around and convert the exercise to a super dog. To progress super dog, put a dynadisk under the weight bearing hand or knee, then both. Then you can further progress the activity with knees off the ground about 1-2 cm.
The Workout
EXERCISES
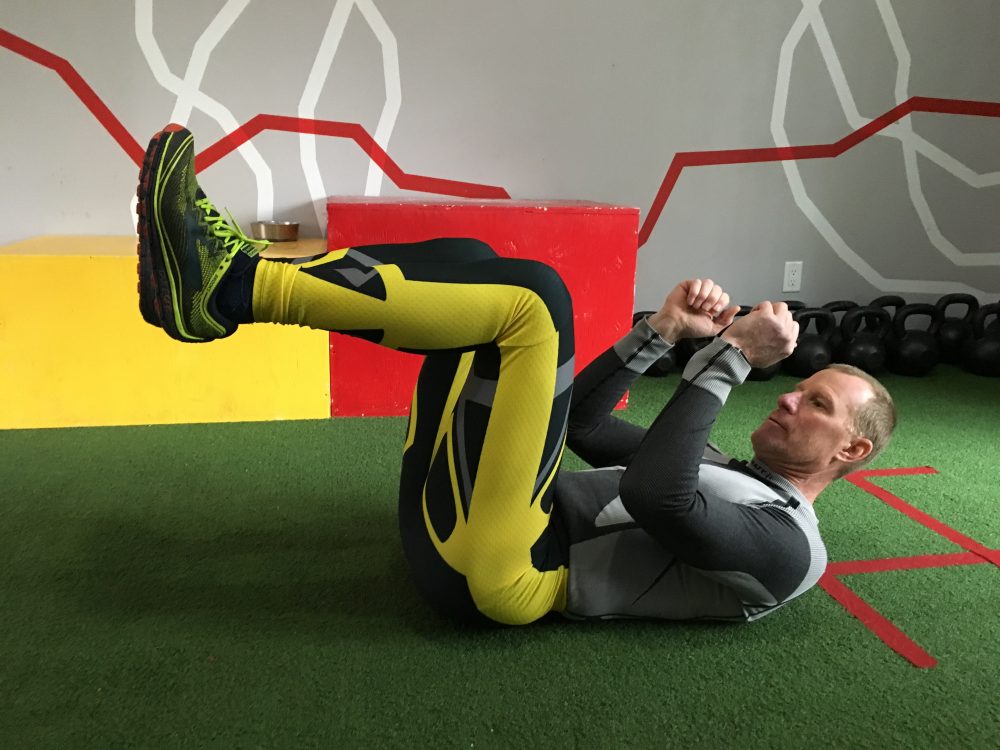
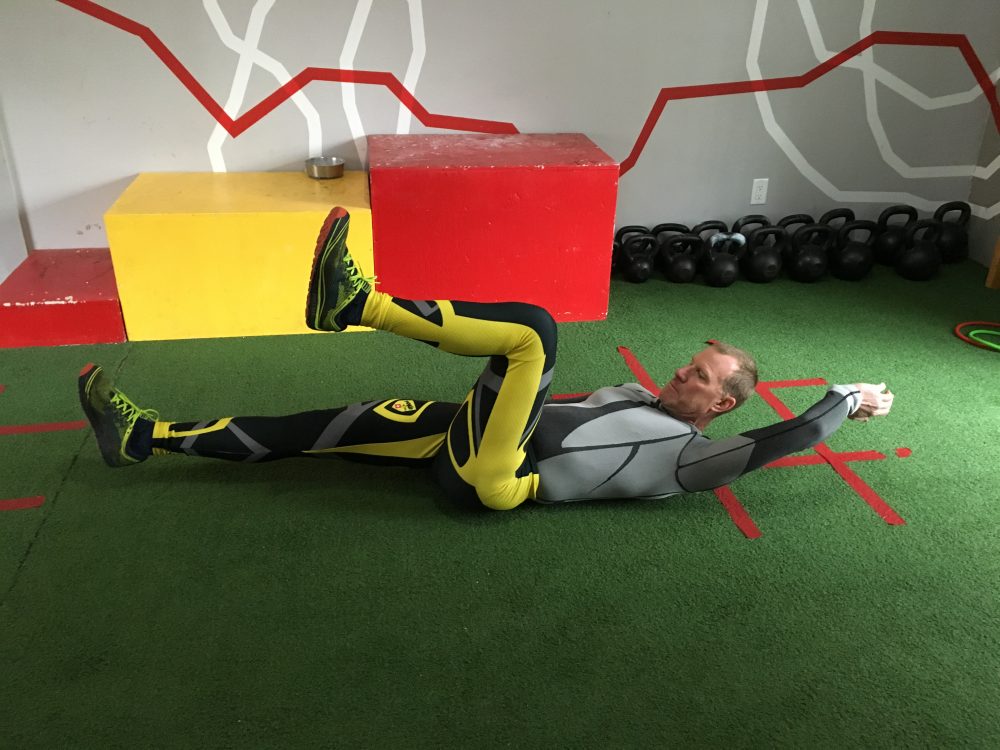
Dead Bugs- Lay on your back. Starting position arms and legs extended, 90 degrees to the ground. Elevate head, extend leg and opposite arm position just above the ground but not touching, hold 5-10 seconds (or to fatigue), return to start position, repeat opposite side.
Deadbug start. (Photo: Stuart Kremzner collection)
Dead bug finish. (Photo: Stuart Kremzner collection)
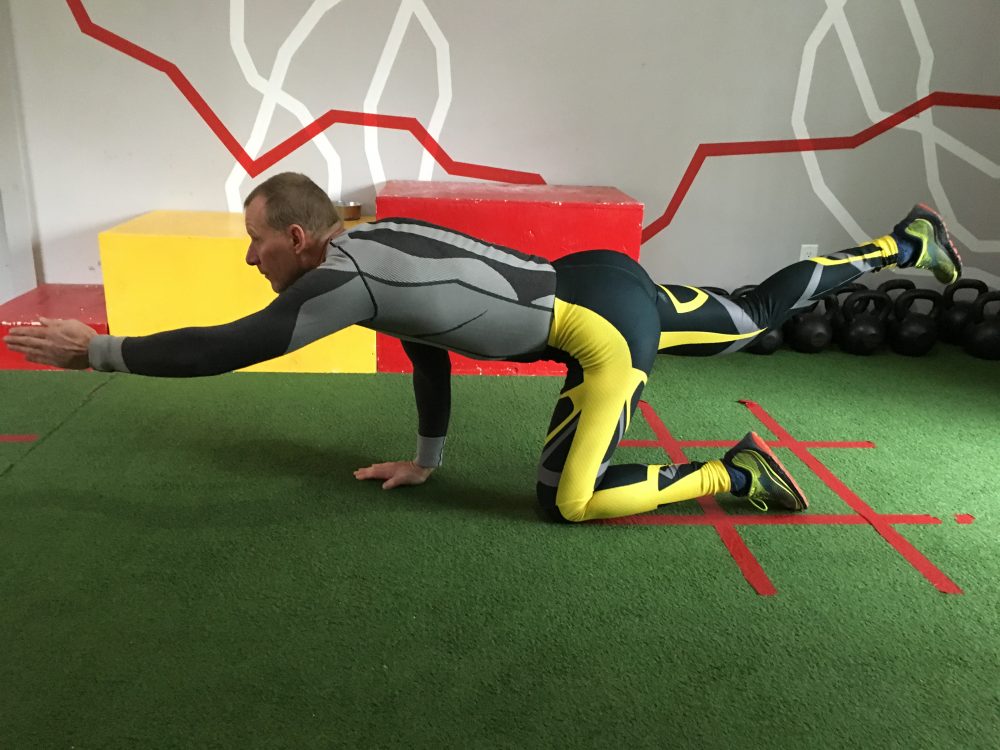
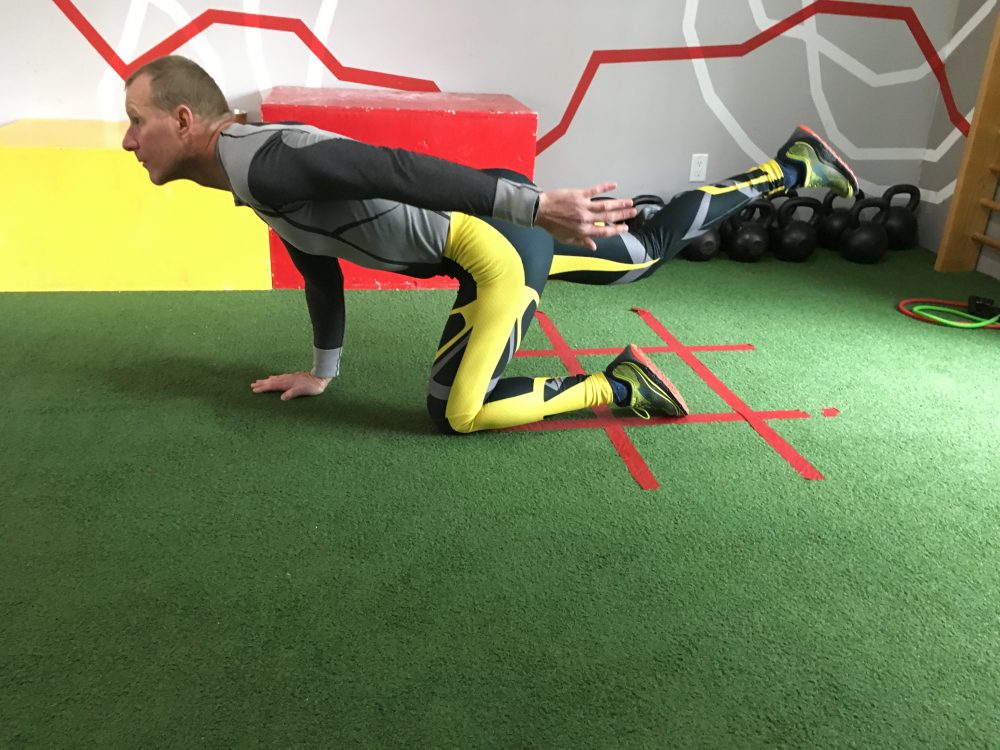
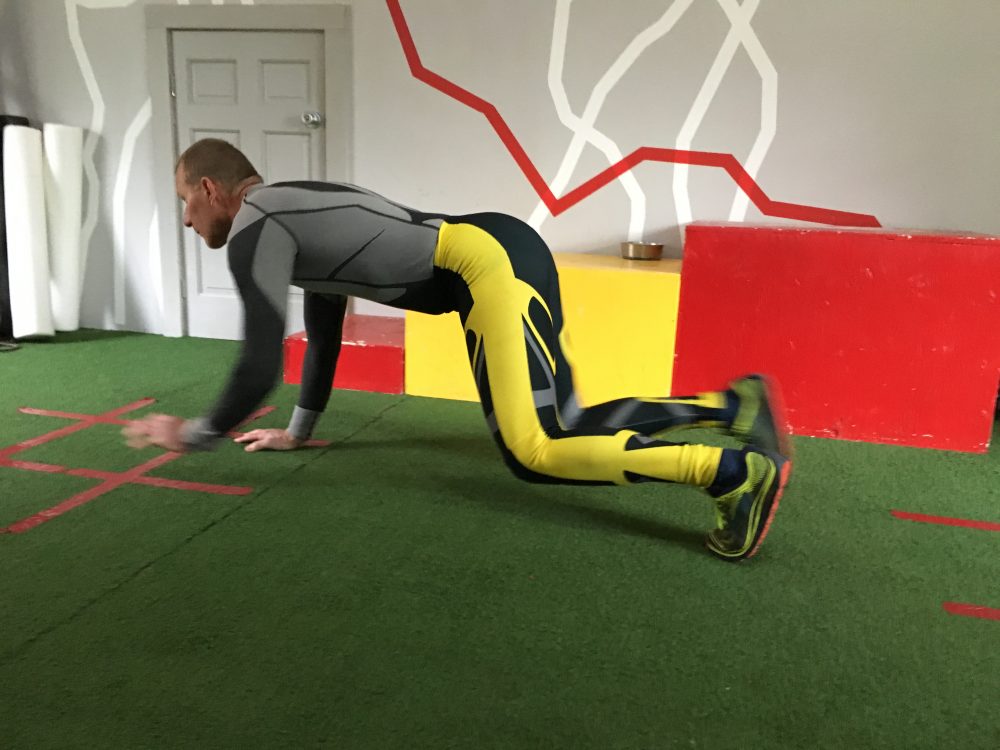
Bird Dogs/Speed Skaters– Begin on all fours, hands under shoulders, knees under hips, with a neutral spine. Brace your midsection and extend your opposite arm and leg. Hold for 2-10 seconds. Concentrate on contracting your glutes without extending your back. Keep your head up throughout the exercise. Repeat opposite side. To progress, add load, or try the quadraped lift off with hip extension as presented in Gus Kaeding’s 8/31 Wednesday workout article.
Bird dog start. (Photo: Stuart Kremzner collection)
Bird dog finish. (Photo: Stuart Kremzner collection)
Speed Skater. (Photo: Stuart Kremzner collection)
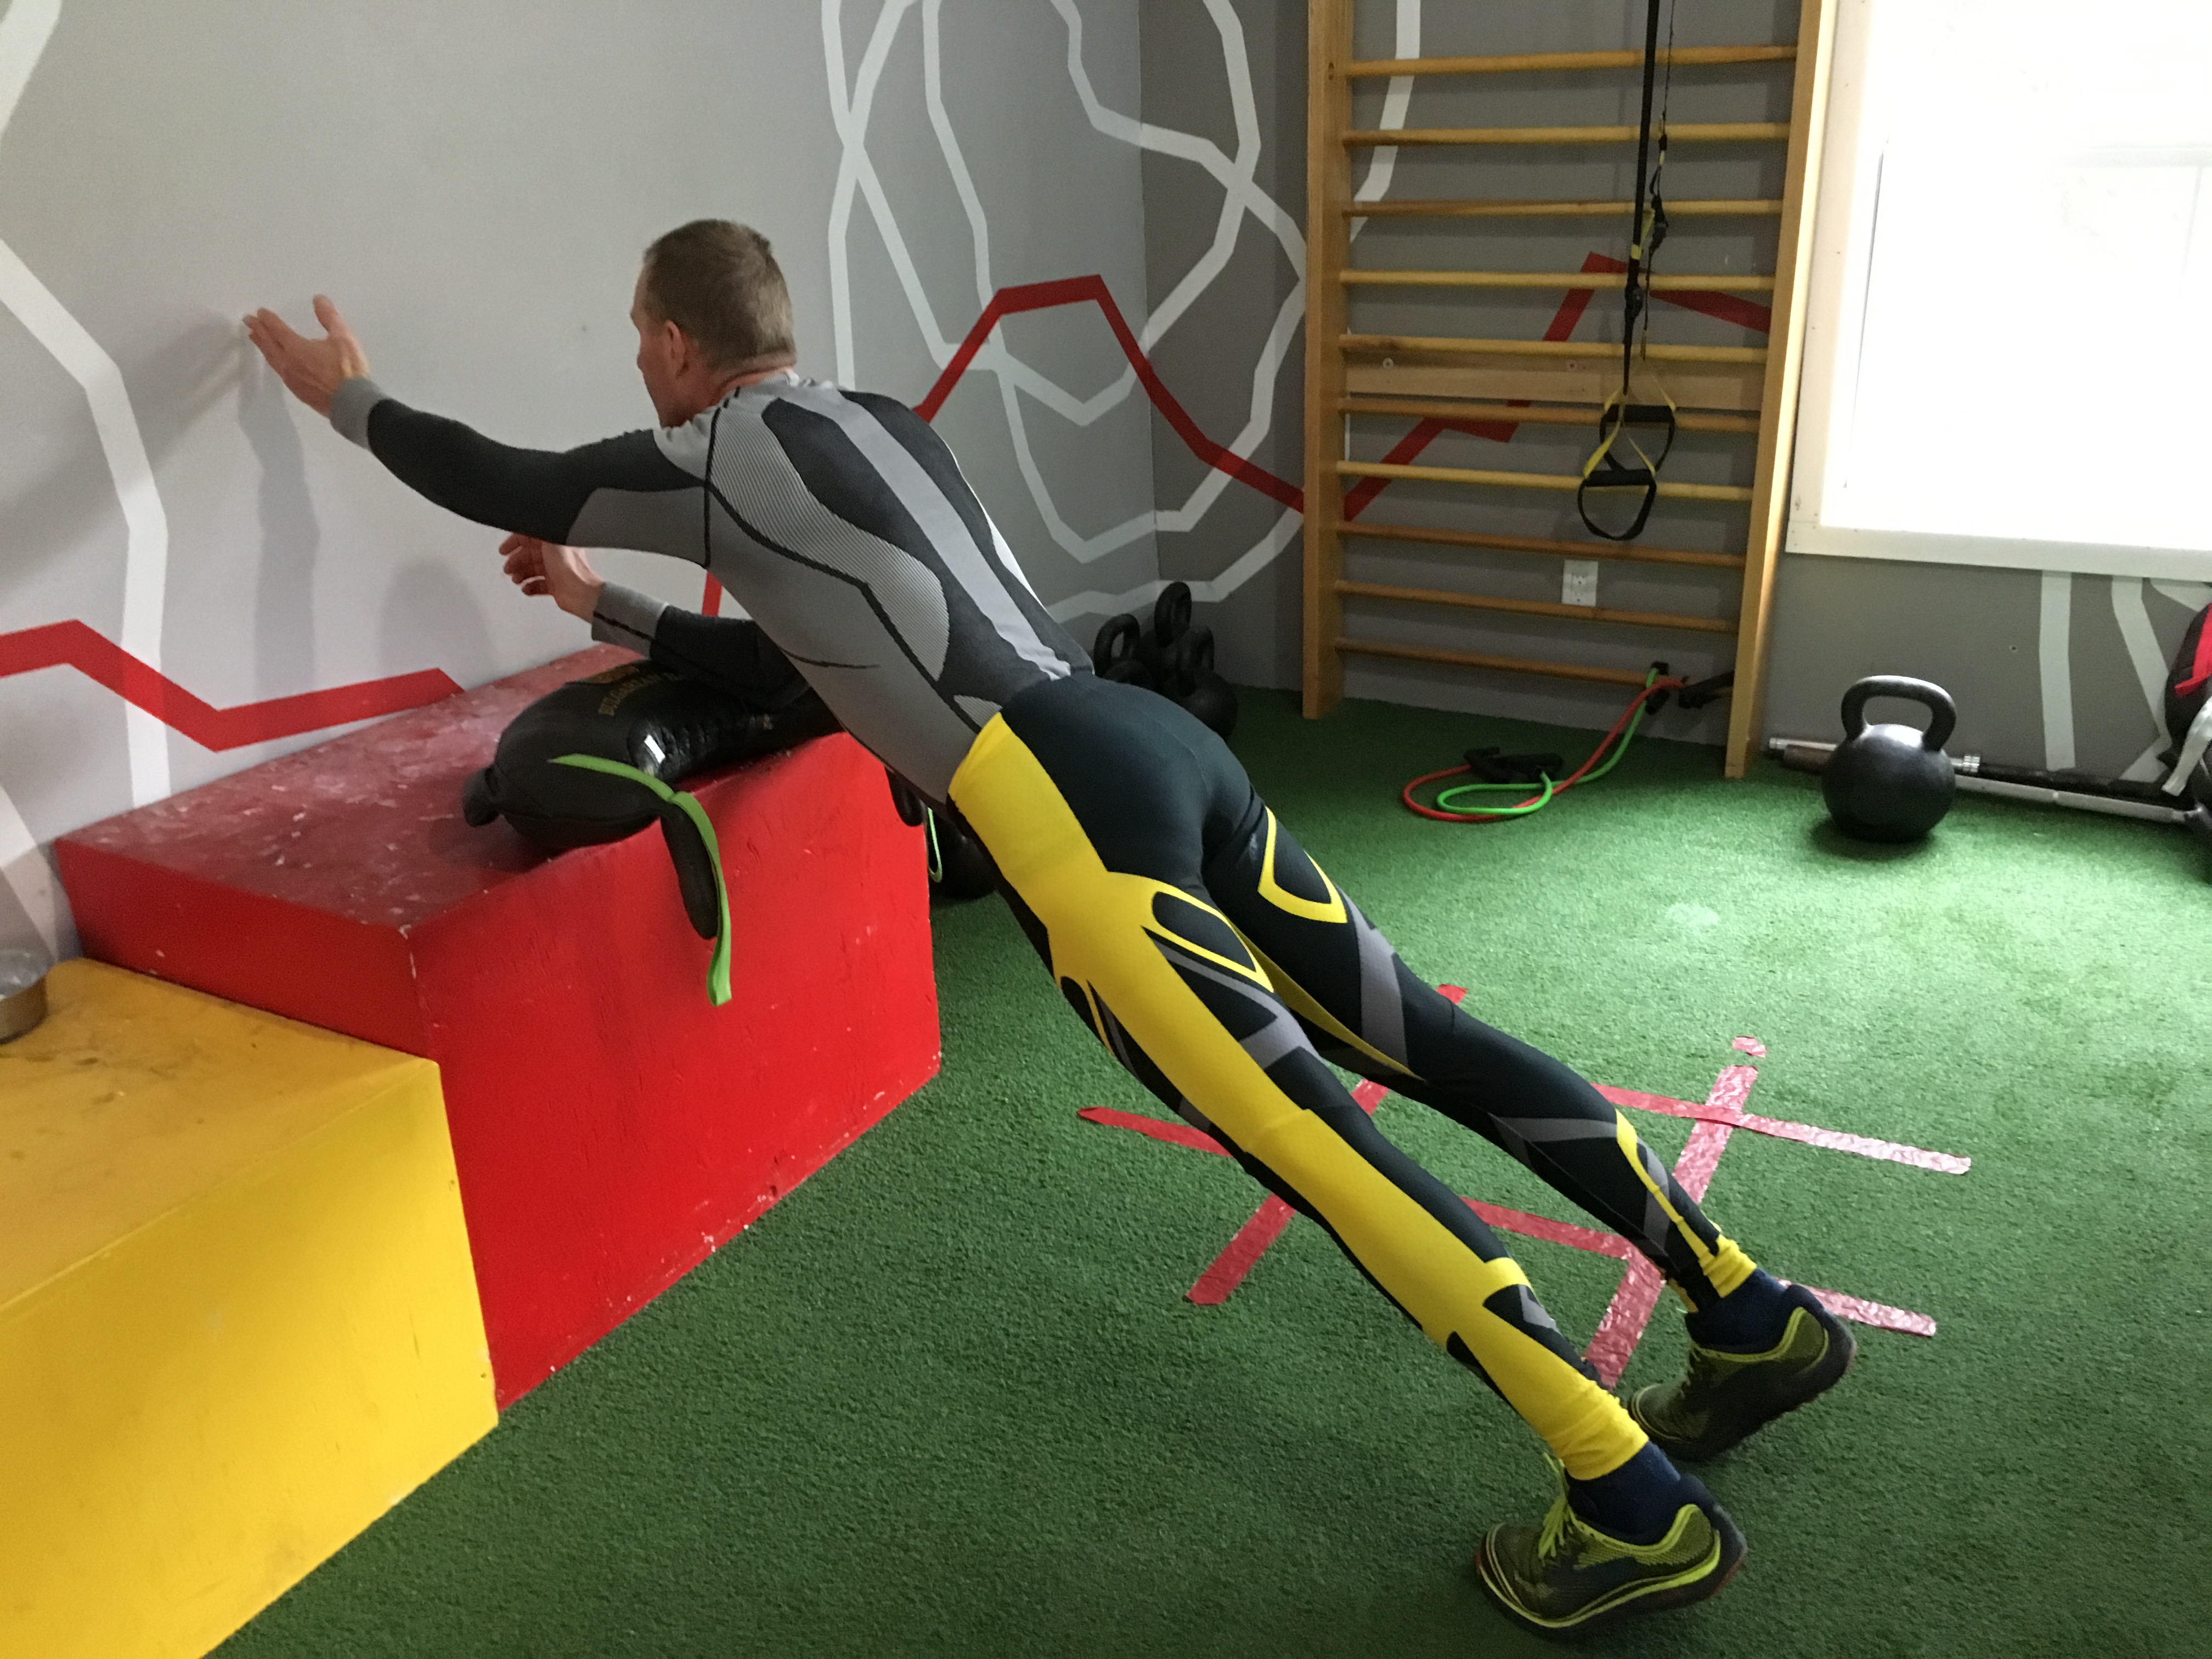
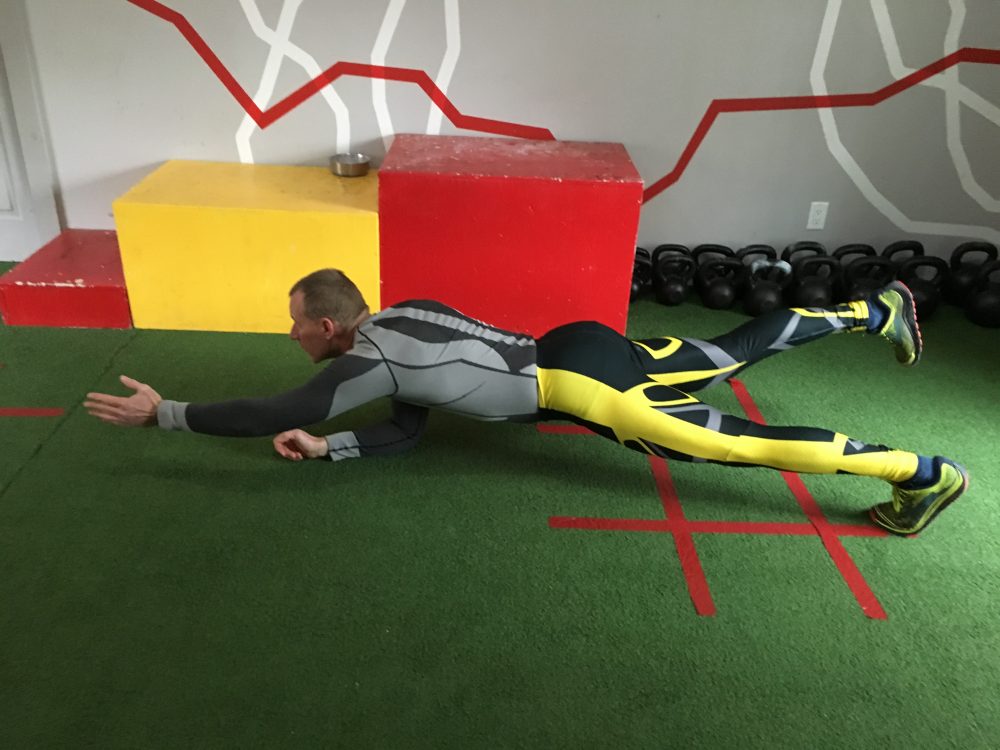
Incline Dynamic Plank- Start with an elevation of 24”-28”, have elbows on the box, and body extended with hips pressed forward, contract glutes to help with this. It is important to keep the torso, hips, and legs extended, and level with no twisting or compensation. Extend an arm and hold to fatigue for 2-10 seconds, then another arm, then each leg. Repeat 2-3 times. Remember, perfect body position is the key, twisting, or pushing your butt back just to get 10 seconds does not achieve the goal of the exercise. You will just end up skiing with the same compensated pattern come snow time.
Beginner Plank. (Photo: Stuart Kremzner collection)
To progress exercises- increase time first to 10 seconds, then decrease incline to lower box, then lift arm and leg, increase the time to 10 seconds, and decrease incline to flat. Once flat, you can add load, distraction, or instability.
Advanced plank. (Photo: Stuart Kremzner collection)
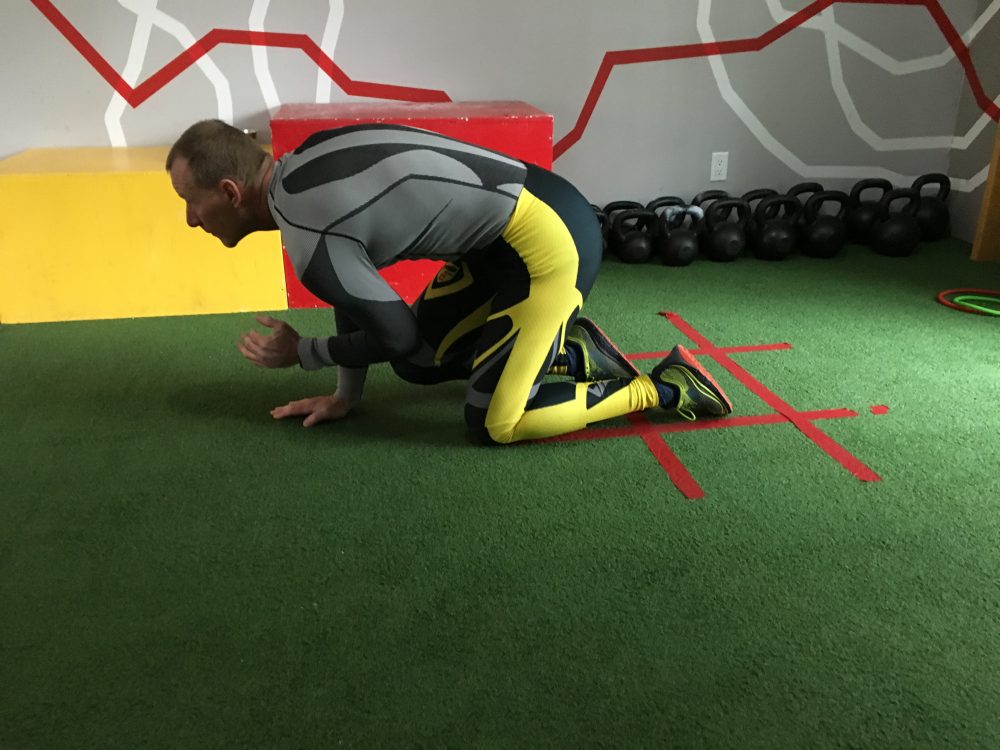
Baby and Elevated Forward and Lateral Crawls– These are baby crawls with more resistance. Focus on keeping a neutral spine and head up. To increase load, advance to Leopard Crawls by elevating knees 1-3 cm off the ground. Keep the same rhythm and technique as baby crawls.
Elevated crawls. (Photo: Stuart Kremzner collection)
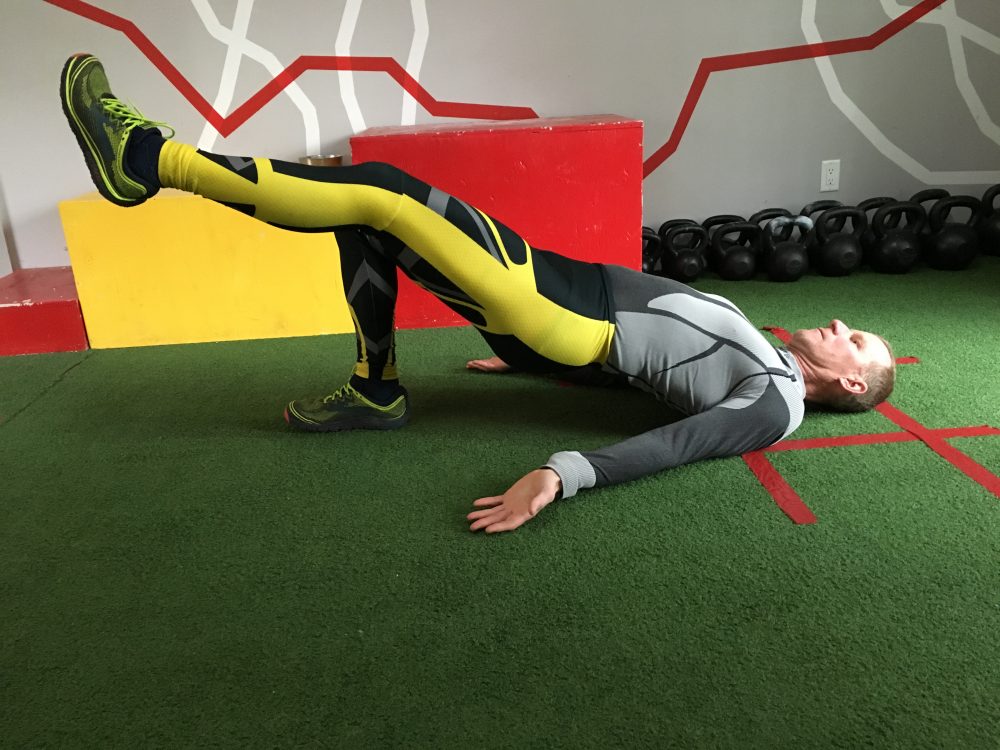
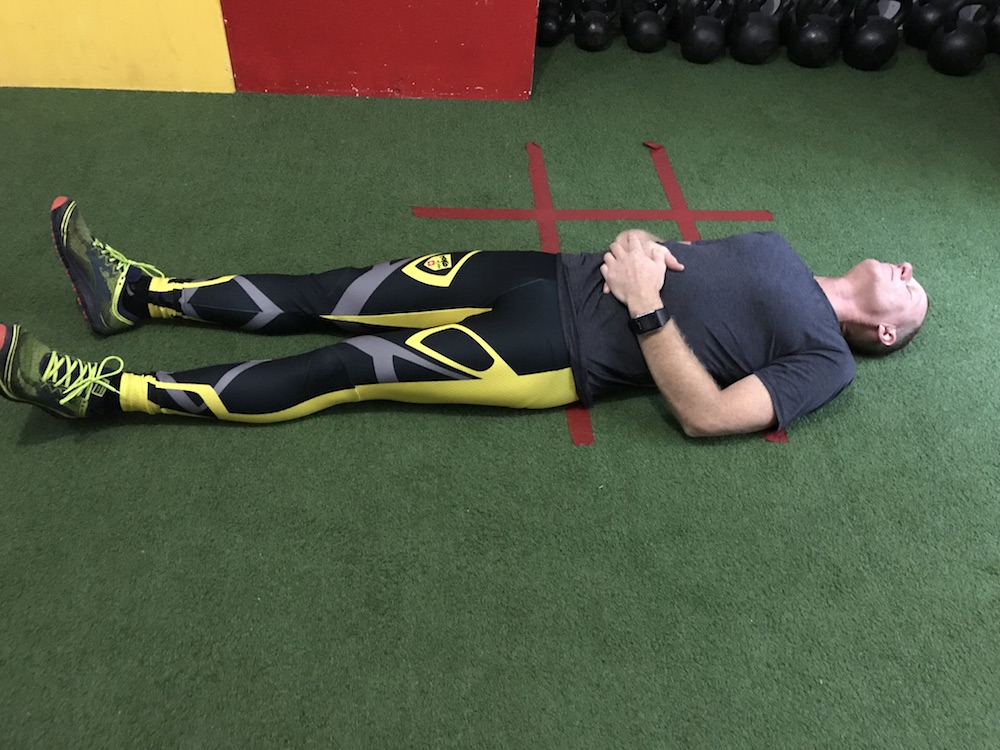
Static Single Leg Glute Bridge- Lay on your back, draw one heel up 6” from buttock, lift hips up with opposite leg extended. Hold 2-10 seconds. To advance exercise, cross arms across chest, use distraction or increased load on opposite leg.
HS bridge. (Photo: Stuart Kremzner collection)
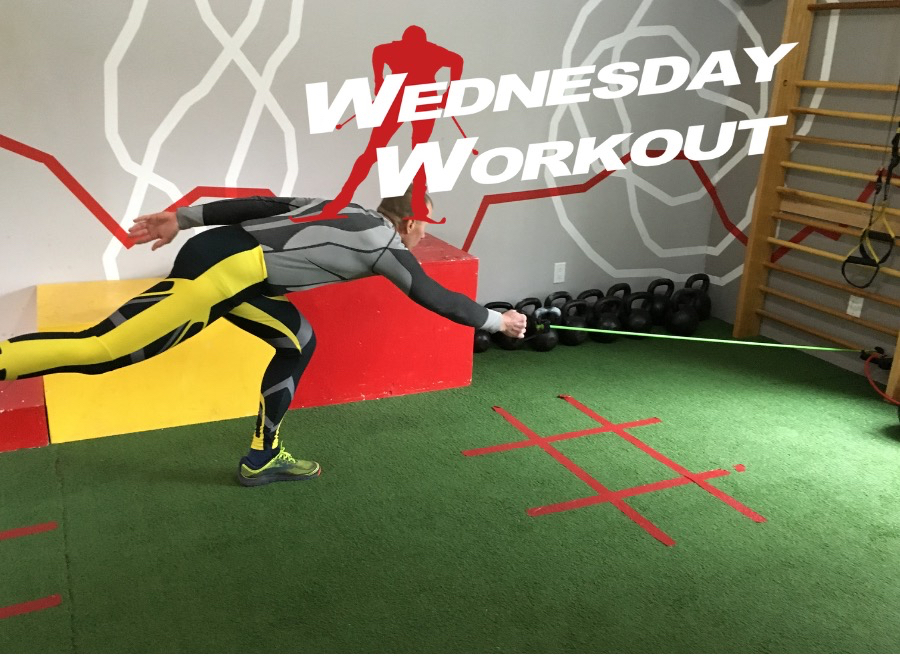
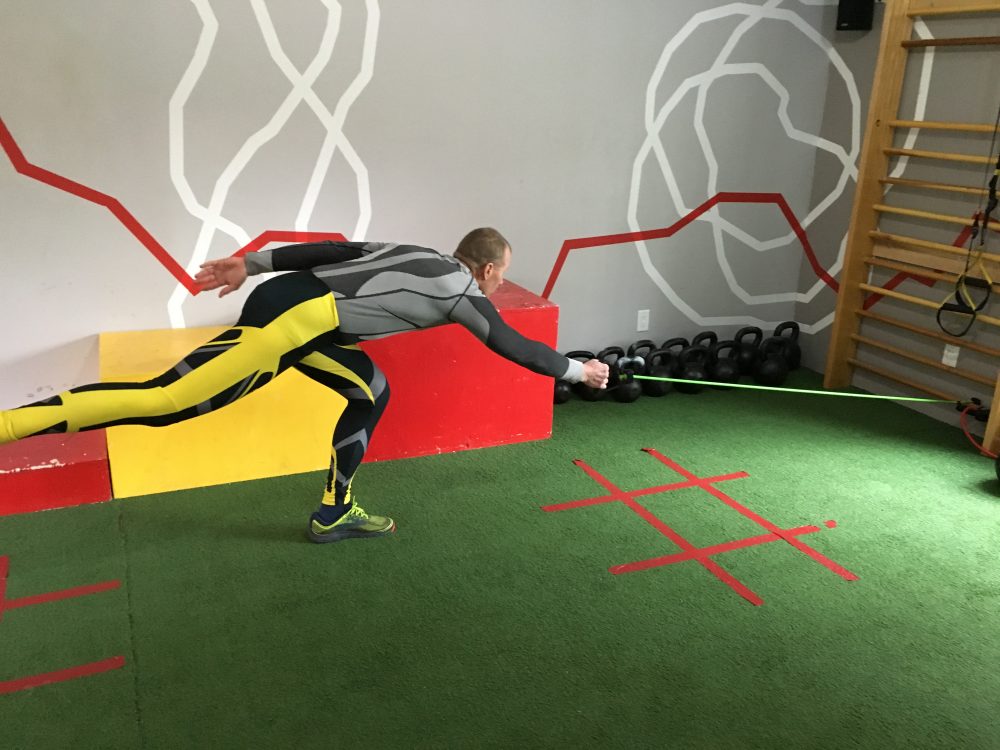
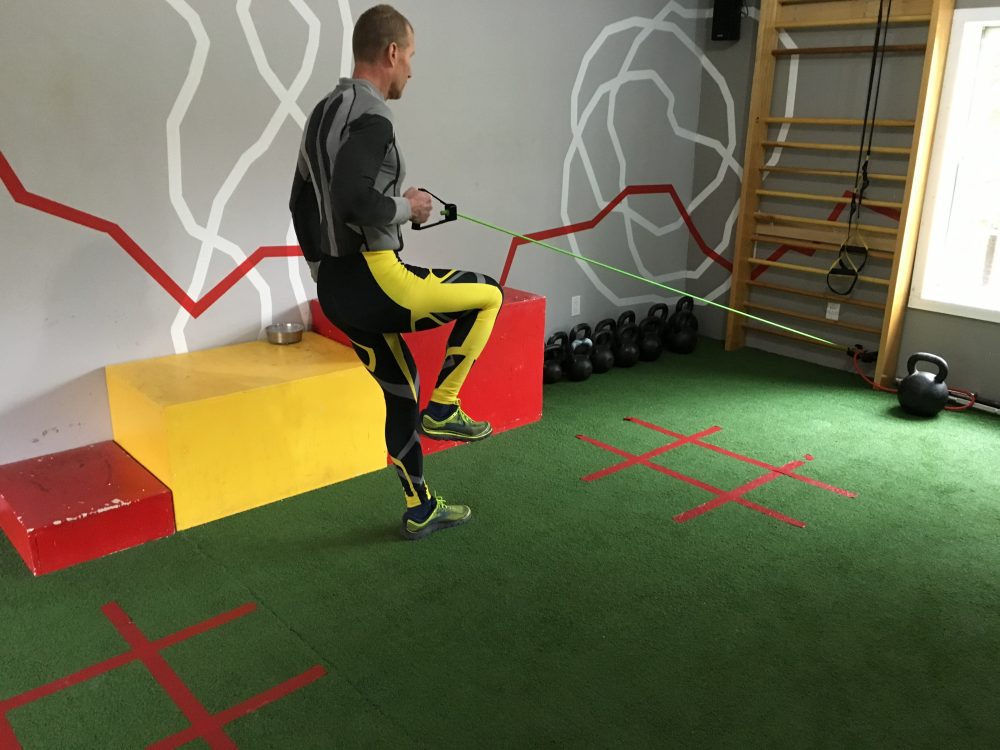
Glute Pulls– This exercise was developed by Mark Shropshire. This is a more advanced method of strengthening the glute-hamstring complex. Have a resistance band or chain with minimal initial load-but with some resistance-attached to a fixed sturdy object. Hold resistance band in right hand, and standing on right leg while extending down and forward, towards the ground, hinge at hips while bending knee, extend left leg, hold, then return upright while lifting the right knee and pulling back with the right arm. Switch sides, repeat.
Glute pull. (Photo: Stuart Kremzner collection)
Glute pull finish. (Photo: Stuart Kremzner collection)
Author Stuart Kremzner demonstrates diaphragmatic breathing, the baseline exercise for reseting the neuromuscular system and optimizing strength in sports like nordic skiing. (Courtesy photo)
The following strength and performance tips come from one of our resident experts, Stuart Kremzner, MS, CSCS, FMSII, OS, RN, an exercise physiologist who has coached and raced in nordic skiing for over 20 years. Kremzner has trained/consulted with college athletic programs, elite teams, and athletes with the goal of improving athletic performance and injury prevention. When not working, he is running and skiing on the trails in New Hampshire or writing wax tips for the TOKO Tech Team. Kremzner can be found at e3sportsperformance.com.
***
Like most coaches, I have been on the eternal quest to get the most out of an athlete’s performance. Not all of us are born with VO2maxes in the 80’s so we need to do lots of tuning to get the most out of our motors. When a skier comes by on the course, I do the quick checklist of what is holding this skier back. More often than not, I see the inability to maintain an efficient body position, transfer weight and balance as the limiting factors. The fundamental commonality between all these elements is reactive core strength. This element is one of the most important for technical efficiency for all skiers.
Author and exercise physiologist Stuart Kremzner putting his “Original Strength” to the test. (Courtesy photo)
Many skiers from beginner to elite can improve. Beginners often lack the balance; elite skiers can have compensated movement patterns from over-specialization or injuries. Most people right now are thinking, “I can do a plank for 2 minutes and I still have trouble balancing.” A four-point plank is static core, i.e. not reflex driven, and not effective training for dynamic balance. Core strength exercises must be dynamic to transfer over to be effective for sports performance. Most important, we need to prime our nervous system prior to the core exercises to get the most out of them. Without this step we are addressing only half the problem.
In 2003, physical therapist Gray Cook introduced and expanded the importance of mobility and stability in the performance hierarchy. Without this solid foundation of the ability to control movement and have a full range of movement, everything else we add on for fitness and performance development will not be optimal. Cook touched on an area of primitive patterns that has gotten much greater recognition. Tim Anderson and Geoff Neupert expanded on the concept in their book, Pressing Reset: Original Strength Reloaded. In it they describe the concept of “Resets” patterned after the neuro developmental movement sequence – the sequence of movement that infants use to develop enough core stability to stand on two feet and walk.
In Original Strength Performance: The Next Level, the concept was applied to the performance realm. The authors learned that resetting the nervous system prior to dynamic core exercises yielded exceptional results in redeveloping and maintaining efficient core strength and movement patterns. Resets are like wiping your hard drive for your neuromuscular system. If we don’t erase the dysfunctional pattern, it will continue to delay development.
Neurophysiologically, we are born with a blueprint for optimal, efficient movement patterns, and our foundational core is developed through a sequence of breathing, head movement, rolling, and crawling. After about 4-6 years, if we don’t use our core we start to lose it, we are seeing this more and more given lifestyle changes. How many of the kids we coach are doing manual labor these days and spending hours outside running and playing? Our movement pattern’s base-level functioning is dictated by the dominant motor programs we use. Our bodies were designed to be up and mobile 8-10 hours a day. Put us in a chair for 6 hours a day (like with school kids) or a desk-jockey job, and we have global changes in the detuning and functioning of our neuromuscular system. Primary core muscles develop dysfunctional firing patterns and weaken. Hip flexors shorten, and posture changes (we get more stooped). Core muscles stop firing optimally in their original motor program; they are not turning on at the right time or not at all. This leads to altered/decreased muscle-firing sequences, compensated movement patterns, power leaks, injuries, and for may of us, decreased athletic performance.
Resets are like wiping your hard drive for your neuromuscular system. If we don’t erase the dysfunctional pattern, it will continue to delay development.
For years as coaches and physiologists, we have been focused on more speed, power, strength and endurance. However, all this work is not optimized if we don’t have the fundamental ability to generate power, transfer it effectively between joints then into the ground, and have optimal mobility to use the full length of all of our muscle fibers effectively.
Reflexive core strength is the foundation of efficient all movement patterns. Hip stabilization and coordinating segmented movements between the upper and lower body is primarily mediated/controlled by our deep pelvic floor and transverse abdominal muscles. The key is to keep the core exercises dynamic and reflexive (as reflexes drive the optimal functioning of the deep reflexive core). Good skiing technique does not consist of doing static planking for 5 minutes. The exercise needs to be dynamic, hence you need to lift an arm, leg, or both (with proper body alignment) to keep the a plank reflexive. It is important to use perfect technique. It is far more effective to use perfect technique for 3 seconds vs. poor technique for 30 seconds (this just keeps reinforcing the dysfunctional muscle firing pattern!)
What follows are some ideas and the very basic science behind activating and training your reflexive core. Think of this as your “quick start” guide. For individualized/targeted training you need to have a good evaluation with an Original Strength certified coach who can develop a program that is most effective for you. At the very least this will help get you started. These exercises were developed by Anderson and Neupert of Original Strength.
Before and after each exercise, grab a 10-20 kilogram weight and do a deep squat, then a toe touch. Pay attention to how it feels, range of motion and “snap” you have going down and coming up.
To start, you need to reset and “overwrite” the dysfunctional movement programs in your nervous system. These exercises are called “resets”.
“Resets are the ABC’s of movement. When you can put all the letters together you can begin to make words, then before you know it you can make sentences. Sentences become paragraphs and eventually master pieces of literature! Movement is a lot like this – it starts out simple and messy and through practice becomes a thing of beauty. It starts with the resets of Original Strength.” (Shropshire, 2018)
This is achieved through systematically activating the muscle firing patterns as we developed them when we were infants/toddlers. These recruitment patterns originate in the more primitive part of our brain (brainstem, medulla oblongata pons, cerebrum); this is the foundational center of our most basic movement patterns. Through aging, injury and dysfunctional pattern overrides (sitting 8 hours a day), these fundamental patterns are overridden by altered muscle firing patterns that are not efficient.
The fundamental resets are diaphragmatic breathing, head nods, rolling, rocking and crawling. Each exercise has a video link to view excellent technique. If your squat or toe touch feels better and you can move with more depth and ease, that is a good reset for you.
It all starts with diaphragmatic breathing. Diaphragmatic breathing is critical to resetting and activating your core. The diaphragm, along with the transverse abdominis and pelvic floor, form the basic reflexive core. Intentional breathing using the diaphragm activates the other muscles of the reflexive core via neural and fascial connections – hence it is the gateway into the reflexive core. Head nods and rolling help reset and stimulate your ocular-vestibular system, which is integrally related to developing proprioception and balance.
Diaphragmatic breathing (restores muscle proprioceptive reactivity, also shifts CNS from sympathetic to parasympathetic): Lay on stomach (or back), forehead resting on flat hands, legs extended. Belly breathe deeply in and out through your nose. Your exhale should be twice as long as your inhale. Tongue should be pressing on the roof of your mouth just behind your teeth. On the inhale, push your belly button into the ground and push it up as much as possible. Belly should always rise before shoulders. Breathe for about 2-3 mins, then flip over on your back and hold your knees up with hands and keep focusing on deep breathing for another 1-2 minutes. Video (The key with all these exercises is to maintain the same tempo and depth of diaphragmatic breathing.)
Head nods: Lay on back with arms at 45-degree angles, palms up, legs extended. Have eyes look back, extend neck and head rotating to point where forehead is touching floor, then roll eyes down flex neck forward to look between heels. Repeat 10 times (keep same breathing depth and rhythm). Video
Rolling: There are many types of rolling variations, different type of rolls are more effective for improving various movement patterns. Start with Egg Rolls then move to segmental rolling.
Egg Rolls: Rotate eyes, head body. Use eyes then head to initiate roll use as little energy as possible, should feel relaxed and easy, keep rotating head all the way though for complete range of motion. Video
Rocking: On hands and knees, keep head/neck extended, rock back and flex neck. Keep back in level alignment and elbows locked out with body/neck extension and flexion. Rock slowly forward and backward, maintaining breathing pattern. Video 1 | Video 2
“Rocking”, a basic movement for reseting the neuromuscular system.
Baby Crawls (3 x 30 meters): Keep head up, diaphragm breathe as you move, lift hand and opposite knee off ground as you move forward. Pay attention to keeping hips level. Once you can do this perfectly progress to keeping knees off the ground (about 2-3 cm, no more). Video
It’s not juvenile: baby crawls can help “reset” the neuromuscular system.
How to apply these exercises:
The resets are the ideal warmup prior to your workouts. When these exercises are complexed with individualized core strength and strength exercises, overall strength and balance will be further improved. Future articles will discuss some great core and strength exercises focused towards developing an improved strength foundation for nordic.
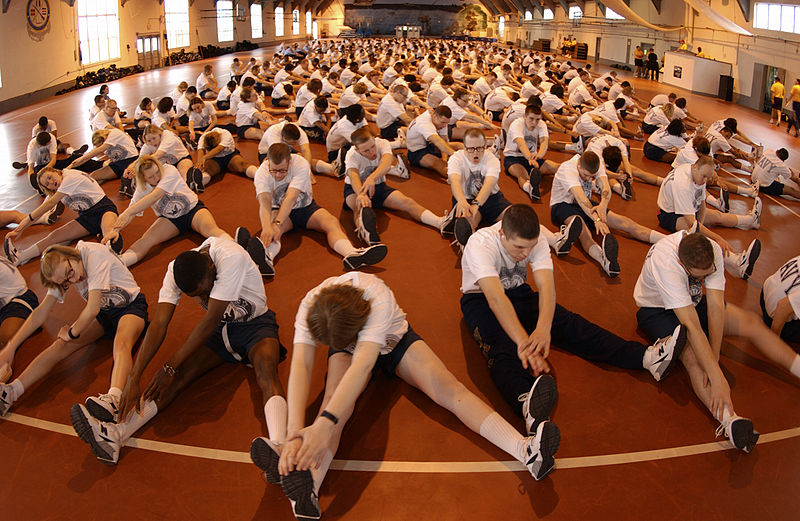
If we could all just stretch a little more effectively, it would go a long way. (Photo: US Navy recruits/Wiki Commons)
Many of us have realized minimal gains with static stretching. For many it seems to be the training element we shove off to the end of the list even though we know it is important. Maybe we do this because for all the time we spend, we don’t get much positive reinforcement?
Static stretching tends to yield short-term changes in muscle lengths. Ever notice about 10 to 15 minutes into your workout you feel tight again? It is because we have not addressed the root issue of what is driving the muscle tightness. We may get a few degrees more range of motion, but it is short lived.
Why are the hamstrings and calves tight to begin with? For a long time, I thought it was due to those muscles being worked more, shortened due to growth spurts or inconsistent flexibility routines. Then I learned that this was only a part of the picture. Yes, these muscles were working extra, but because others were not. The main reason for the tightness had nothing to do with the muscle length, but the muscles that keep them tight are more active or “turned on” when they are not supposed to be, which will keep them tight. Essentially the muscles that are abnormally tight are working extra and always turned on.
In my last article, ‘The Freedom of Movement,’ I discussed the importance of mobility and stability. Physical therapists, doctors and trainers have different theories on which element is best to address first. To a certain degree as we still develop our diagnostic tools, it will continue to be a chicken-and-egg conundrum. Since everyone’s body reacts differently, the best approach is to try a different method of improving flexibility and re-test your mobility or stability to see if it has an effect.
Since we need to look at the muscles as an interrelated system, we should use mobility techniques as such as well (i.e. not stretch one isolated muscle group, but address the whole system). We address the system by turning on the muscles that are not activated (but are supposed to be), while at the same time lengthening the target muscle group we are hitting.
Since no muscle group works with out interacting with other muscle groups, I like to think of targeting an area versus a specific muscle group. For example, instead of stretching just hamstrings, I like to think of stretching the hip, calf and foot muscles, all of which are involved with the hamstrings. Often, we may think our hamstrings are tight when it’s really our hip flexors and weak core driving the movement restrictions.
How to Stretch
Since our bodies work best fully mobile, we ideally want to exercise after improving our mobility.
Hit your primary trouble spot with a mobility exercise sequence, for example, a toe touch (as detailed below)
Then move into your workout.
This will take 10 to 15 minutes, but you will feel like a different athlete for most of your workout.
Since many skiers tend to have tight hips, and especially those that use cycling as their core form of endurance base building – the body position in cycling tends to shorten hip flexors – I will use the hips as a starting-point example. Please keep in mind this is one example of multiple ways to address this.
What will work most effectively to keep these changes in is flexibility coupled with strength exercises that teach and reinforce this improved muscle firing pattern. After a short time, the additional strength exercises will make the improvements in flexibility long term (for days/weeks), versus for 20 to 30 minutes.
What works best for each person will again be driven by what you learn in your evaluation or FMS screening. For making long-term changes in your flexibility muscle release helps for a short duration, but will only elicit a change for a short while, unless we continue to work on fixing the system. The exercises below are based off the work of physical therapist and author Gray Cook.
Hip Mobility
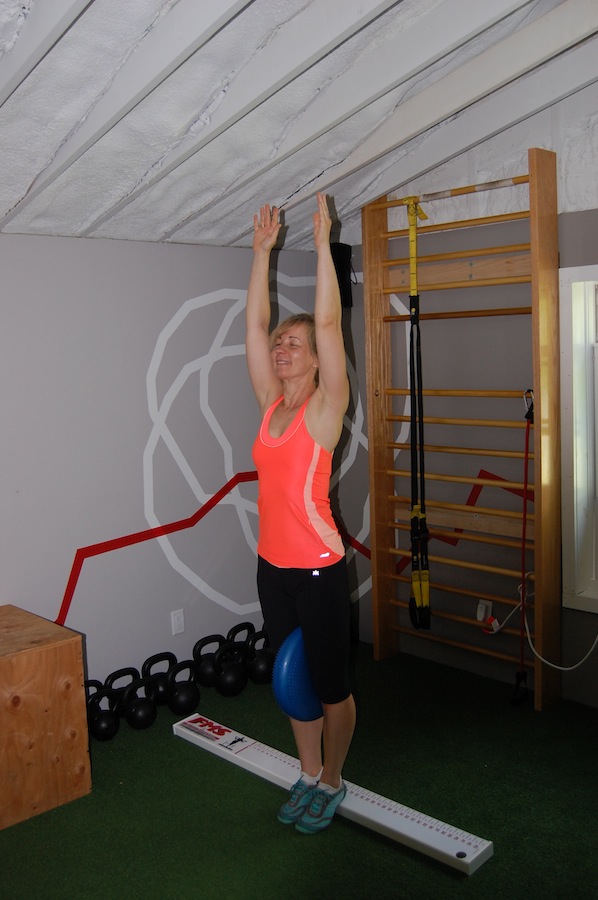
Figure 1: Toe-touch demonstration
Toe-touch example:
Goal: Release tight hamstrings and hip flexors as a system.
Start by doing a toe touch to see your existing range of motion.
Foam roll back and forth 15-20 times: hamstrings, hip flexors, calves, abductors (outside leg muscles), adductors (inside leg muscles), and glutes. (For some folks, try rolling out your foot with a golf ball)
Start with toes up (figure 1) on a 2-inch board and a towel roll between knees, reach up, inhale, then reach down. When you hit resistance, pinch your knees together and stretch more (figure 2). Bend knees if you still cannot touch your toes. Repeat 6-10 times.
Start with heels on a 2-inch board and a towel roll between knees, reach up, inhale, then reach down (figure 3). When you hit resistance, pinch your knees together and stretch more. Repeat 6-10 times.
Figure 2: Toe touchFigure 3: Toe touch
Hip Flexor:
Goal: Release tight hip flexors as a system.
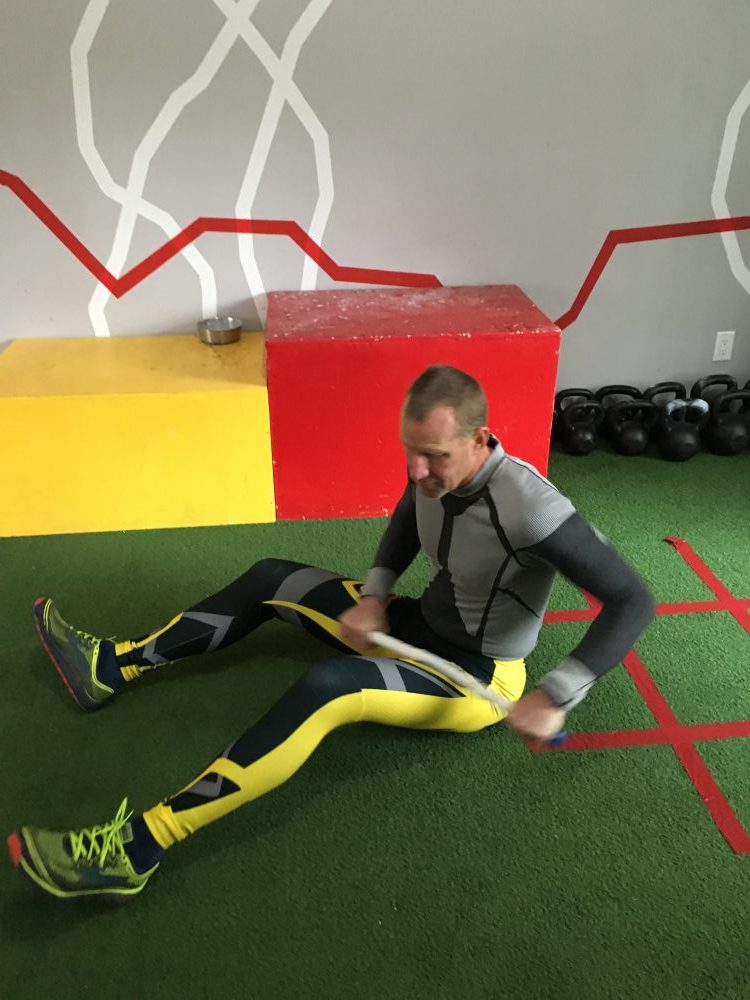
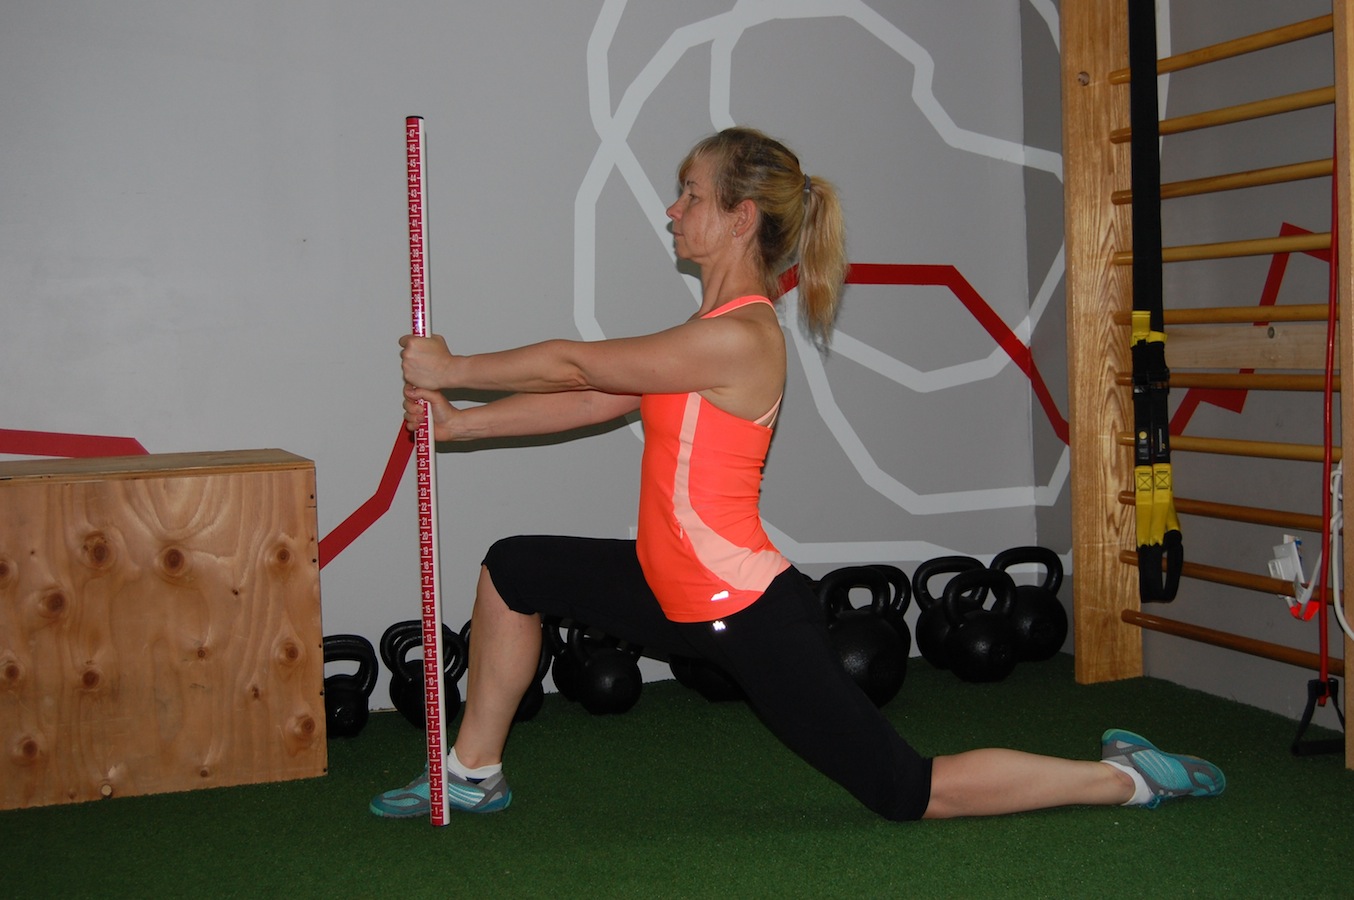
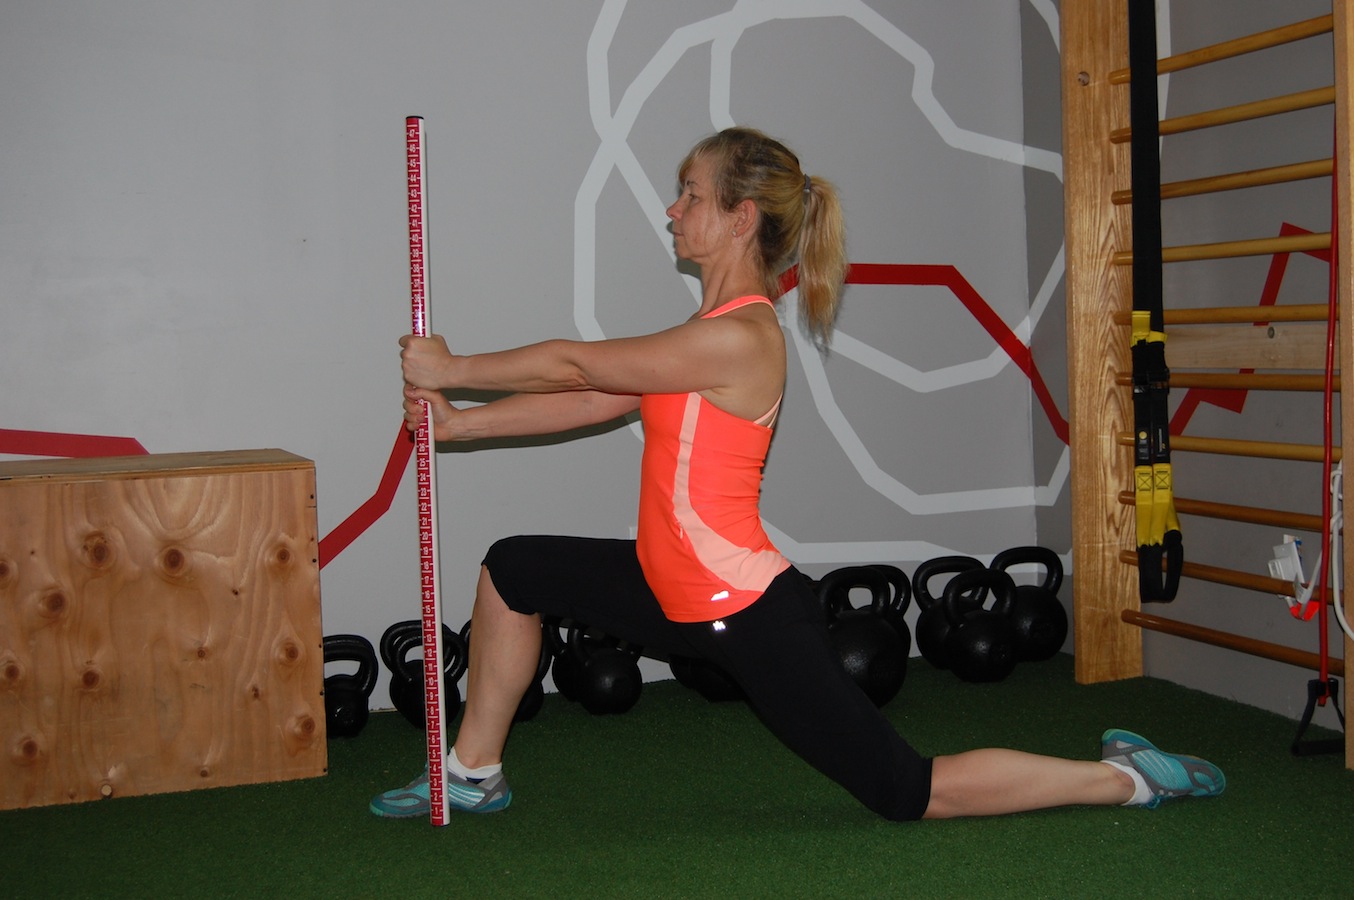
Figure 4: Hip flexor release
Foam roll back and forth 15-20 times: hamstrings, hip flexors, calves, abductors (outside leg muscles), adductors (inside leg muscles), and glutes. If you did this for other exercises, no need to repeat.
Position yourself as in figure 4. Press hips downward into the ground
When you hit resistance, press the dowel into the ground with straight arms, keeping back straight, exhale. This will release the hip flexor further by engaging the core.
Repeat 2-3 times. Switch legs, repeat.
Ankle Mobility
Ankle mobility is important for correct running mechanics. Without the nominal 30 degrees of ankle dorsiflexion (the range of motion in the ankle when the toes are flexed up), one will tend to “over stride” or “block out” (strike the ground too far ahead of their center of gravity) when running.
This can lead to a host of problems do to the repeated jarring and deceleration of the bodyweight when running. It can lead to shin splints and knee and hip injuries. Lack of mobility in these muscles can also cause Achilles tightness and over-active muscles involved in stabilizing the body, perhaps even contribute significantly to compartment syndrome, which can be caused by over-active muscle tissue that swells within it’s muscle sheath (like a piece of wet spaghetti swelling in a straw).
As I explained in my previous article, if mobility cannot happen in the joint and muscles that were meant to handle these forces, it is transferred to adjacent muscles and joints that were not designed to mange these forces, and injury occurs.
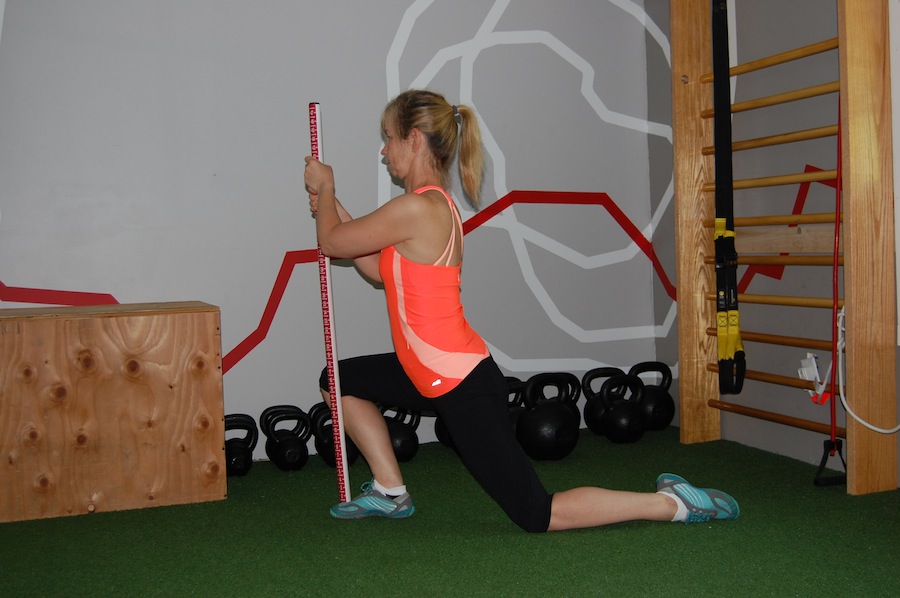
Figure 5: Ankle release
Ankle release:
Goal: Increase ankle mobility by stretching inter-related muscle groups.
Foam roll back and forth 15 to 20 times: hamstrings, hip flexors and calves. Roll out foot, calf and anterior tibialis (front of shin) muscles. If you did this for other exercises, no need to repeat.
Position yourself as in as in figure 5, dowel on the outside of your little toe, knee on the outside of the dowel, press ankle forward with heel flat. When you hit resistance, press the dowel into the ground with straight arms, keeping back straight, also press opposite knee down into the ground, exhale. Hold for 4-6 seconds.
Repeat 6-8 times. Switch legs, repeat.
After you have done these, re-test your toe-touch, move around and see how your body feels with the improved flexibility.
Having good mobility though out your body is important for movement efficiency, not only injury resistance. You may not be getting injured do to some flexibility deficiencies but you may move with less efficiency, and who does not want to be a little (or a lot) faster?
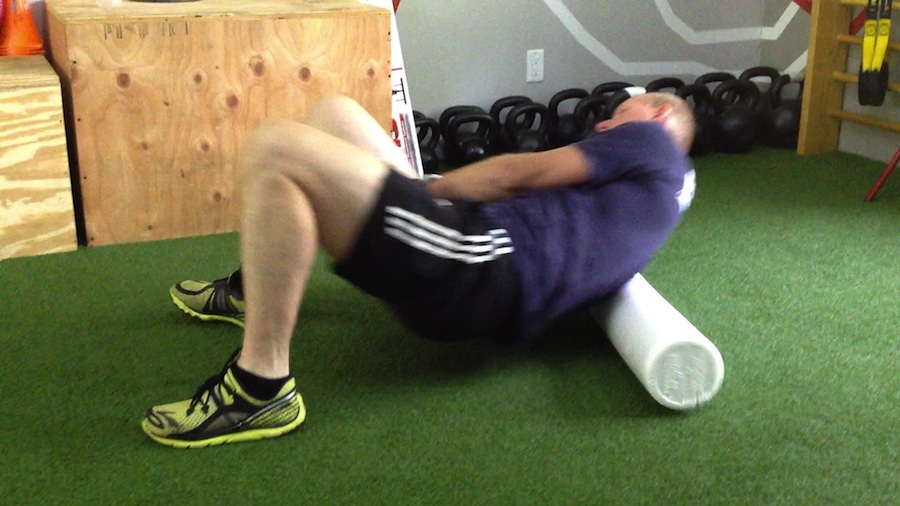
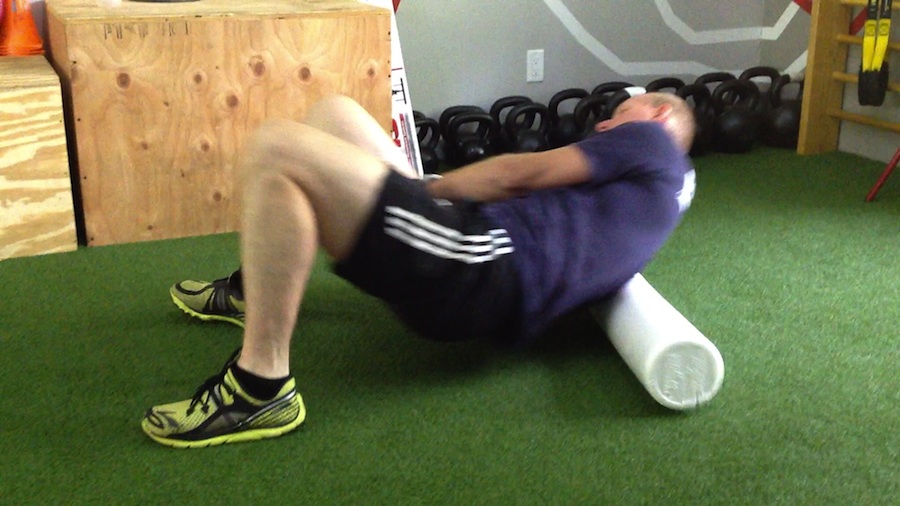
Author Stuart Kremzner demonstrates one way to use a foam roller to work out the kinks along the spine and back.
Editor’s Note: Wednesday Workout fans, you’re in luck! The following article complements Bill Pierce’s recommendations for stretching, agility and self-massage. Not exactly sure how to use a foam roller? Stuart Kremzner, exercise physiologist,owner of E3 Sports Performance, nordic skier and coach, explains.
***
Many of us have been to training centers and weight rooms and seen the foam rollers in the corners. Maybe even seen someone using it moving around on it and usually grimacing, puffing, and cursing it. Foam rollers are a tool to be used in preparation for exercise to limber us up. You will find after foam rolling, you will usually have an increased range of motion, and your muscles will feel suppler.
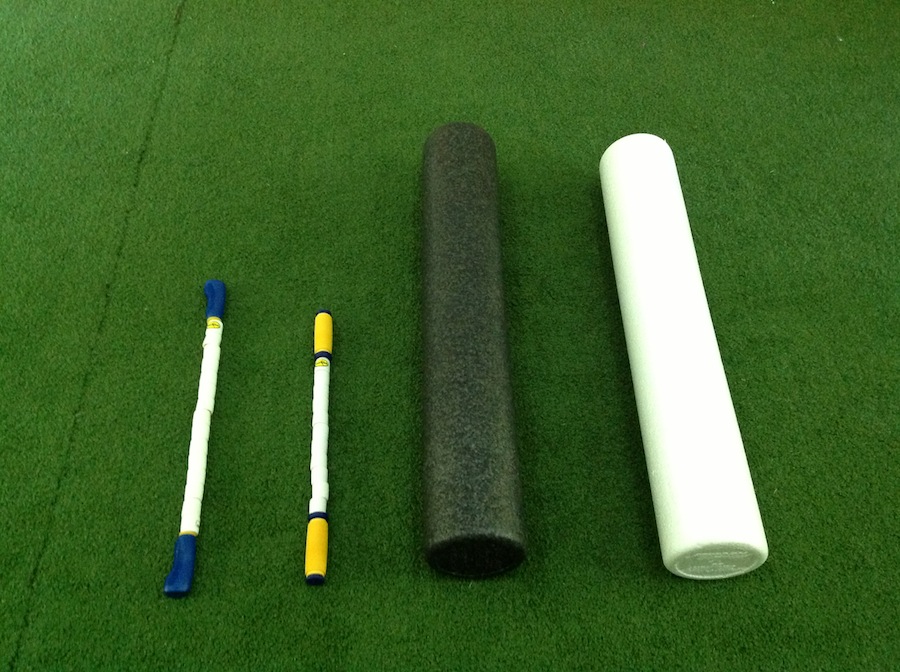
Stick rollers (l) and foam rollers.
The purpose of foam rolling is to achieve the same outcomes as from tissue massage or other physical therapy techniques such as manual therapy or active release therapy (or the more scientific term myofascial release), just without the masseuse or therapist working on you.
The goal is to loosen up those tight muscles and trigger points (“small areas of muscle that act differently … this increases tension throughout the entire muscle and can cause pain in another area of the body,” according to physical therapist and author Gray Cook).
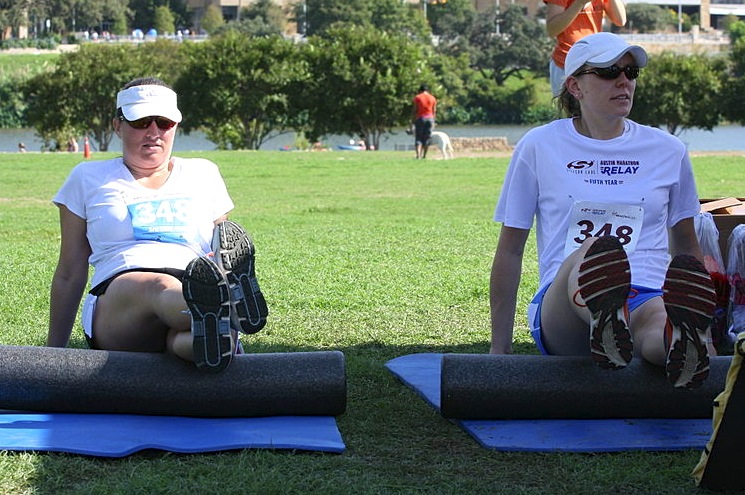
We all know what tight muscles feel like. Rolling can release these areas of tightness just like massage will, and can give you some short-term improvements in muscle range of motion. Rolling out can also help with recovery after a workout. Like many of the warm-up and warm-down tools you need to try it to see if it works well for you and if you feel better in your workouts when utilized. Like with most training methods you will have responders and non-responders. My experience has been most athletes benefit from this as part of their warm-up and warm-down routine.
Foam rolling can help ease sore muscles after a race and aid in recovery after a workout. (Photo: Wiki Commons)
How to use it?
Rolling out is best done as the first and last step in a workout. For general loosening up roll over one muscle group back and forth 10-15 times. If you find a knot or trigger point roll over that area in shorter, lighter strokes until it releases or feels less tender.
Stick vs. Foam Rollers:
Sticks: smaller muscle groups (i.e. back, arms, front of shin)
Foam: larger muscle groups (i.e. lower body, legs, back).Start with basic low- to mid-density foam roller before trying a harder or textured one.
There are a variety of rolling devices. Fifteen years ago there were about two – now any fitness catalog will present a mind-numbing variety; it is like trying to buy shampoo in Wal-Mart!
The primary two are the stick rollers and foam rollers. Sticks are best for work on harder to get areas, and smaller muscle groups (back, arms, front of the shin). The foam roller pretty much does the same thing but you move your body over it versus rolling the stick over your muscles. Since a foam roller is wider it can hit a bigger area.
I find sticks are best when you have less time to roll out and are also more portable, so you can pack it for a race so you are not trying to roll out in an icy or sandy parking lot. That said, the foam roller will feel great for those larger muscle groups, primarily in the lower body and back (where you can’t reach with a stick by yourself). After a while you will find both come in handy.
Rollers also come in various densities and textures, start simple with a basic low- to mid-density foam roller and then once you get used to it try a harder or textured roller.
It’s a great way to start and finish your workouts as part of your warm-up and warm-down routine.
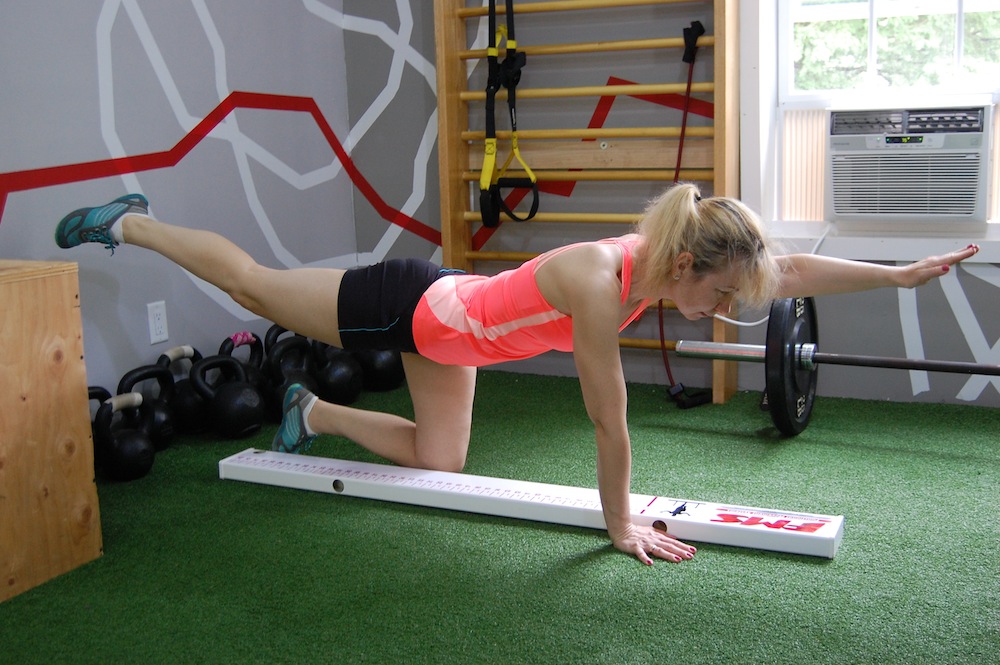
Functional Movement Screens, an example of which is shown, can help evaluate an athlete’s mobility, stability and optimal muscle function. Above, rotary stability shows one’s ability to stabilize their core.
This is the time of year nordic skiers are excited to really ramp up the hours and build that summer base. It’s also the time that in our excitement to do so, we get some kind of injury or aches and pains that slow this process down.
Years ago for me, it was an IT band, then shoulder, then Achilles. Many look at this as part of the process of being an athlete, each of the injuries due to too much too soon, just random pains and strains, right? Wrong!
In the seemingly randomness there is a pattern, it is just not apparent unless one understands the body’s movement patterns and what drives injury risk through muscle and mobility imbalances. Just because one is not injured does not mean an imbalance will not catch up to them at some point, be it with increased training volume, intensity or a different movement pattern, such as a change in technique or activity (switching form biking to running).
For many of us addressing imbalances will lead to improved movement efficiency, which will directly impact race times. Once the dysfunction is determined the imbalance can be fixed with an individualized strength, and mobility program. Hence these injuries are very preventable.
The muscles and joints getting injured are the ones that are usually working the hardest and pulling the weight of neighbors not doing their job. It’s kind of like that group science project where one or two members do the majority of the work and the others coast along. After a while, the one working hard either gets irritated or burnt out.
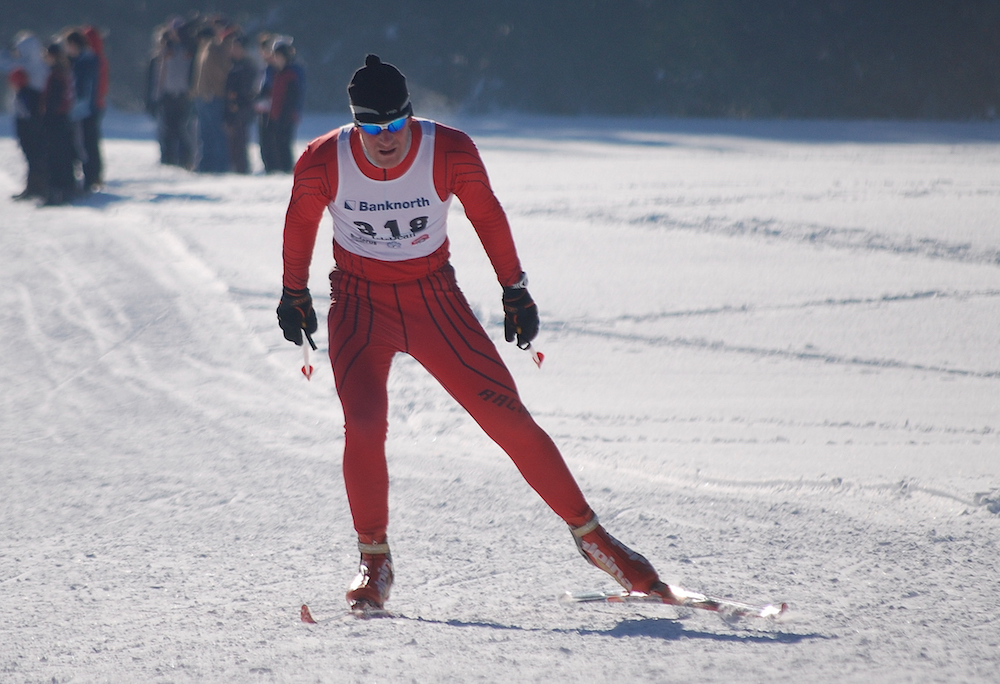
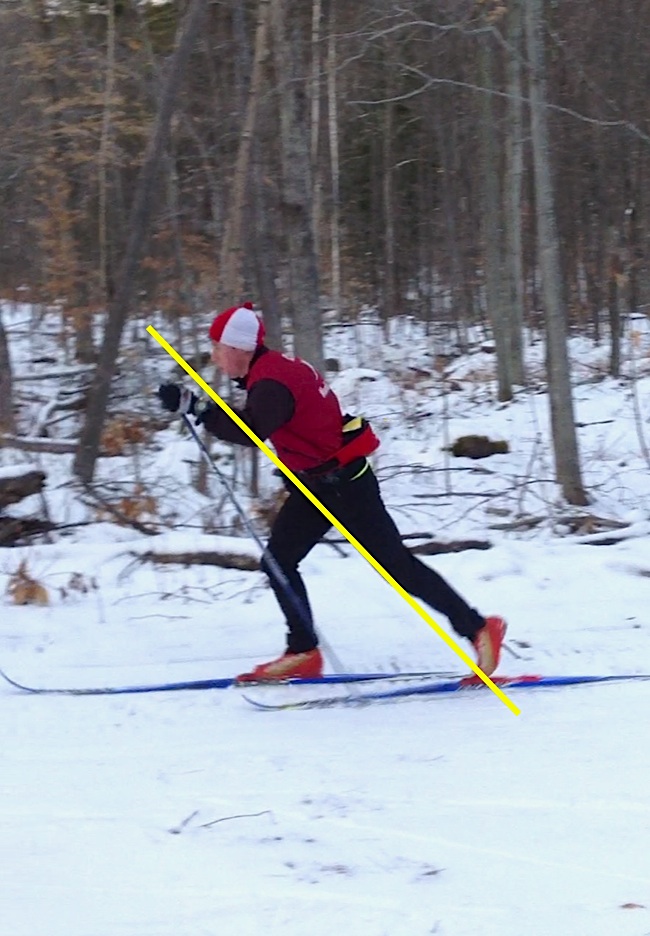
Body lean is a combination of leaning from the ankle (ideally with the hips forward) so gravity is helping propel your body forward. For runners and skiers, if they maintain a 3- to 5-degree body lean, it allows them to apply more power with each stride (whether kicking or pushing off while running or skating). For example, body lean is one of the most important factors in the running stride efficiency of elite female runners. Only 5 to 10 percent of female runners have it, according to Kremzner.
Now imagine this happening for the full semester. That is what happens to your body. A good example is low-back pain when you do your first long classic ski. Those muscles are working extra hard to keep your pelvis balanced and in position; that is also your abdominals’ job. If they are just along for the ride, guess what happens? Add tight hamstrings or hip flexors and it just accelerates the process.
For years we did stretches, back extensions and sit-ups and usually it didn’t fix much. Why? It never really addressed the root problem of mobility and stability imbalances.
The body’s musculoskeletal system (kinetic chain) mobility and stability are an interdependent foundation of all other aspects of fitness; one balances the other like a seesaw. When not fully developed (and this is the case in many elite athletes), we see injuries, technique deficits and minimal gains from higher-level fitness elements like strength, power, and speed. Physical therapist and author Gray Cook talks of mobility as the freedom of movement of multiple muscles and joints, then stability as “the ability to control force.”
As a coach, I’d be frustrated when given skier couldn’t grasp a certain aspect of technique, be it body lean angle (see accompanying photo) in skiing or lifting the knees when sprinting. But the athlete’s body won’t let them move that way due to mobility, stability or asymmetrical deficits.
For example, a restriction in ankle mobility will limit the amount of lean angle in running and skiing. Tight hip flexors/hamstrings or a weak core will limit the amount of pelvic rotation one can have or maintain (i.e. the butt pushing back).
Many of us have also coached athletes who are strong, but after many hours of work they did not develop to expectation. This, too, is a symptom of a mobility/stability deficit, as any higher-level development will not be optimized with an unstable foundation.
A simple system exists to evaluate and address this: the Functional Movement Screen. Many of us have heard of Cook’s book Athletic Body in Balance, a hidden gem in its implications for developing athletes by addressing these kinetic-chain imbalances. Once we diagnose and fix kinetic-chain deficits, like core instability, where an athlete has difficulty balancing on one leg, or stabilizing upper and lower body, we can progress athletes much faster.
From the time we are born, our body’s musculoskeletal and nervous systems start compensating and adapting to environmental stresses, such as repetitive movement, bad posture from sitting at a computer for hours a day, or injuring an ankle so we lose ankle mobility. The body mostly adapts in a positive manner, however as we mature our bodies are exposed to a host of repetitive stresses (and sometimes traumas) that can cumulatively cause restrictions/imbalances in our body’s movement, stability, and strength. This will cause inefficiencies in movement and power application.
With movement restrictions, no matter how hard we try, we cannot achieve an efficient body position. This compensated body position will not allow us to ski efficiently. This can be very frustrating to beginning and advanced skiers alike, and very perplexing to a coach. Why can’t this skier push his or her hips forward to get in a good body position? Why are they hunched or struggling with balance?
Coaches have skiers stretch, strengthen and do planks for minutes on end, yet problems persist. In order to more effectively address this, we need to think about, evaluate and train the musculoskeletal system as an interrelated system.
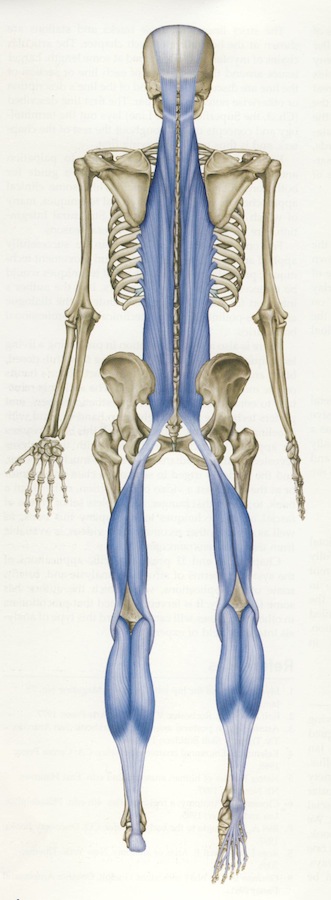
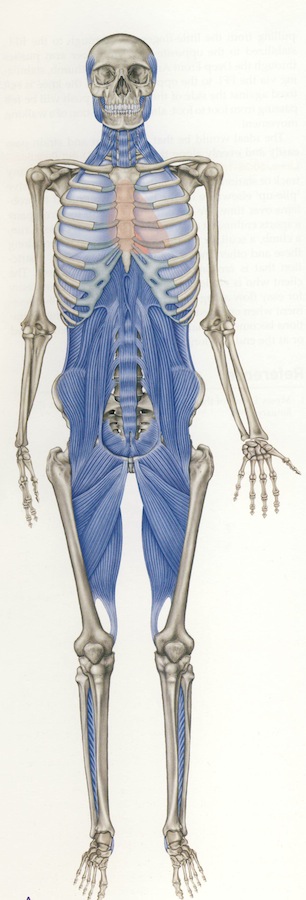
In the following model, refined by Cook and Thomas Myers, the muscles are thought of as a series of myofascial slings (a network of muscles) that extend the full length of the body. Hence what aches you have in your back can be driven by tightness in your foot or shoulder, as they are connected through the same muscular networks, or myofascial slings.
Superficial back line (Credit: Thomas W. Myers/Anatomy Trains)Deep front line (Credit: Thomas W. Myers/Anatomy Trains)
Your skeletal system works in tandem with this system. Its stacked joints alternate their roles between stability and mobility.
Michael Boyle explains this in depth in his article “The Joint-by-Joint Approach to Training.” The ankle is a mobile joint, knee a stable joint, hip is mobile, lumbar (lower) spine is stable, and Thoracic (middle) spine is mobile.
What usually happens if you lose ankle mobility due to multiple injuries or tight muscles? Movement has to happen somewhere so it gets transferred to an adjacent joint, usually the knee, which is meant to be a stable joint. The knee isn’t designed to be mobile so it gets sore or even much worse, injured (such as tearing an ACL, IT band, etc.).
Trying to fix a single problem, for example hip tightness or knee pain, will not be as effective as addressing the whole system. One muscle group does not work in isolation, nor should we train it in such a manner. In order to achieve proper body position when skiing, we first need to address movement restrictions to allow it to move freely and efficiently. Cook has taken this concept to a user-friendly level and developed a system of evaluation and corrective exercises.
For example, think about how many hours per day students and adults are seated. This seemingly benign activity will cause a variety of mobility and altered muscle firing pattern dysfunctions, such as tightened hip flexors and altered glute/hamstring functioning (glute amnesia).
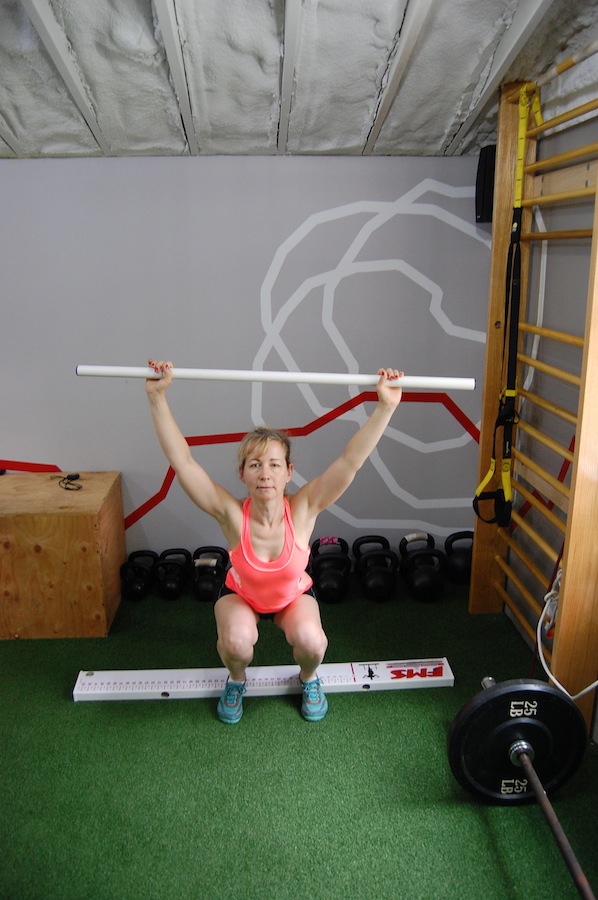
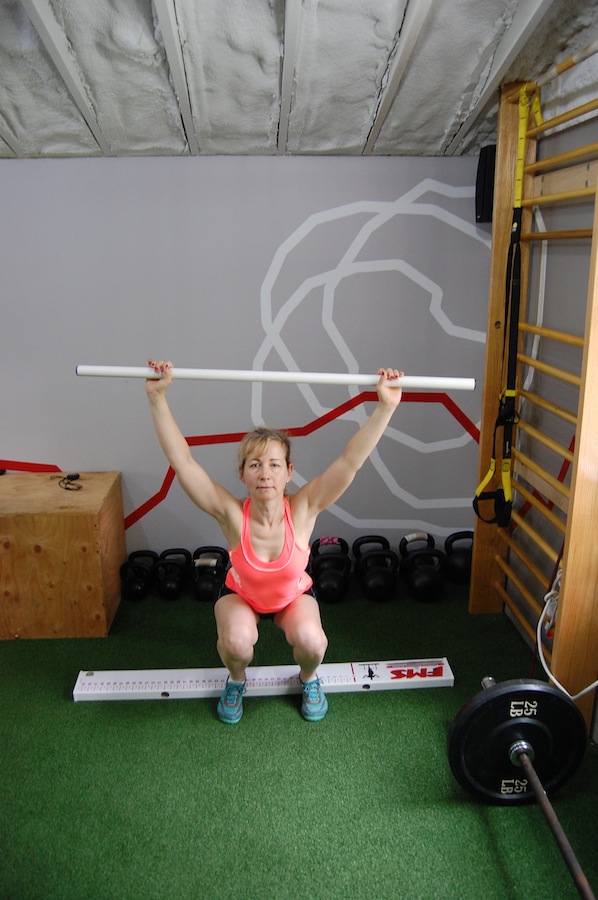
One of the seven FMS screens, the overhead squat evaluates total body mobility and stability patterns.
How does this affect a skier? From running studies we know that for each degree of anterior hip rotation we gain 2 ½ centimeters of stride length. It is common with tight hip flexors to have a 5- to 10-degree deficit; think about the impact an improvement of this could have on one’s overall race pace.
In addition, if the glutes are turned off, the hamstrings are putting energy doing their neighbor’s job (and producing less power for locomotion), plus the knee is less stable and someone is going to be unhappy (i.e. knee or back pain, hamstring pulls).
As skiers, we strive for movement efficiency and optimal power production. To achieve this we need to evaluate skier’s mobility, stability and optimal muscle function. This is best achieved through an advanced Functional Movement Screen (FMS) or a very well done kinetic-chain physical therapy evaluation.
The basic FMS is excellent for picking up on major deficiencies, but well trained athletes have learned how to “cheat” very well. They need additional sub-tests to determine deficiencies, but this process has gained much-needed recognition and is used with many elite sports teams. The best option is to find a sports trainer or physical therapist who has a FMSII certification.
The athlete’s early season is an ideal time to have an evaluation done, this way corrective exercises can be applied in the preparatory phase of training and full movement restored prior to big summer volume phases.
So get all those muscles working together for better performance. Your body will thank you for it in the first races in the fall and winter!
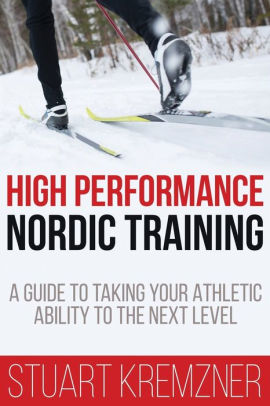
 Stuart Kremzner has published a new book with a bold title — High Performance Nordic Training: A Guide to Taking Your Athletic Ability to the Next Level. Kremzner is an exercise physiologist and nordic coach and also the author of the Bill Koch League leader manual, last updated in 2008.